Set up GitHub sign-in
Sign in with GitHub uses OAuth2 credentials from a GitHub App registered on GitHub.
Prerequisites
Before following this guide, make sure you have:
- A GitHub account with access to Developer Settings.
- A running Serverpod project (server, client, and Flutter app packages from
serverpod create). - The Serverpod auth module installed and configured per the authentication setup. If your project was generated with an older Serverpod version, follow that guide first to add
serverpod_auth_idp_serverandserverpod_auth_idp_flutterand to configurepod.initializeAuthServices()before continuing. serverpod_auth_idp_server4.0.0-beta.0 or later (required for the web callback route).
Get your GitHub credentials
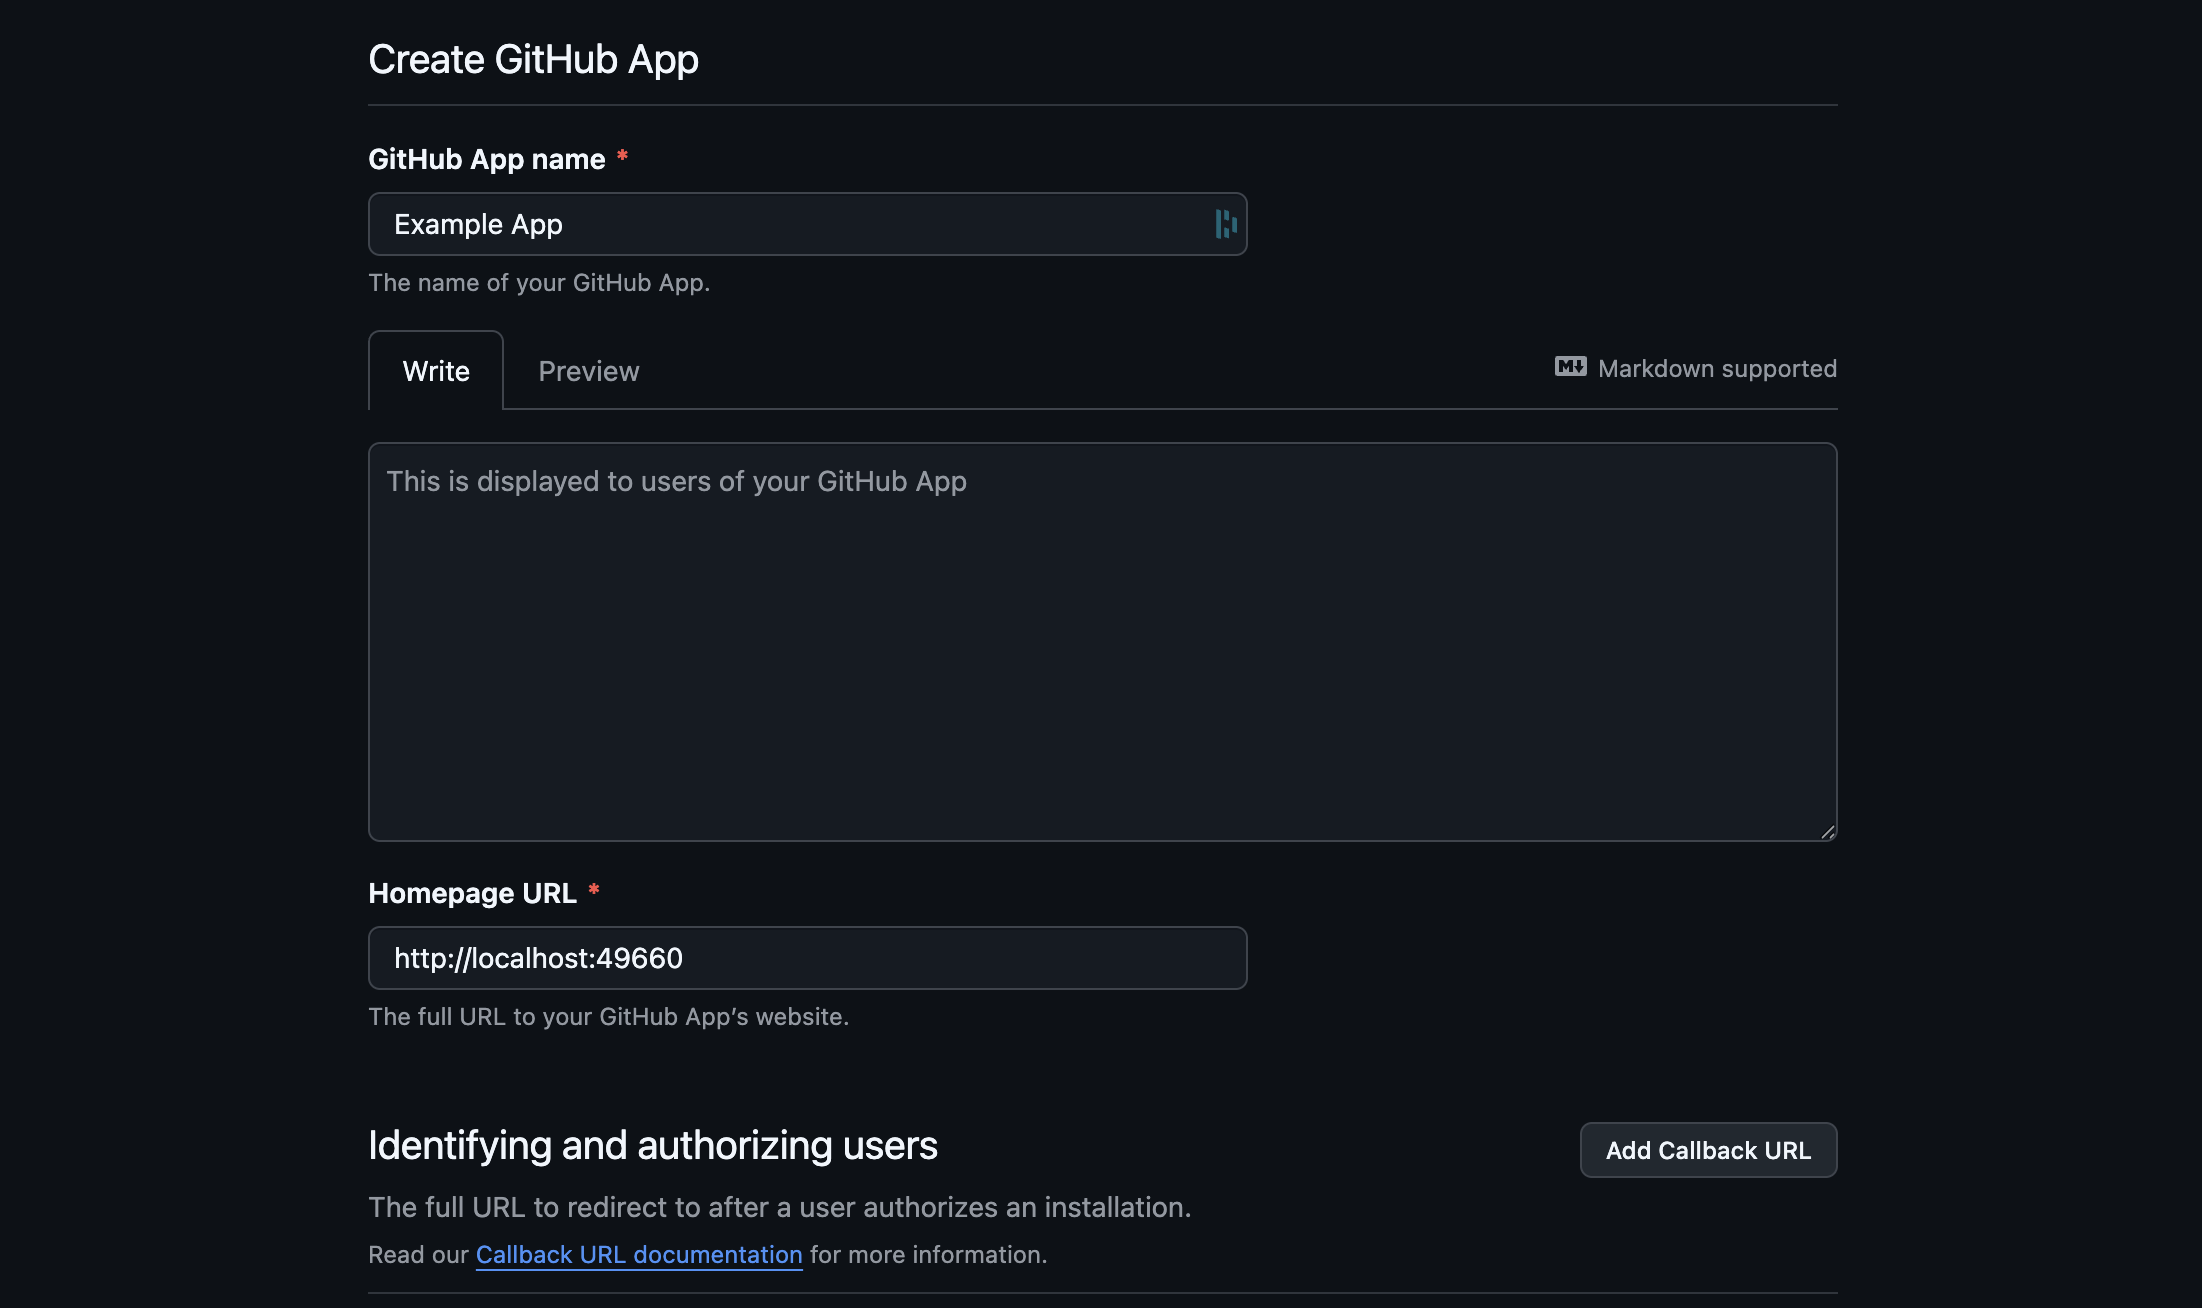
Register a new GitHub App
-
Go to Register new GitHub App.
-
Fill in the basics:
- GitHub App name.
- Homepage URL.
- Description (optional).
Configure the callback URL
The callback URL is where GitHub redirects the user after they authorize your app.
-
In the Callback URL field, enter the redirect URI for your app. GitHub Apps accept up to 10 entries, one per line. Add every platform you target:
- iOS and Android:
com.example.yourapp://auth(a custom scheme registered inAndroidManifest.xmlandInfo.plist). - Web:
http://localhost:8082/auth/callbacklocally,https://my-awesome-project.serverpod.space/auth/callbackin production.
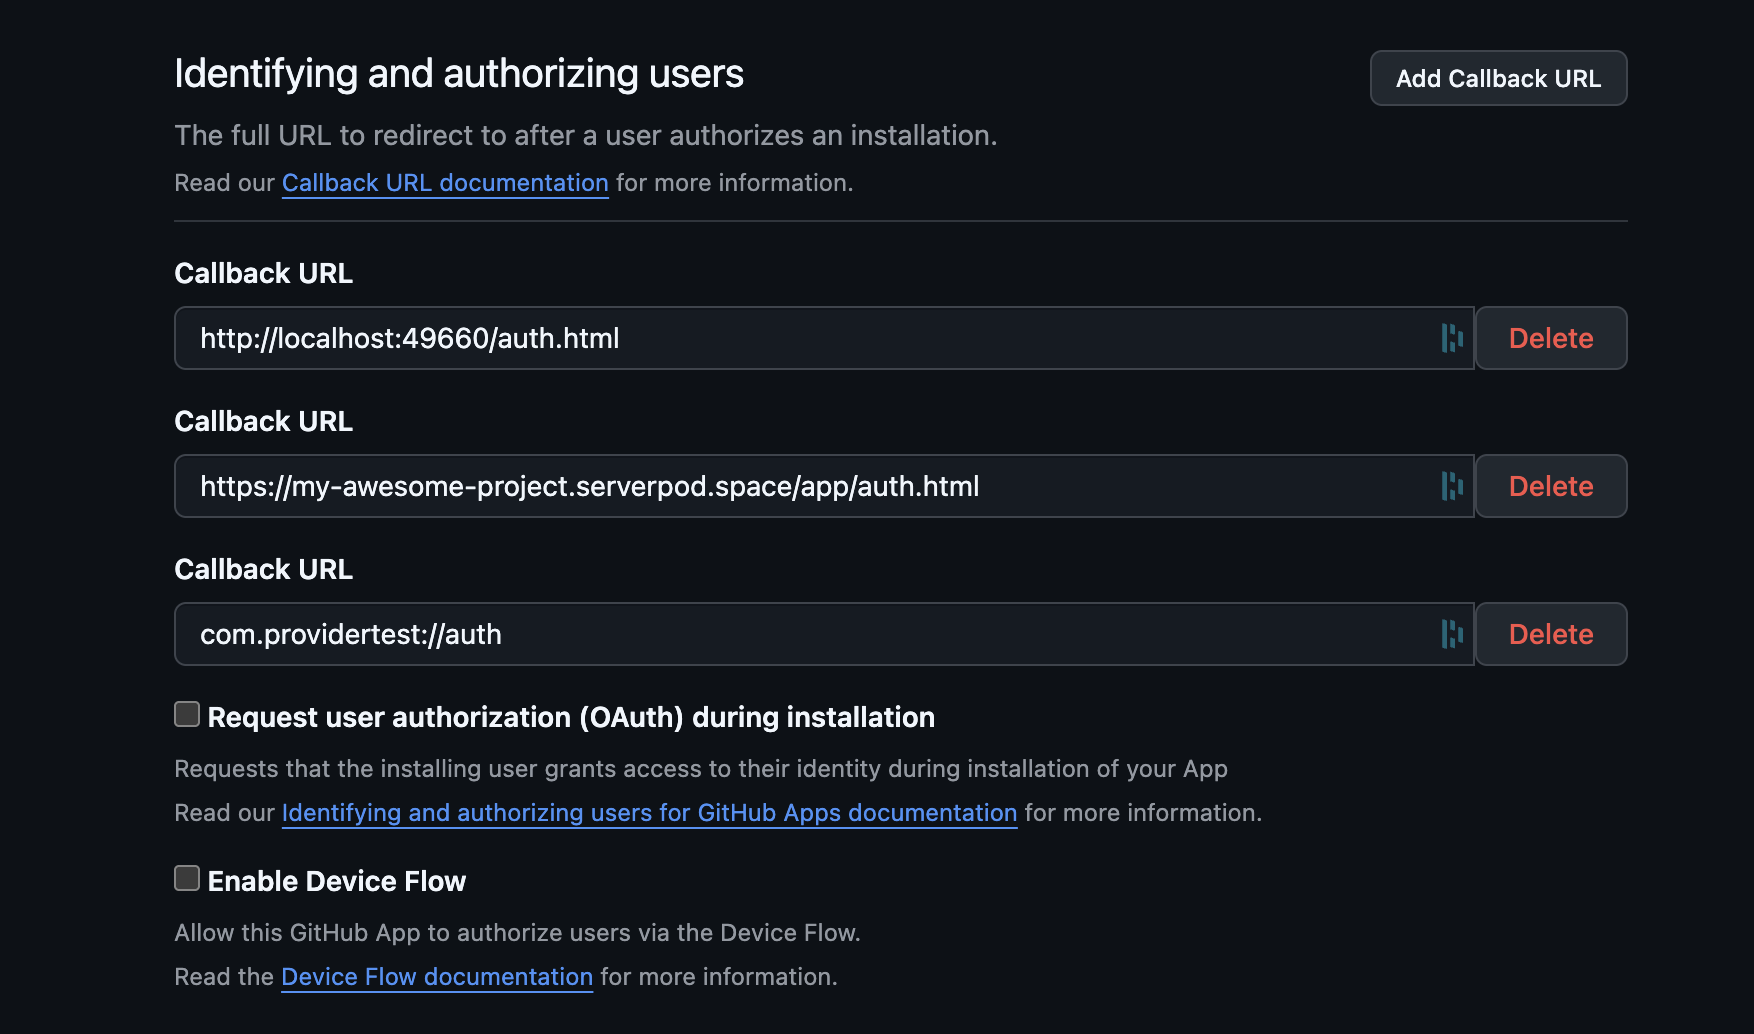
- iOS and Android:
-
Leave Expire user authorization tokens enabled (GitHub's default). Token expiration is recommended for sign-in flows so leaked tokens have a short useful lifetime. Serverpod handles refreshing the token; you do not need to write any refresh logic.
-
Leave Request user authorization (OAuth) during installation unchecked unless you need the installation of your Flutter app to immediately trigger an OAuth sign-in.
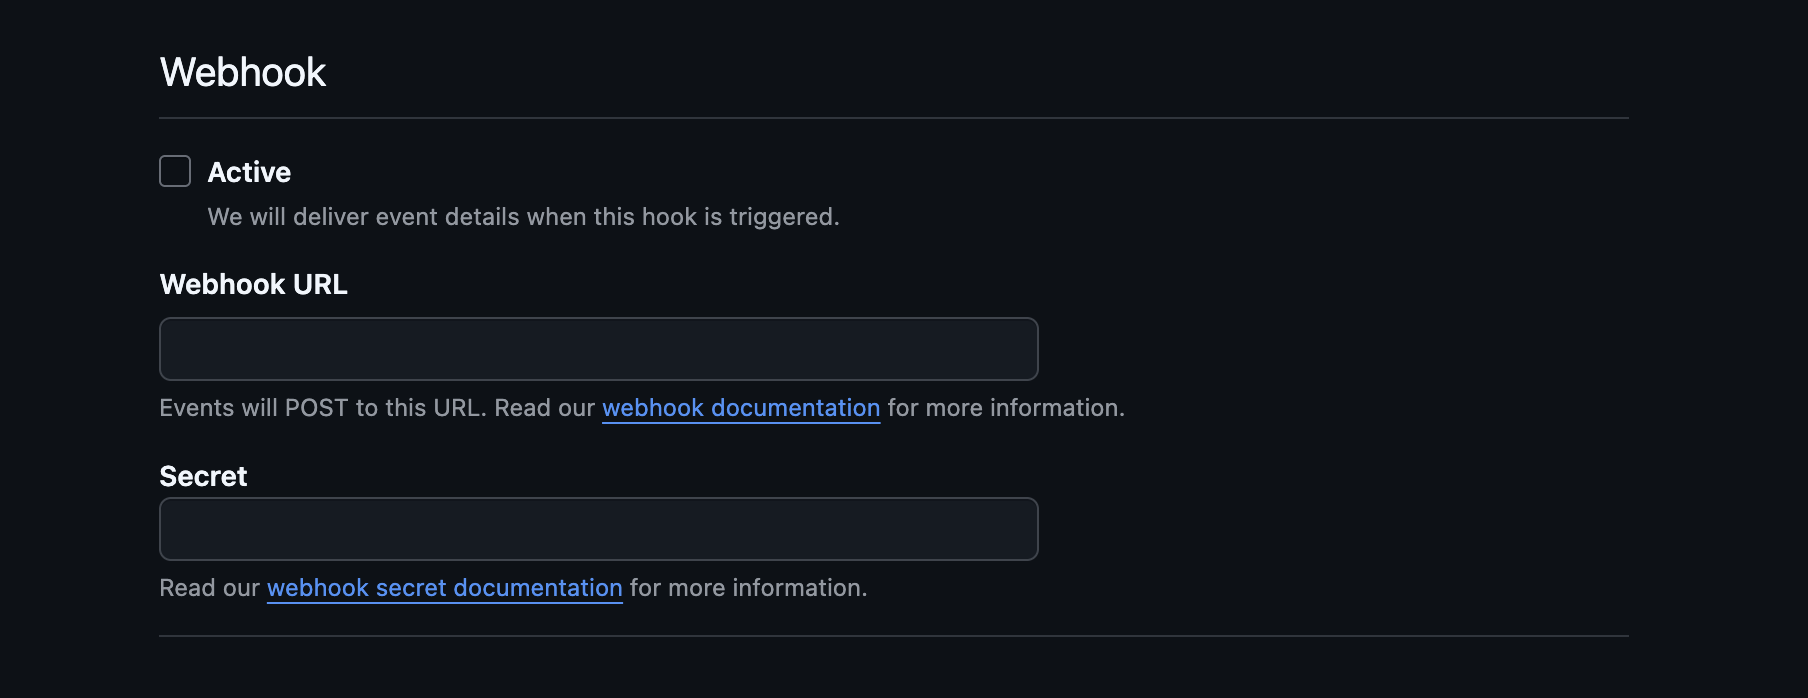
Disable webhooks
Webhooks let your GitHub App receive events like pushes, pull requests, and issue activity. They are unrelated to sign-in and add complexity if you do not need them, so turn the section off for now. You can re-enable webhooks later without affecting the auth flow.
Under Webhook, uncheck Active to disable the whole section.
Set permissions
For sign-in you only need access to the user's profile.
-
Under Account permissions, set Email addresses to Read-only. This lets your app read the user's primary verified email.
-
Leave all other permissions at No access unless your app needs them for non-auth reasons.
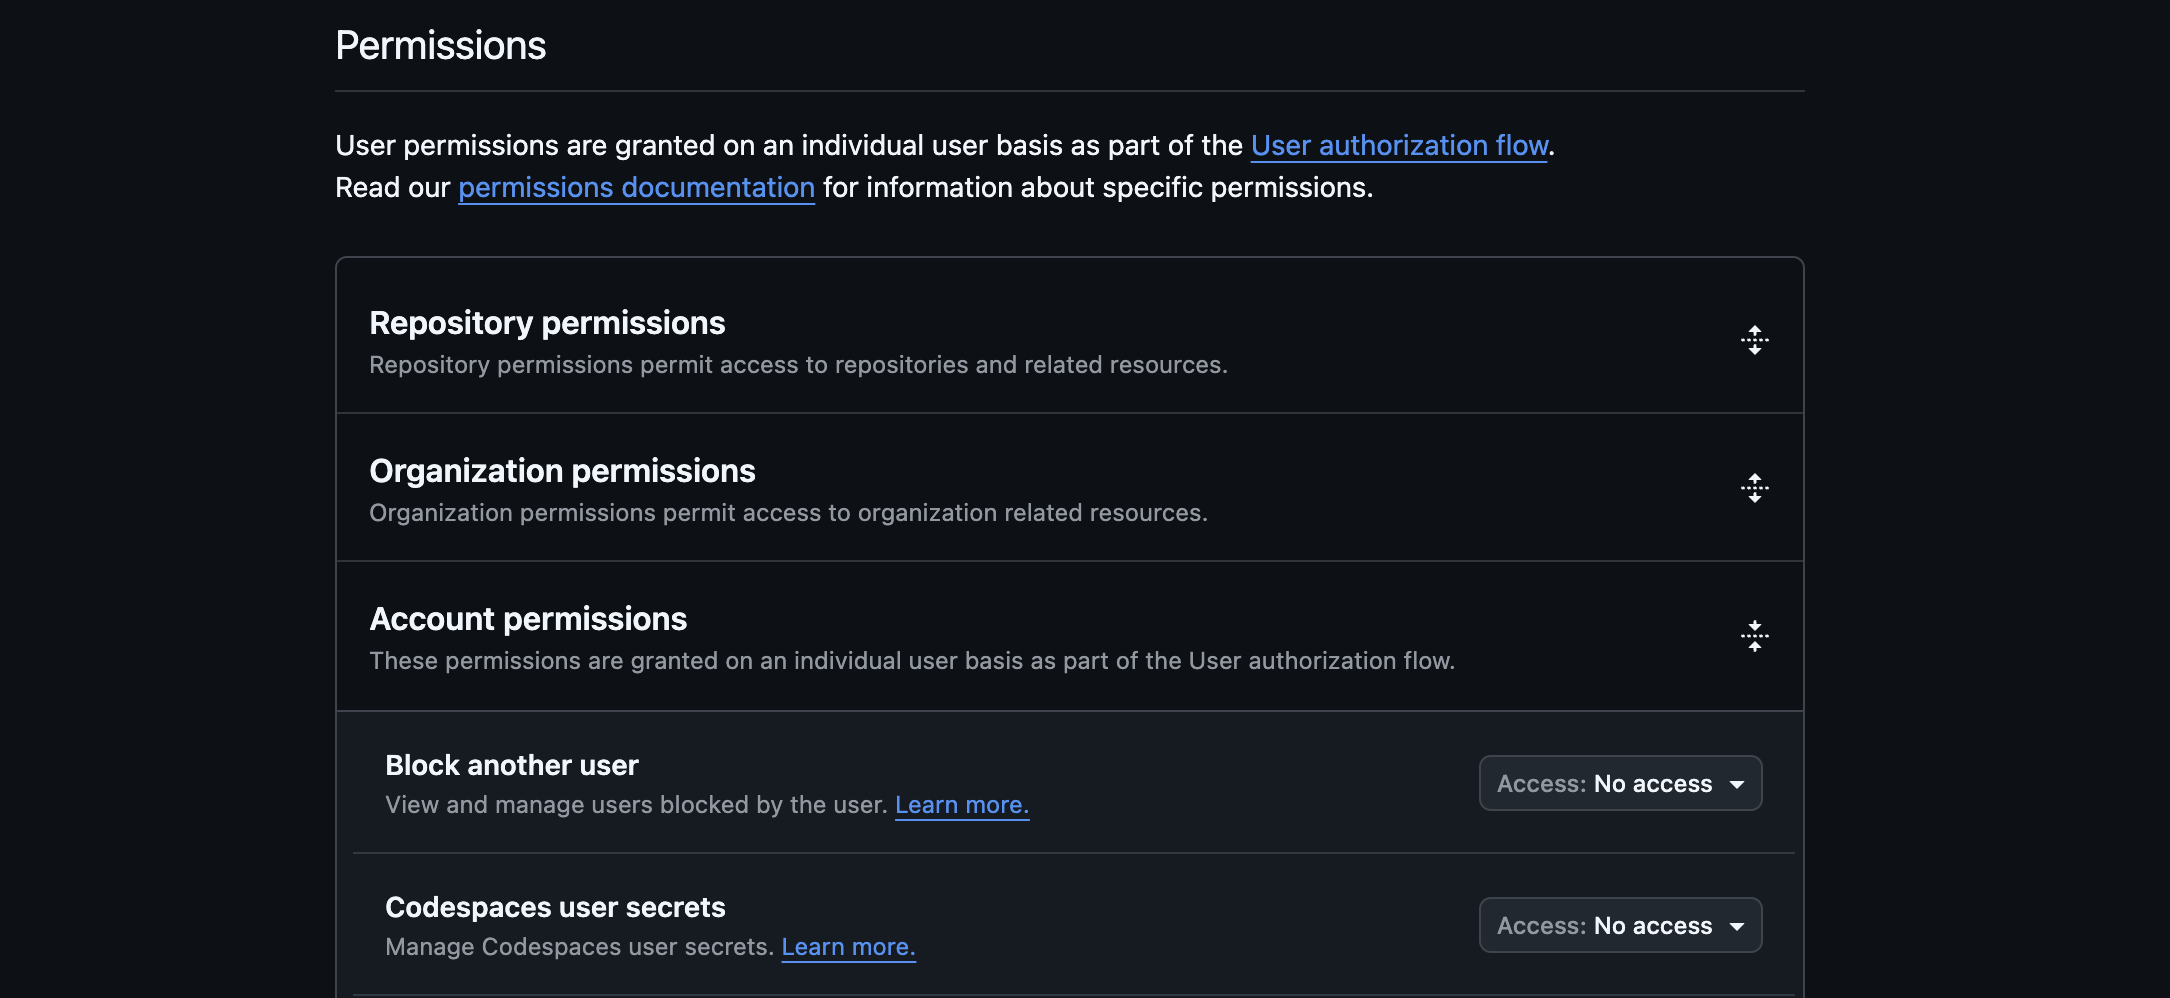
GitHub users can keep their email private. Even with the Email addresses permission, the email field on the account may be null. See Custom account validation for how to handle this without blocking sign-in.
Choose the installation scope
-
Under Where can this GitHub App be installed?, choose:
- Only on this account for development or internal-only apps.
- Any account for production apps that anyone can sign in to.
Create the app and copy credentials
-
Click Create GitHub App. GitHub takes you to the new app's settings page.
-
Copy the Client ID shown on that page.
-
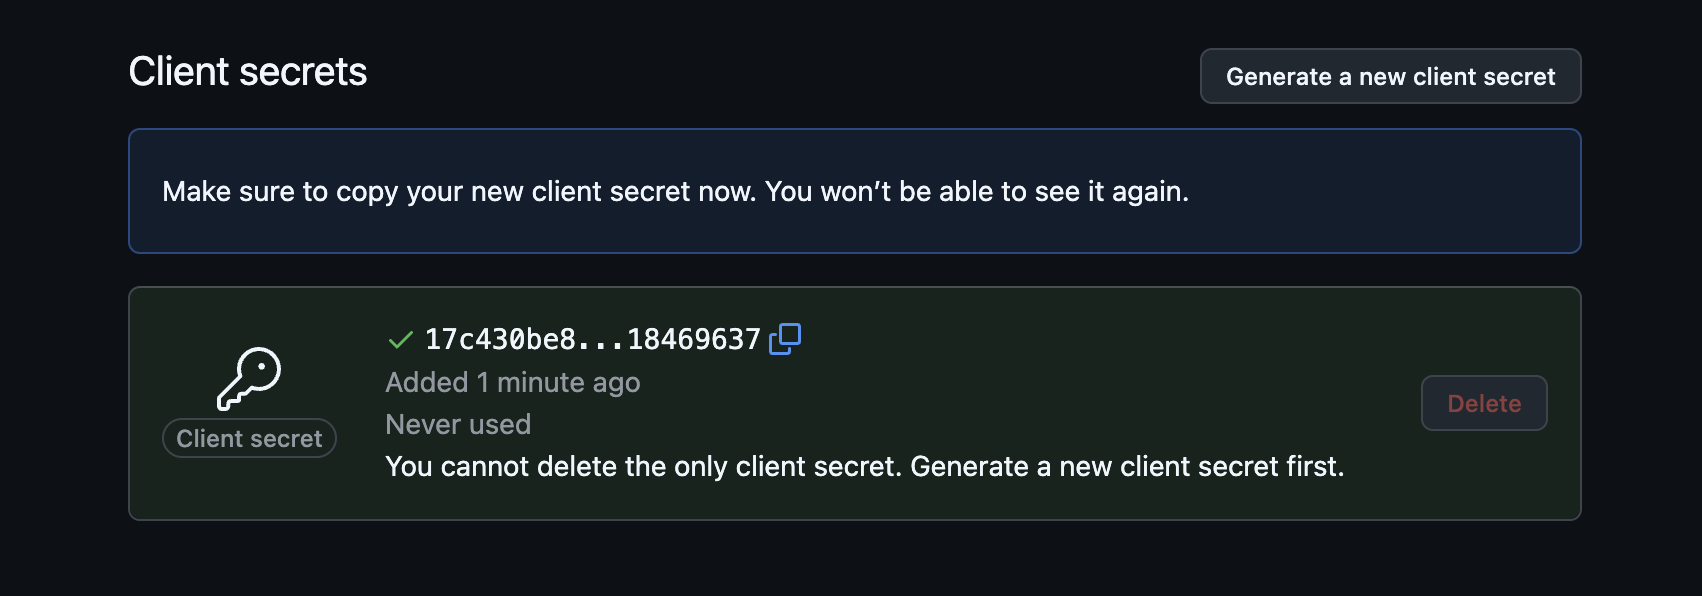
Click Generate a new client secret, then copy the secret immediately. GitHub only shows the secret once.
Keep the Client Secret confidential. Do not commit it to version control. Use config/passwords.yaml (excluded from git) or environment variables.
Server-side configuration
Store your credentials
Your server's config/passwords.yaml already has development:, staging:, and production: sections from the project template. Add githubClientId and githubClientSecret to the development: section using the values you just copied:
development:
  # ... existing keys (database, redis, serviceSecret, etc.) ...
  githubClientId: 'your-github-client-id'
  githubClientSecret: 'your-github-client-secret'
For production, add the same two keys to the production: section, or set the SERVERPOD_PASSWORD_githubClientId and SERVERPOD_PASSWORD_githubClientSecret environment variables on your production server. See Publishing to production below for the full prod walkthrough.
Never commit config/passwords.yaml to version control. It contains your client secret. Use environment variables or a secrets manager in production.
Add the GitHub identity provider
Your server's server.dart file (e.g., my_project_server/lib/server.dart) should already contain a pod.initializeAuthServices() call if your project was created with the Serverpod project template (serverpod create). If it's not there, see Setup first to configure the auth module and JWT settings.
Add the GitHub import and GitHubIdpConfigFromPasswords() to the existing identityProviderBuilders list:
import 'package:serverpod_auth_idp_server/providers/github.dart';
pod.initializeAuthServices(
  tokenManagerBuilders: [
    JwtConfigFromPasswords(),
  ],
  identityProviderBuilders: [
    // ... any existing providers (e.g., EmailIdpConfigFromPasswords) ...
    GitHubIdpConfigFromPasswords(),
  ],
);
The GitHubIdpConfigFromPasswords() constructor automatically loads the client ID and secret from the githubClientId and githubClientSecret keys in config/passwords.yaml (or the matching SERVERPOD_PASSWORD_* environment variables).
If you need more control over how the credentials are loaded, use GitHubIdpConfig(clientId: ..., clientSecret: ...) instead. See Customizations for details.
Create the endpoint
Create a new endpoint file in your server project (e.g., my_project_server/lib/src/auth/github_idp_endpoint.dart) alongside the existing auth endpoints. Extending the base class registers the sign-in methods with your server so the Flutter client can call them to complete the authentication flow:
import 'package:serverpod_auth_idp_server/providers/github.dart';

class GitHubIdpEndpoint extends GitHubIdpBaseEndpoint {}
Start the server
Start the server from your server project directory (e.g., my_project_server/):
serverpod start
Then create and apply the migration for the provider's tables: in the serverpod start terminal, press M to create the migration, then A to apply it.
Skipping the migration will cause the server to crash at runtime when the GitHub provider tries to read or write user data. More detailed instructions can be found in the general identity providers setup section.
Client-side configuration
The GitHub identity provider uses flutter_web_auth_2 under the hood to drive the OAuth2 redirect on every platform. The configuration differs slightly between platforms because each one has a different way of receiving the callback URL.
iOS and macOS
No special configuration is needed for a standard custom-scheme callback URL (e.g., myapp://auth). The flutter_web_auth_2 package handles the redirect using ASWebAuthenticationSession.
If you use Universal Links instead, your redirect URI must use https and you must follow the flutter_web_auth_2 iOS setup to register the associated domain.
Android
To capture the custom-scheme callback URL, add the following activity to your Flutter project's android/app/src/main/AndroidManifest.xml. Replace your-callback-scheme with the scheme you registered on your GitHub App (e.g., myapp for myapp://auth):
<manifest>
  <application>

    <activity
      android:name="com.linusu.flutter_web_auth_2.CallbackActivity"
      android:exported="true"
      android:taskAffinity="">
      <intent-filter android:label="flutter_web_auth_2">
        <action android:name="android.intent.action.VIEW" />
        <category android:name="android.intent.category.DEFAULT" />
        <category android:name="android.intent.category.BROWSABLE" />
        <data android:scheme="your-callback-scheme" />
      </intent-filter>
    </activity>

  </application>
</manifest>
The scheme in AndroidManifest.xml must exactly match the scheme in your GitHub App's Callback URL and the redirectUri you pass to initializeGitHubSignIn. A mismatch causes the OAuth callback to never reach your app.
Web
On web, GitHub completes sign-in by redirecting the browser to a callback URL you control. This flow requires Serverpod to serve your Flutter web app on the same origin as the callback route. To test locally, build your Flutter web app into Serverpod's web/app/ directory:
flutter build web --output ../my_project_server/web/app  # from your Flutter project
serverpod start --no-flutter                             # from your server project
Open http://localhost:8082/app to test. Pass --no-flutter so serverpod start serves your prebuilt web app instead of launching a separate flutter run -d chrome instance, which runs on a different port and would not share Serverpod's origin. For hot-reload workflows, use the separately-hosted Flutter web flow instead.
The examples below use port 8082 (Serverpod's default from config/development.yaml).
-
In your server project's
server.dartfile, beforepod.start(), register the callback route:import 'package:serverpod_auth_idp_server/core.dart';// ...pod.webServer.addRoute(FlutterWebAuth2CallbackRoute(),'/auth/callback',);The path
/auth/callbackcan be anything, as long as it matches the URL you register with GitHub in step 2 and pass toinitializeGitHubSignInlater.In production, pass
host:to restrict the route to your production domain:pod.webServer.addRoute(FlutterWebAuth2CallbackRoute(host: 'my-awesome-project.serverpod.space'),'/auth/callback',);tipThe same route works for every OAuth2 PKCE provider. Register it once and reuse the callback URL for GitHub, Google, and any future provider.
-
Add the full callback URL to your GitHub App's Callback URL field (e.g.,
http://localhost:8082/auth/callbacklocally,https://my-awesome-project.serverpod.space/auth/callbackin production). GitHub Apps accept up to 10 entries, so dev and prod entries can coexist.
Present the authentication UI
Initialize the GitHub sign-in service
Open your Flutter app's main.dart (e.g., my_project_flutter/lib/main.dart). The Serverpod template already creates the Client and calls client.auth.initialize() inside main(). Add client.auth.initializeGitHubSignIn(...) on the line immediately after it.
The GitHub provider requires clientId and redirectUri on every platform because GitHub does not have native platform-specific clients (unlike Google or Apple):
void main() async {
  WidgetsFlutterBinding.ensureInitialized();

  final serverUrl = await getServerUrl();

  client = Client(serverUrl)
    ..connectivityMonitor = FlutterConnectivityMonitor()
    ..authSessionManager = FlutterAuthSessionManager();

  await client.auth.initialize();
  await client.auth.initializeGitHubSignIn(
    clientId: 'your-github-client-id',
    redirectUri: Uri.parse('com.example.yourapp://auth'),
  );

  runApp(const MyApp());
}
Replace your-github-client-id with the Client ID from your GitHub App, and redirectUri with the matching callback URL you registered: a reverse-DNS custom scheme for mobile, or the route URL from Web for Flutter web. Swap the redirect URI for your production URL when deploying.
To keep these values out of main.dart and vary them per build, read them from --dart-define. See Configuring client IDs on the app for the pattern.
Show the GitHub sign-in button
The Serverpod template ships with a SignInScreen widget at lib/screens/sign_in_screen.dart. It listens to client.auth.authInfoListenable and swaps between SignInWidget while the user is signed out and the child you pass it once they sign in. SignInWidget auto-detects which identity provider endpoints are registered on the server, so once GitHubIdpEndpoint is exposed and the client code has been regenerated, the GitHub button appears inside it.
To customize the GitHub button or build a fully custom UI, see Customizing the UI.
Publishing to production
Before going live, complete the following steps:
1. Add the production callback URL
Go back to your GitHub App's settings and add your production callback URL to Callback URL alongside the development one. Both should remain registered so dev and prod work simultaneously.
- For web, add the production route URL you registered in Web (e.g.,
https://my-awesome-project.serverpod.space/auth/callback). Make surepod.webServer.addRoute(FlutterWebAuth2CallbackRoute(host: 'my-awesome-project.serverpod.space'), '/auth/callback')is called inserver.dartso the route is registered in production. If you use the separately-hosted Flutter web flow, register the productionauth.htmlURL instead (e.g.,https://app.example.com/auth.html). - For mobile custom schemes (e.g.,
com.example.yourapp://auth), no change is needed between dev and prod.
2. Set production credentials
Production runs out of the production: section of passwords.yaml, which is separate from the development: section you populated during setup. Adding production credentials does not replace your development ones, both stay in place and Serverpod picks the right set based on the run mode.
If you use the same GitHub App for development and production, you can reuse the same githubClientId and githubClientSecret. For separate environments, register a second GitHub App first and use its values.
Self-hosted
Add githubClientId and githubClientSecret to the production: section of passwords.yaml:
production:
  # ... existing keys ...
  githubClientId: 'your-github-client-id'
  githubClientSecret: 'your-github-client-secret'
Alternatively, set the SERVERPOD_PASSWORD_githubClientId and SERVERPOD_PASSWORD_githubClientSecret environment variables on your production server with the same values.
Serverpod Cloud
Use scloud password set to upload each value. The Client ID is public, so pass it as a positional argument. The Client Secret is sensitive, so read it from a file with --from-file to keep it out of your shell history:
scloud password set githubClientId your-github-client-id
scloud password set githubClientSecret --from-file path/to/github-client-secret.txt
Run these from your linked server project directory, or pass --project <project-id> on each call (the flag is required unless the project is linked). See the Serverpod Cloud passwords guide for project linking and other options.
3. Verify the redirect URI in the Flutter build
The production build of your Flutter app must initialize GitHubSignInService with the production redirectUri. The cleanest pattern is to read it from --dart-define so a single main.dart works in dev and prod. See Configuring client IDs on the app.
If you run into issues, see the troubleshooting guide.