Set up Facebook sign-in
Sign in with Facebook uses a Facebook Login app and the external serverpod_auth_idp_flutter_facebook package. Unlike providers built into the core auth module, Facebook sign-in needs this extra package, which wraps the native Facebook SDK to handle the flow on iOS, Android, web, and macOS.
Prerequisites
Before following this guide, make sure you have:
- A Facebook account with access to Facebook for Developers.
- A running Serverpod project (server, client, and Flutter app packages from
serverpod create). - The Serverpod auth module installed and configured per the authentication setup. If your project was generated with an older Serverpod version, follow that guide first to add
serverpod_auth_idp_serverandserverpod_auth_idp_flutterand to configurepod.initializeAuthServices()before continuing.
Create your Facebook app
- Go to Facebook for Developers and log in with your Facebook account.
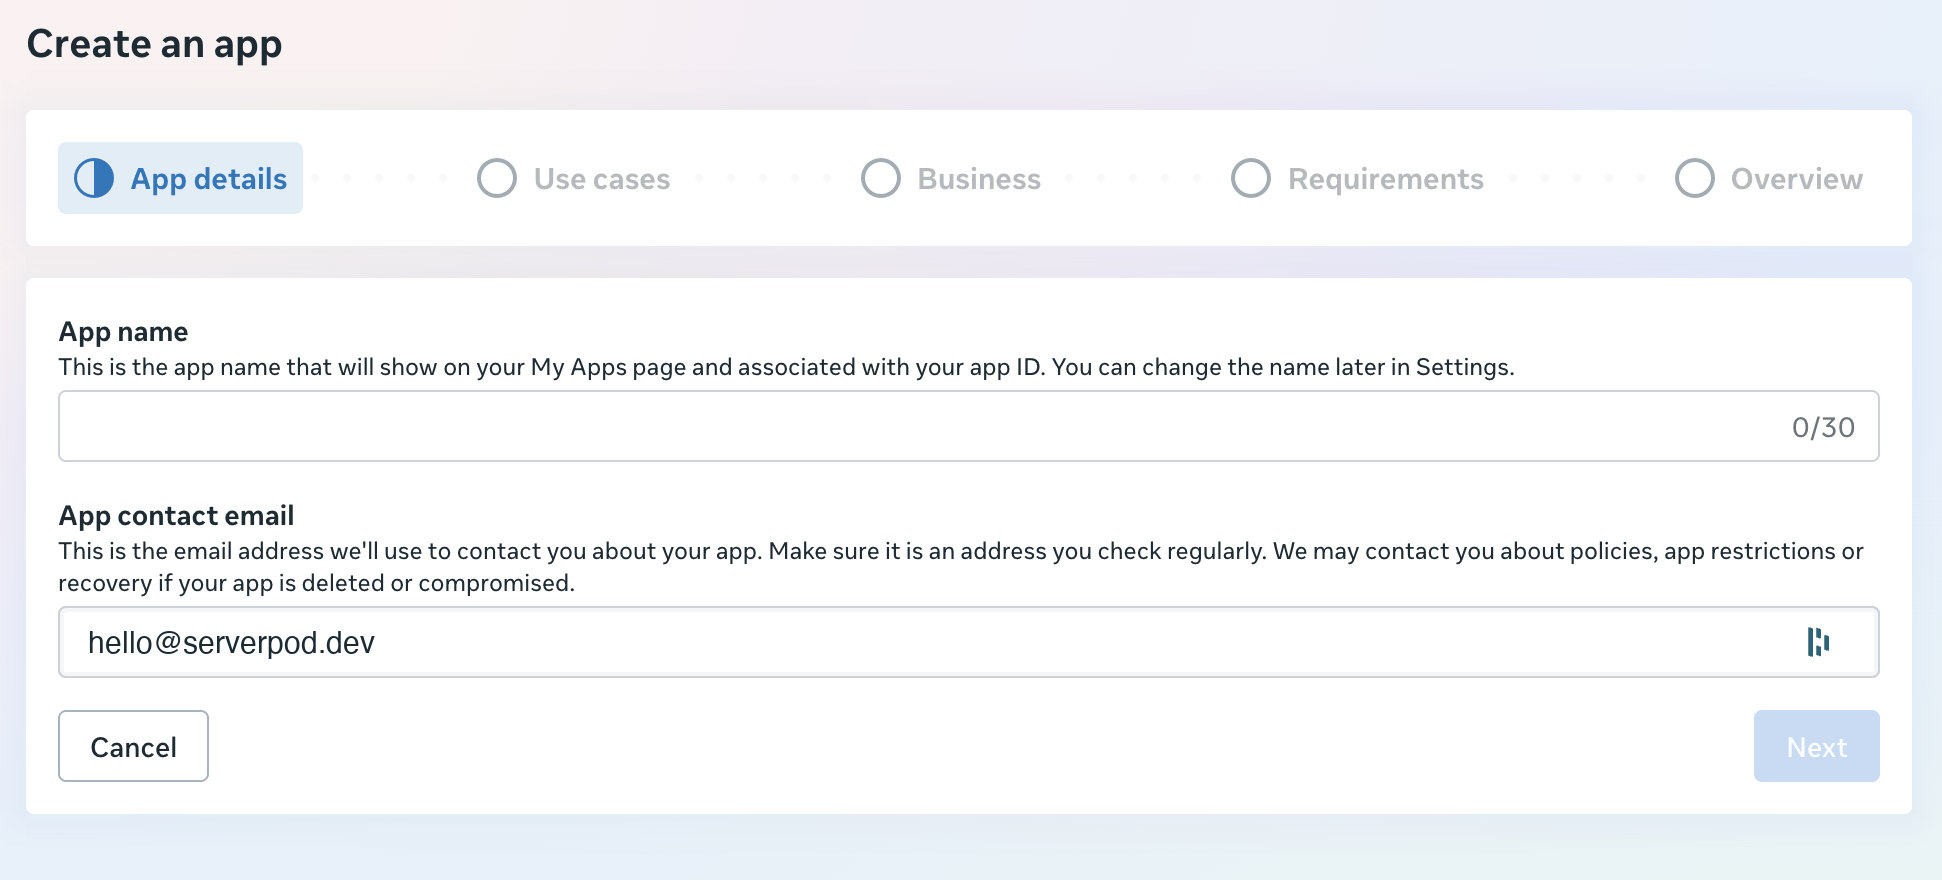
- Click Create an app and follow the setup wizard:
-
App details: Enter your App name and App contact email.
-
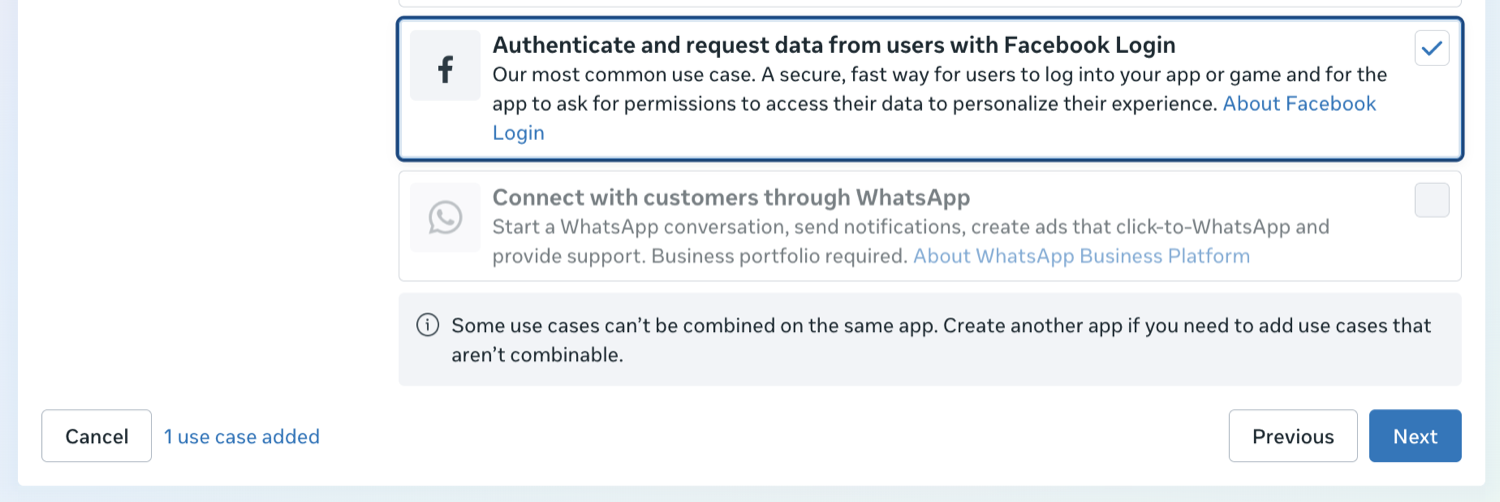
Use cases: Select "Authenticate and request data from users with Facebook Login".
-
Business: Optionally select a Business Portfolio if available.
-
Complete any additional Requirements.
-
- Click through to the Overview page and go to your app Dashboard.
Configure Facebook Login
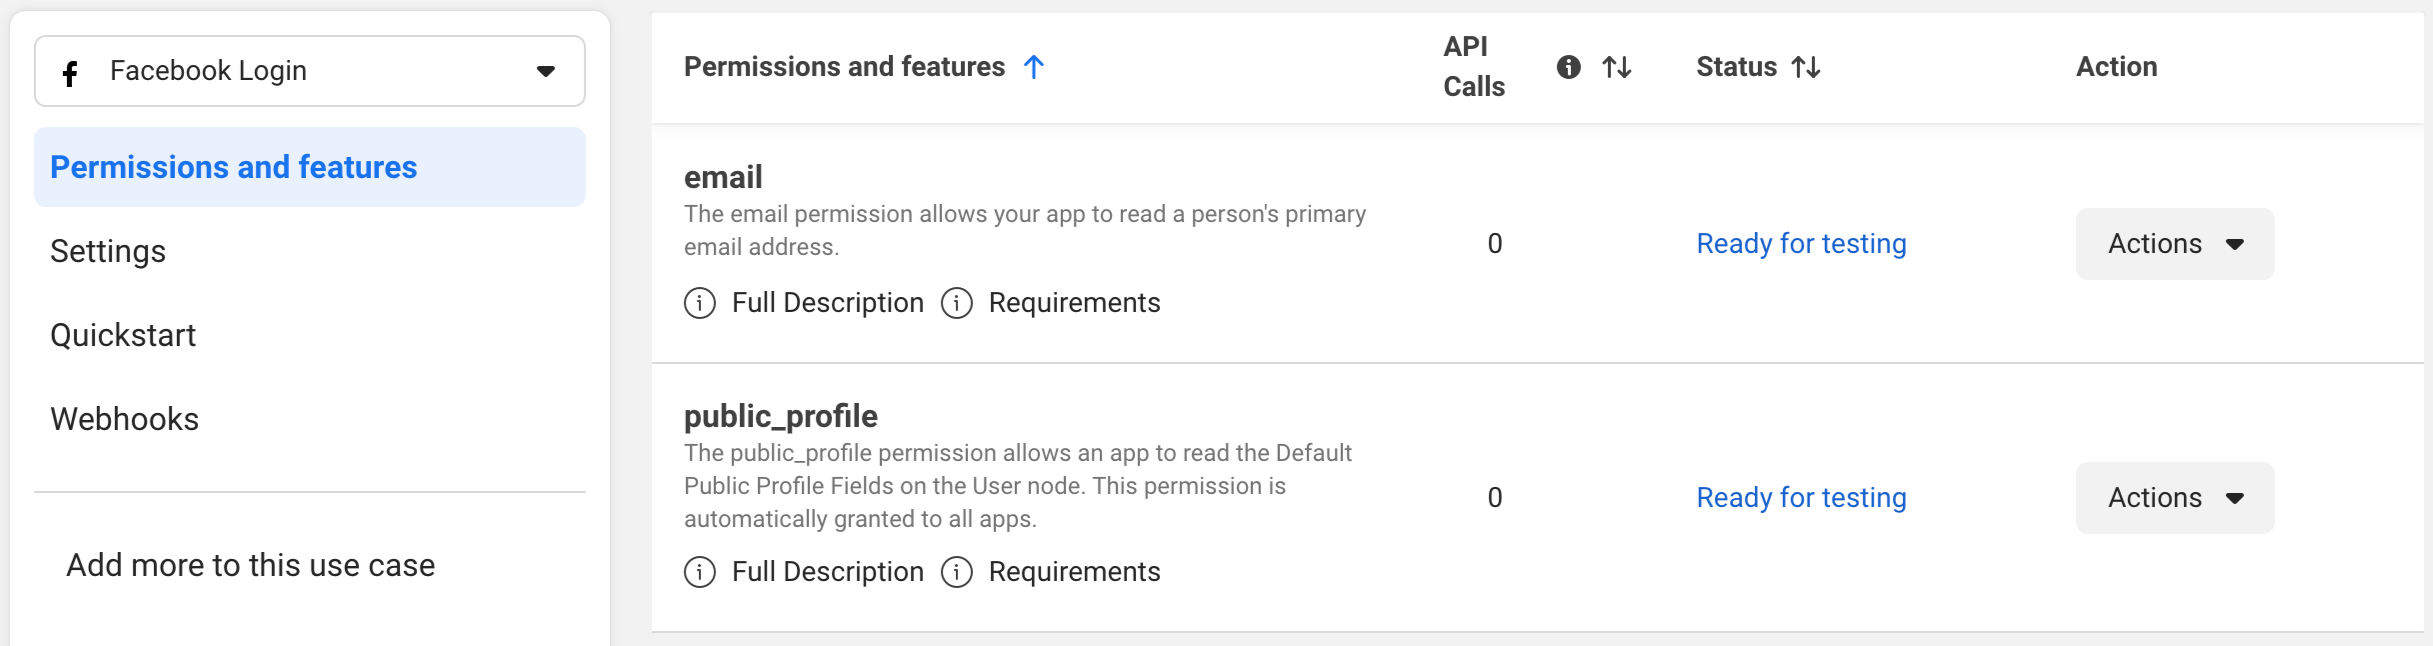
After creating your app, click the Customize button next to "Authenticate and request data from users with Facebook Login" on the Dashboard or Use cases page. This opens the customization page with the following menu options:

1. Permissions and features
Configure the permissions your application will request:
public_profile: Added by default, allows access to basic profile information.email: Recommended. Allows to read a person's primary email address.
2. Settings
Configure the authentication settings:
-
Turn Login with the JavaScript SDK to Yes. Web and macOS sign-in use the Facebook JavaScript SDK, and the flow fails at runtime with "JSSDK Option is Not Toggled" if this is left off. You can skip this if you only target iOS and Android.

-
In Allowed Domains for the JavaScript SDK, add:
https://www.facebook.com(required to avoid CORS issues)- Your own domain if you plan to support web authentication (e.g.,
https://yourdomain.com)

3. Quickstart
Set up your platforms by selecting and configuring:
- iOS
- Android
- Web
- Other (for additional platforms like macOS)
Save your changes after completing the configuration.
Get app credentials
- Go to App settings > Basic in your Facebook App Dashboard to retrieve:
- App ID
- App secret
- Go to App settings > Advanced to retrieve:
- Client token
The App secret is sensitive. Keep it confidential and never commit it to version control. The Client token is required for some platforms (especially mobile and web).
Server-side configuration
Store your credentials
Your server's config/passwords.yaml already has development:, staging:, and production: sections from the project template. Add facebookAppId and facebookAppSecret to the development: section using the values from your Facebook app:
development:
  # ... existing keys (database, redis, serviceSecret, etc.) ...
  facebookAppId: 'your-facebook-app-id'
  facebookAppSecret: 'your-facebook-app-secret'
For production, add the same two keys to the production: section, or set the SERVERPOD_PASSWORD_facebookAppId and SERVERPOD_PASSWORD_facebookAppSecret environment variables on your production server. See Publishing to production below for the full prod walkthrough.
Never commit config/passwords.yaml to version control. It contains your app secret. Use environment variables or a secrets manager in production.
Add the Facebook identity provider
Your server's server.dart file (e.g., my_project_server/lib/server.dart) should already contain a pod.initializeAuthServices() call if your project was created with the Serverpod project template (serverpod create). If it's not there, see Setup first to configure the auth module and JWT settings.
Add the Facebook import and FacebookIdpConfigFromPasswords() to the existing identityProviderBuilders list:
import 'package:serverpod_auth_idp_server/providers/facebook.dart';
pod.initializeAuthServices(
  tokenManagerBuilders: [
    JwtConfigFromPasswords(),
  ],
  identityProviderBuilders: [
    // ... any existing providers (e.g., EmailIdpConfigFromPasswords) ...
    FacebookIdpConfigFromPasswords(),
  ],
);
The FacebookIdpConfigFromPasswords() constructor automatically loads the App ID and secret from the facebookAppId and facebookAppSecret keys in config/passwords.yaml (or the matching SERVERPOD_PASSWORD_* environment variables).
If you need more control over how the credentials are loaded, use FacebookIdpConfig(appId: ..., appSecret: ...) instead. See Customizations for details.
Create the endpoint
Create a new endpoint file in your server project (e.g., my_project_server/lib/src/auth/facebook_idp_endpoint.dart) alongside the existing auth endpoints. Extending the base class registers the sign-in methods with your server so the Flutter client can call them to complete the authentication flow:
import 'package:serverpod_auth_idp_server/providers/facebook.dart';

class FacebookIdpEndpoint extends FacebookIdpBaseEndpoint {}
Start the server
Start the server from your server project directory (e.g., my_project_server/):
serverpod start
Then create and apply the migration for the provider's tables: in the serverpod start terminal, press M to create the migration, then A to apply it.
Skipping the migration will cause the server to crash at runtime when the Facebook provider tries to read or write user data. More detailed instructions can be found in the general identity providers setup section.
Client-side configuration
Install required packages
Add the serverpod_auth_idp_flutter_facebook package to your Flutter project:
flutter pub add serverpod_auth_idp_flutter_facebook
This package uses flutter_facebook_auth to handle the authentication flow. The documentation for that package should in most cases also apply to this setup.
Unlike providers such as Google or Apple that are built into the core serverpod_auth_idp_flutter package, Facebook authentication is provided as a separate external package. This keeps the core package lightweight while allowing you to opt-in to Facebook authentication when needed.
Android
The minimum Android SDK version required is 21. Update your android/app/build.gradle file:
defaultConfig {
    ...
    minSdkVersion 21
    ...
}
Add Facebook SDK configuration
- Open or create
/android/app/src/main/res/values/strings.xml:
<?xml version="1.0" encoding="utf-8"?>
<resources>
    <string name="facebook_app_id">YOUR_FACEBOOK_APP_ID</string>
    <string name="fb_login_protocol_scheme">fbYOUR_FACEBOOK_APP_ID</string>
    <string name="facebook_client_token">YOUR_CLIENT_TOKEN</string>
</resources>
Replace YOUR_FACEBOOK_APP_ID with your App ID and YOUR_CLIENT_TOKEN with your Client token (found in Settings > Advanced > Client token in the Facebook App Dashboard).
- Open
/android/app/src/main/AndroidManifest.xmland add the following:
Add internet permission before the <application> element:
<uses-permission android:name="android.permission.INTERNET"/>
Add meta-data inside the <application> element:
<application>
    ...
    <meta-data
        android:name="com.facebook.sdk.ApplicationId"
        android:value="@string/facebook_app_id"/>
    <meta-data
        android:name="com.facebook.sdk.ClientToken"
        android:value="@string/facebook_client_token"/>
    ...
</application>
Configure Package Visibility (Android 11+)
For Android 11 and above, add the following inside the <manifest> element:
<manifest package="com.example.app">
    <queries>
        <provider android:authorities="com.facebook.katana.provider.PlatformProvider" />
    </queries>
    ...
</manifest>
Configure Android platform in Facebook
In the Facebook App Dashboard, go to Use cases > Customize > Quickstart and select the Android tab.
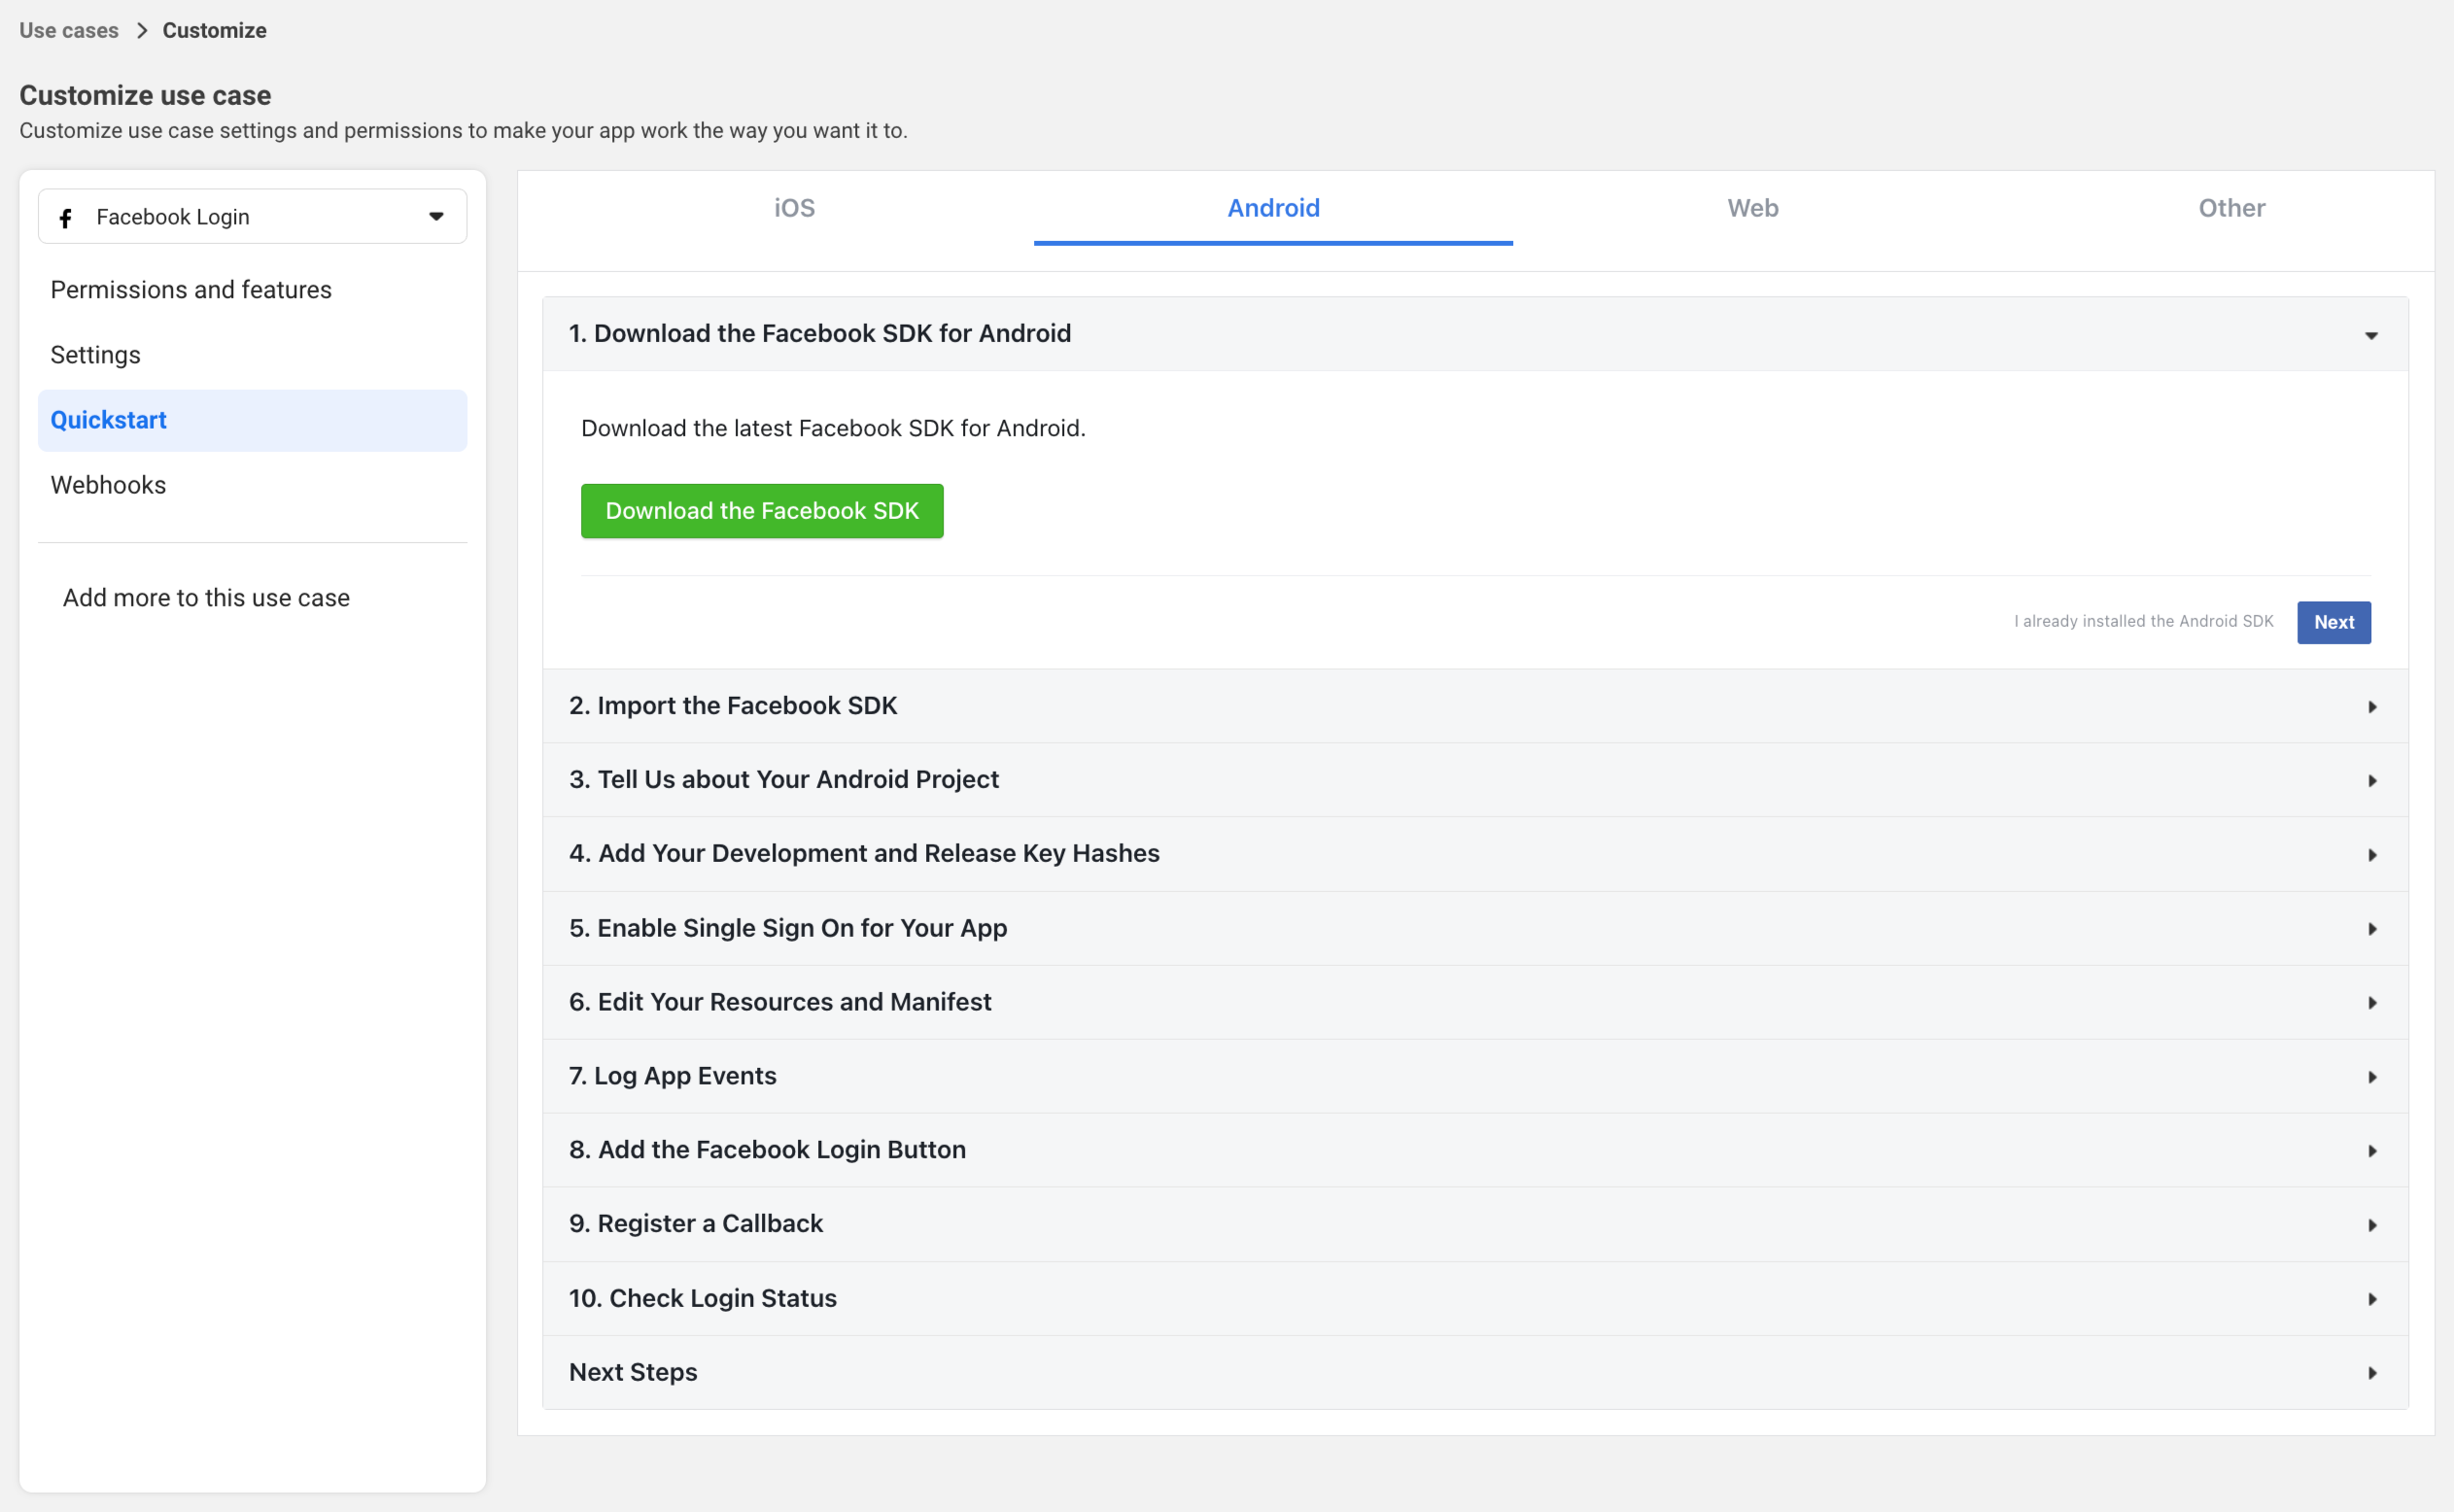
Follow these steps:
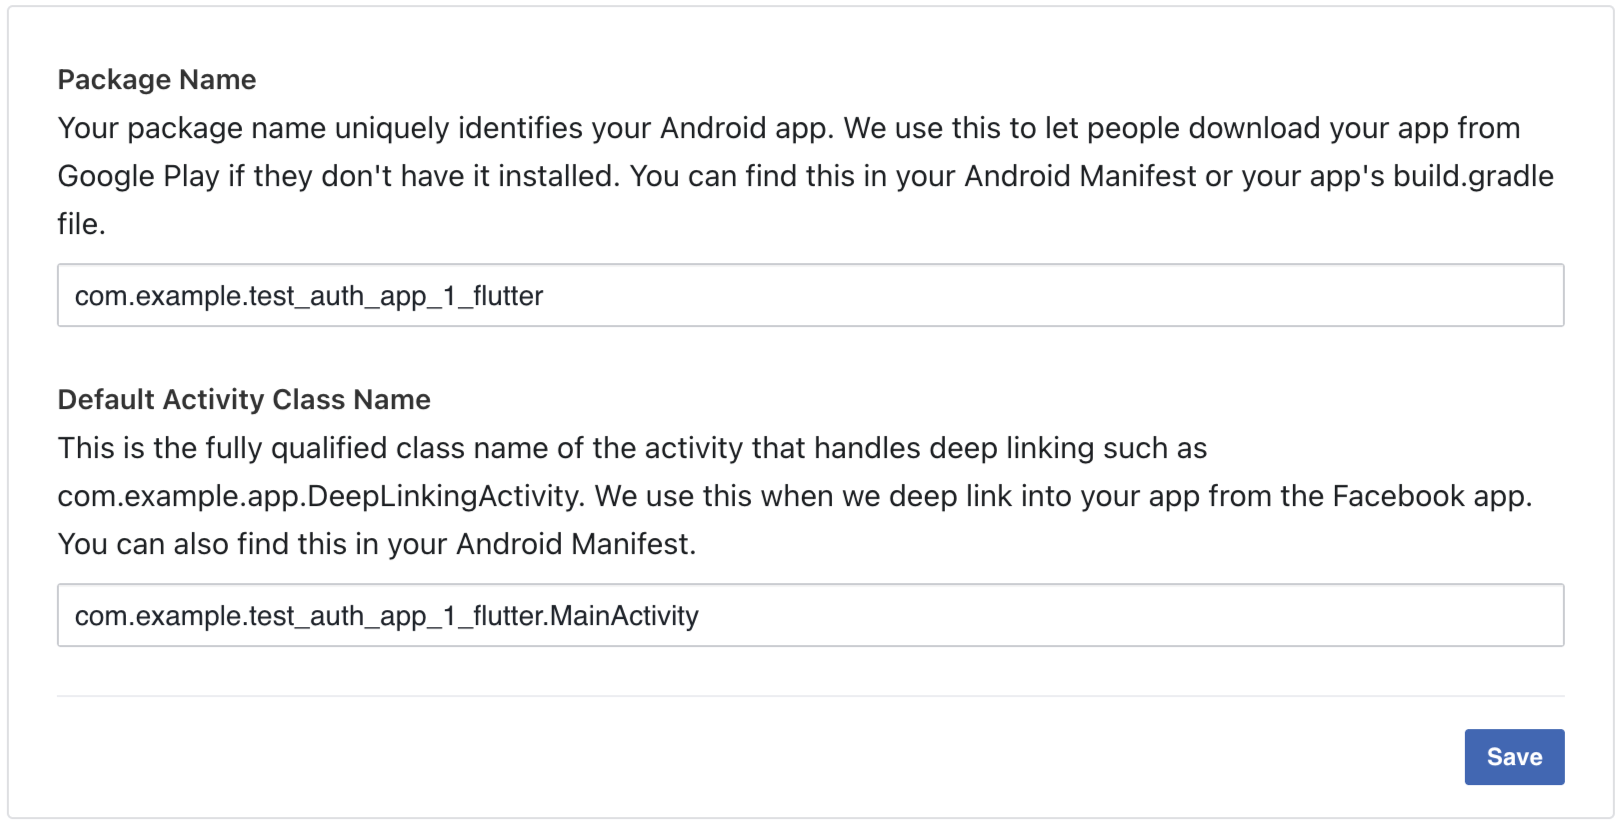
Step 3: Tell Us about Your Android Project
Fill in your Android app details:
- Package Name: Your app's package identifier (found in
android/app/build.gradleasapplicationIdor inAndroidManifest.xmlaspackage). - Class Name: Your main activity class name (typically
MainActivity).
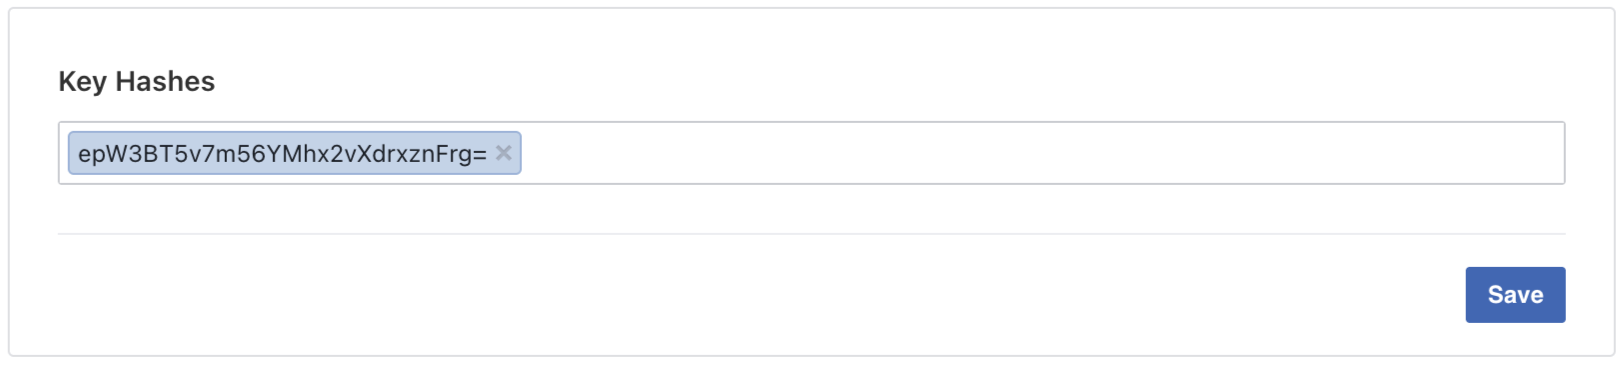
Step 4: Add Your Development and Release Key Hashes
Generate and add your key hashes:
Debug Key Hash (for development):
macOS/Linux:
keytool -exportcert -alias androiddebugkey -keystore ~/.android/debug.keystore | openssl sha1 -binary | openssl base64
Windows:
keytool -exportcert -alias androiddebugkey -keystore "C:\Users\USERNAME\.android\debug.keystore" | "PATH_TO_OPENSSL_LIBRARY\bin\openssl" sha1 -binary | "PATH_TO_OPENSSL_LIBRARY\bin\openssl" base64
Release Key Hash (for production):
keytool -exportcert -alias YOUR_RELEASE_KEY_ALIAS -keystore YOUR_RELEASE_KEY_PATH | openssl sha1 -binary | openssl base64
Paste the generated key hashes into the Facebook console and save.
You can skip the remaining steps (1, 2, 5, 6+) as they are not required for Flutter apps or have already been covered.
For more detailed Android setup instructions, refer to the flutter_facebook_auth Android documentation.
iOS
The minimum iOS deployment target is 12.0. Update your ios/Podfile:
platform :ios, '12.0'
Also set the deployment target to 12.0 in Xcode (Runner > General > Deployment Info).
Configure iOS platform in Facebook
In the Facebook App Dashboard, go to Use cases > Customize > Quickstart and select the iOS tab.
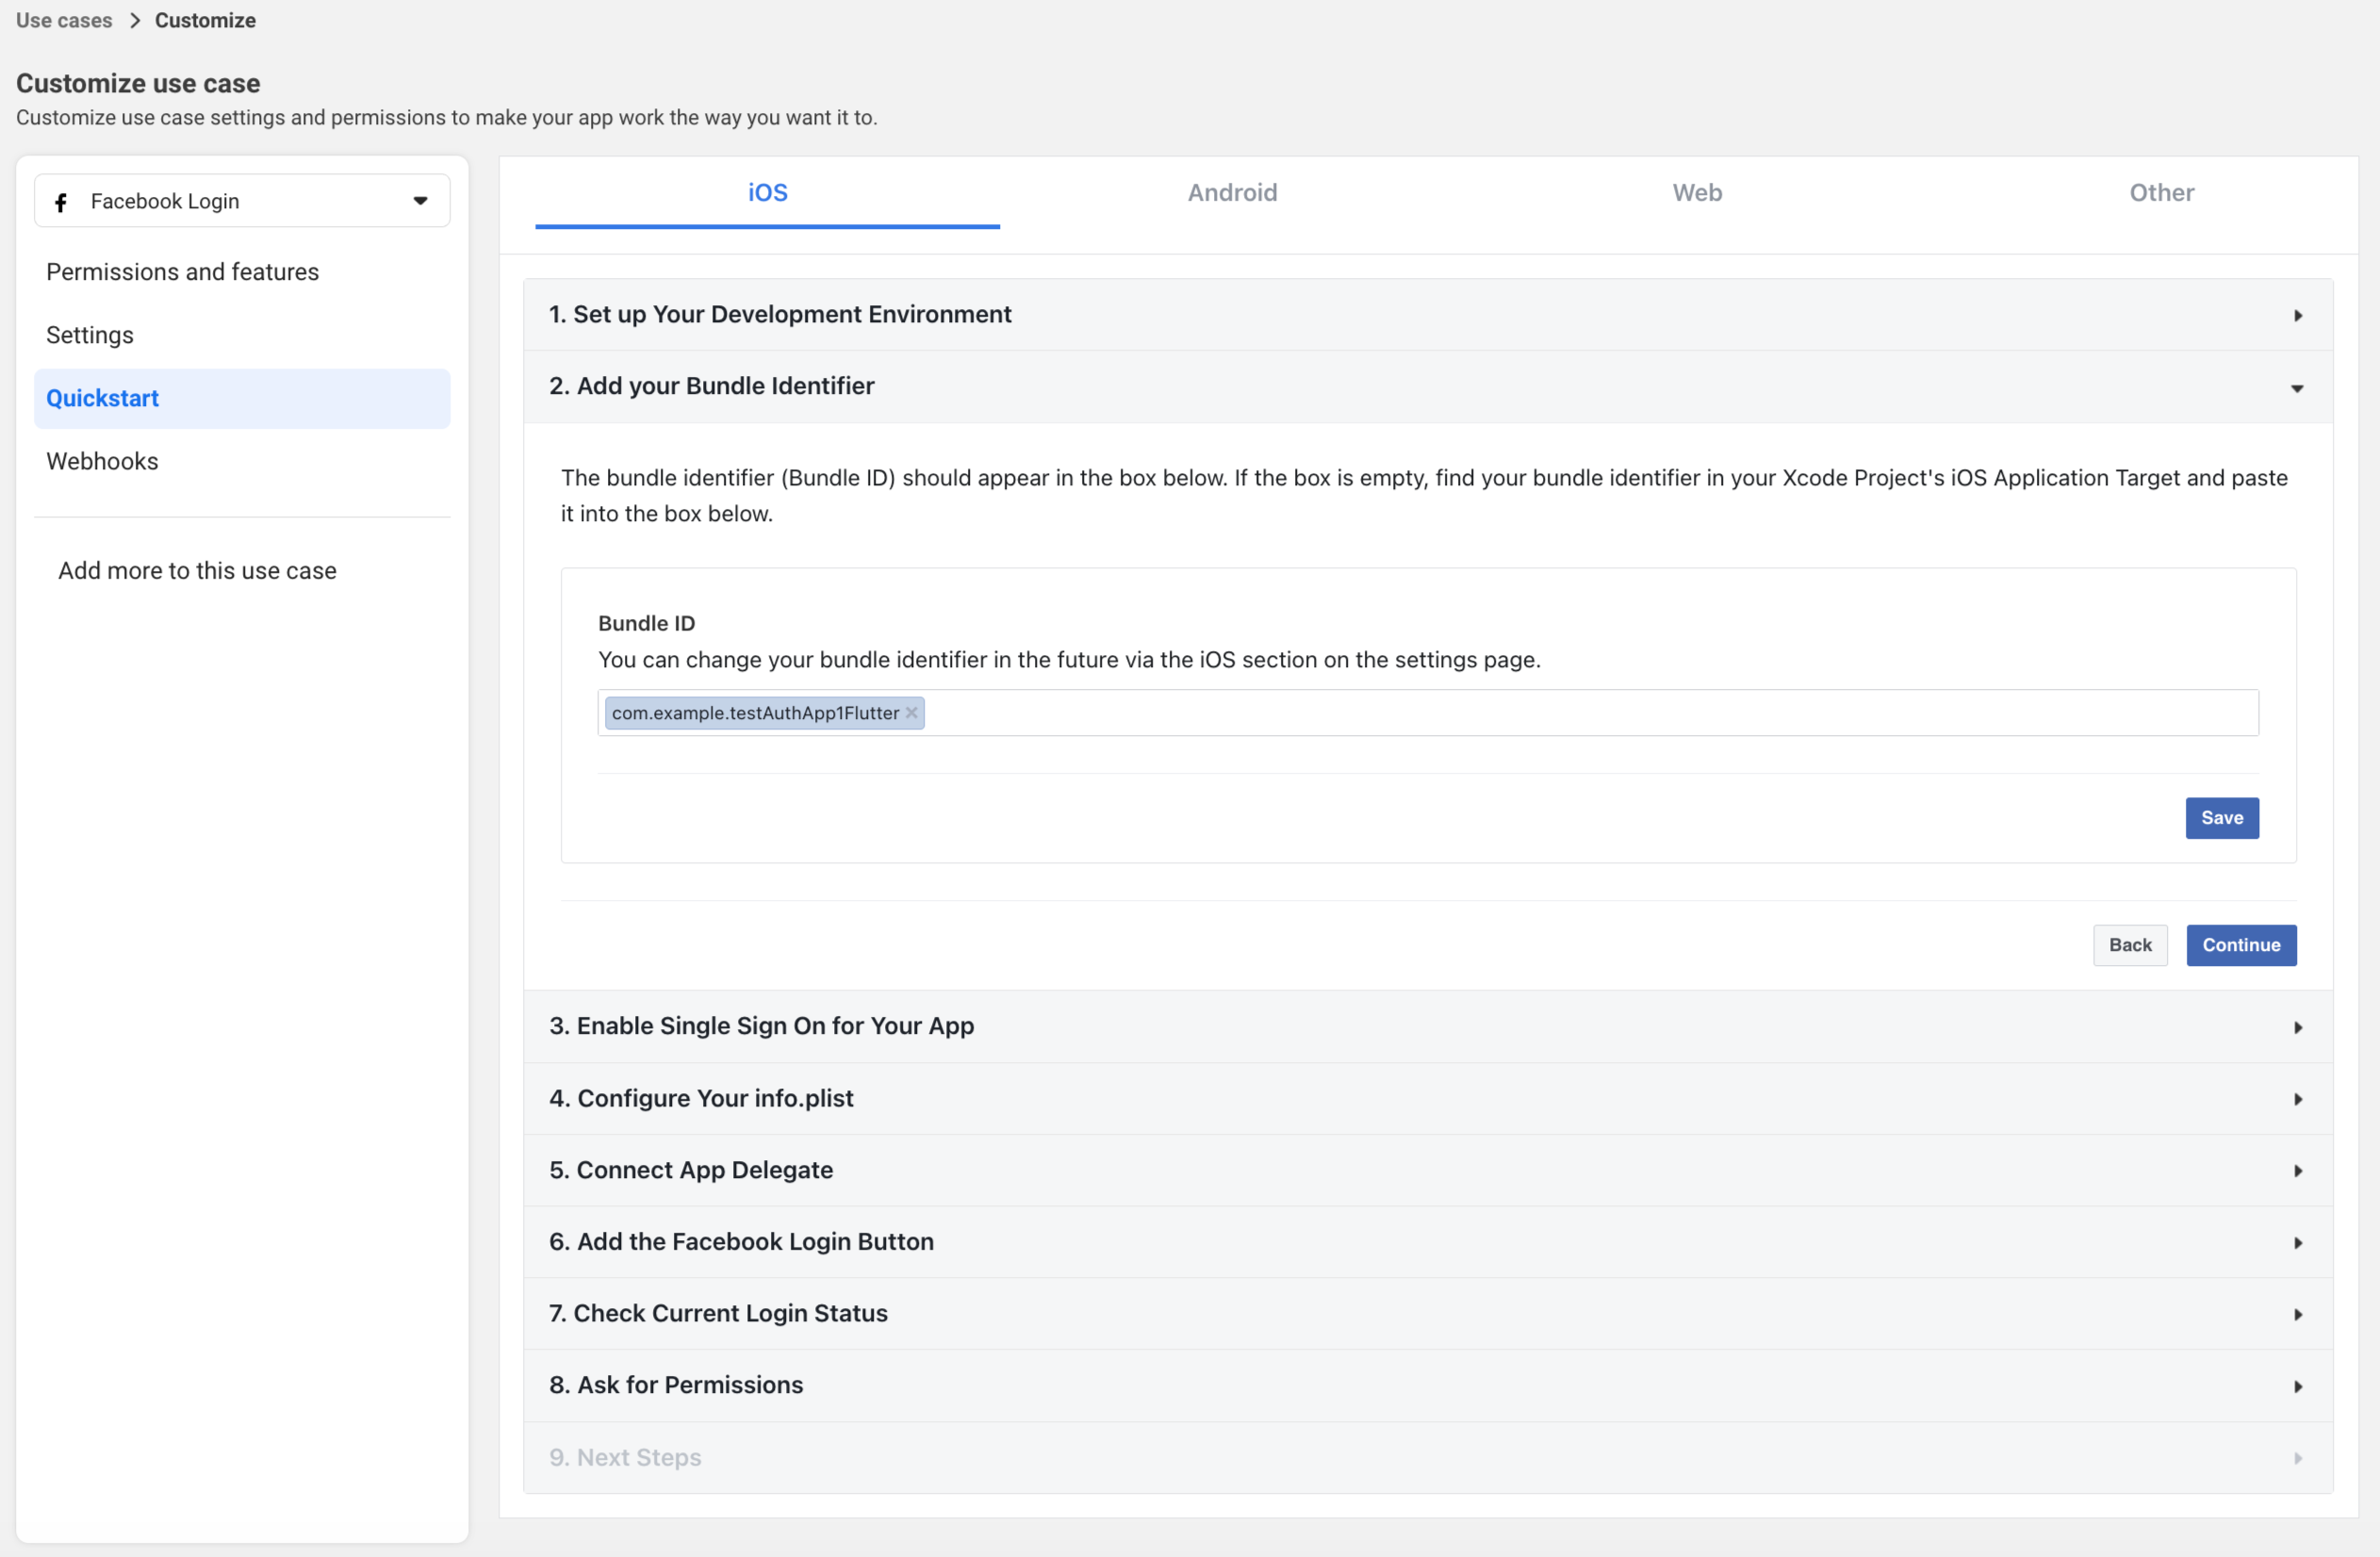
Follow these steps:
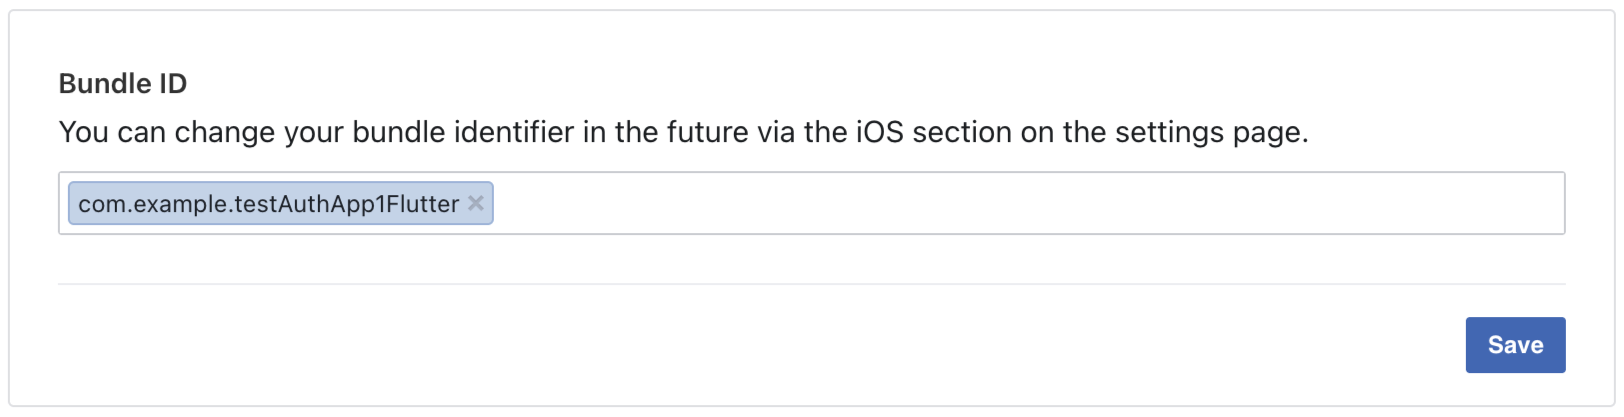
Step 2: Add your Bundle Identifier
Enter your iOS app's Bundle Identifier (found in Xcode under Runner > General > Identity or in your Info.plist).
Step 4: Configure Your info.plist
Open ios/Runner/Info.plist and add the following configuration (replace placeholders with your actual values):
<key>CFBundleURLTypes</key>
<array>
  <dict>
    <key>CFBundleURLSchemes</key>
    <array>
      <string>fbYOUR_APP_ID</string>
    </array>
  </dict>
</array>
<key>FacebookAppID</key>
<string>YOUR_APP_ID</string>
<key>FacebookClientToken</key>
<string>YOUR_CLIENT_TOKEN</string>
<key>FacebookDisplayName</key>
<string>YOUR_APP_NAME</string>
<key>LSApplicationQueriesSchemes</key>
<array>
  <string>fbapi</string>
  <string>fb-messenger-share-api</string>
</array>
Replace YOUR_APP_ID with your Facebook App ID, YOUR_CLIENT_TOKEN with your Client token, and YOUR_APP_NAME with your app's name.
If you have other providers (like Google) implemented, merge the values for CFBundleURLTypes and LSApplicationQueriesSchemes instead of creating duplicate keys.
Additionally, ensure that the Keychain Sharing capability is enabled for your target in Xcode (Runner > Signing & Capabilities > + Capability > Keychain Sharing).
You can skip the remaining steps (1, 3, 5-9) as they are not required for Flutter apps or have already been covered.
iOS App Tracking Transparency (ATT)
On iOS, Facebook may issue limited access tokens when App Tracking Transparency (ATT) permission is not granted. These limited tokens cannot be validated by the server or used to retrieve user profile data, which will cause authentication to fail.
To ensure full Facebook authentication functionality on iOS, you should request ATT permissions before initiating Facebook Sign In. You can use the app_tracking_transparency package to handle this:
import 'package:app_tracking_transparency/app_tracking_transparency.dart';

// Request tracking authorization before showing Facebook Sign In
final status = await AppTrackingTransparency.requestTrackingAuthorization();
Without ATT permission granted, Facebook authentication fails on iOS. Consider requesting this permission early in your app's flow or before showing the Facebook Sign In button.
For more detailed iOS setup instructions, refer to the flutter_facebook_auth iOS documentation.
Web
For web platforms, you must initialize the FacebookSignInService with your App ID:
await client.auth.initializeFacebookSignIn(
  appId: 'YOUR_FACEBOOK_APP_ID',
);
Configure Web platform in Facebook
In the Facebook App Dashboard, go to Use cases > Customize > Quickstart and select the Web tab.
Follow these steps:
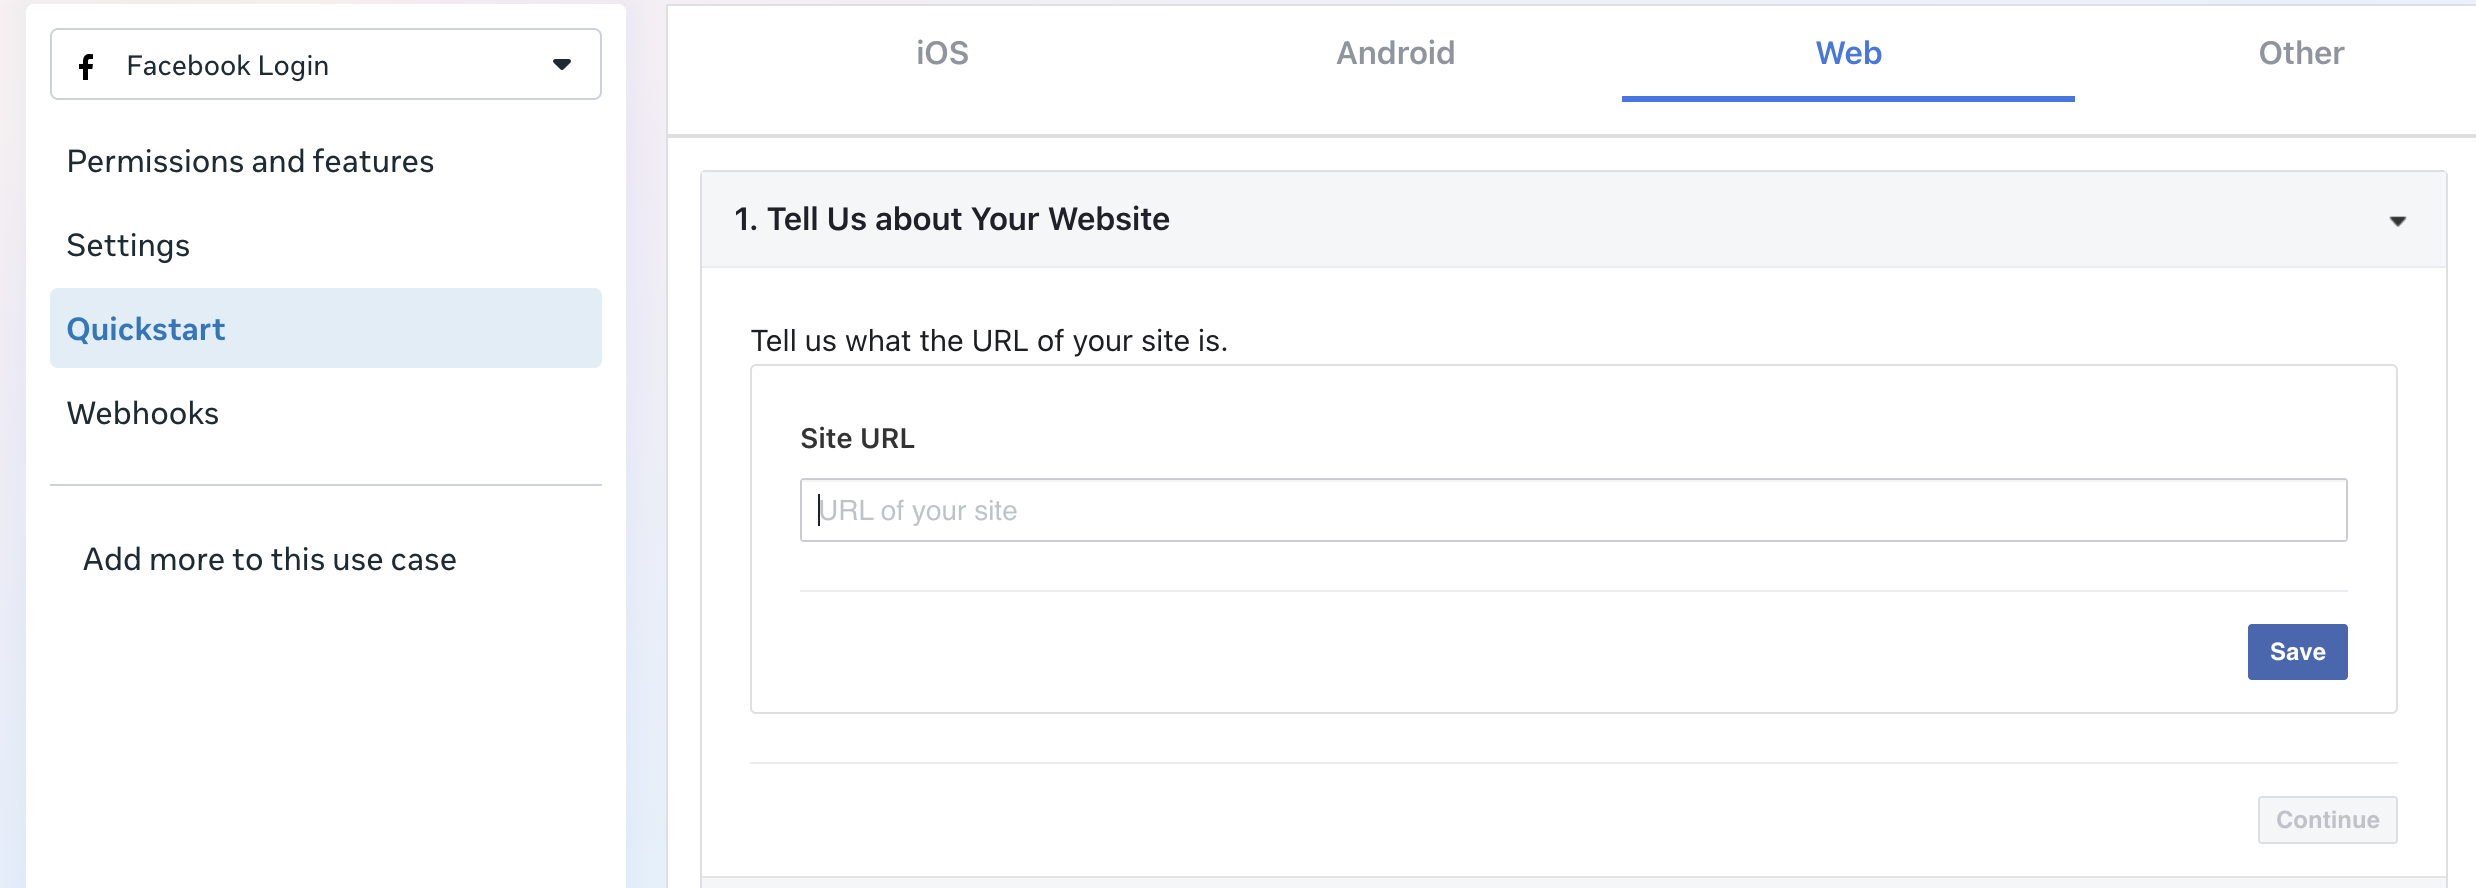
1. Add Site URL in Quickstart
Enter your website's Site URL (e.g., https://yourdomain.com) and save your changes.
You can skip the remaining steps (2-5) as they are not required for Flutter apps or have already been covered.
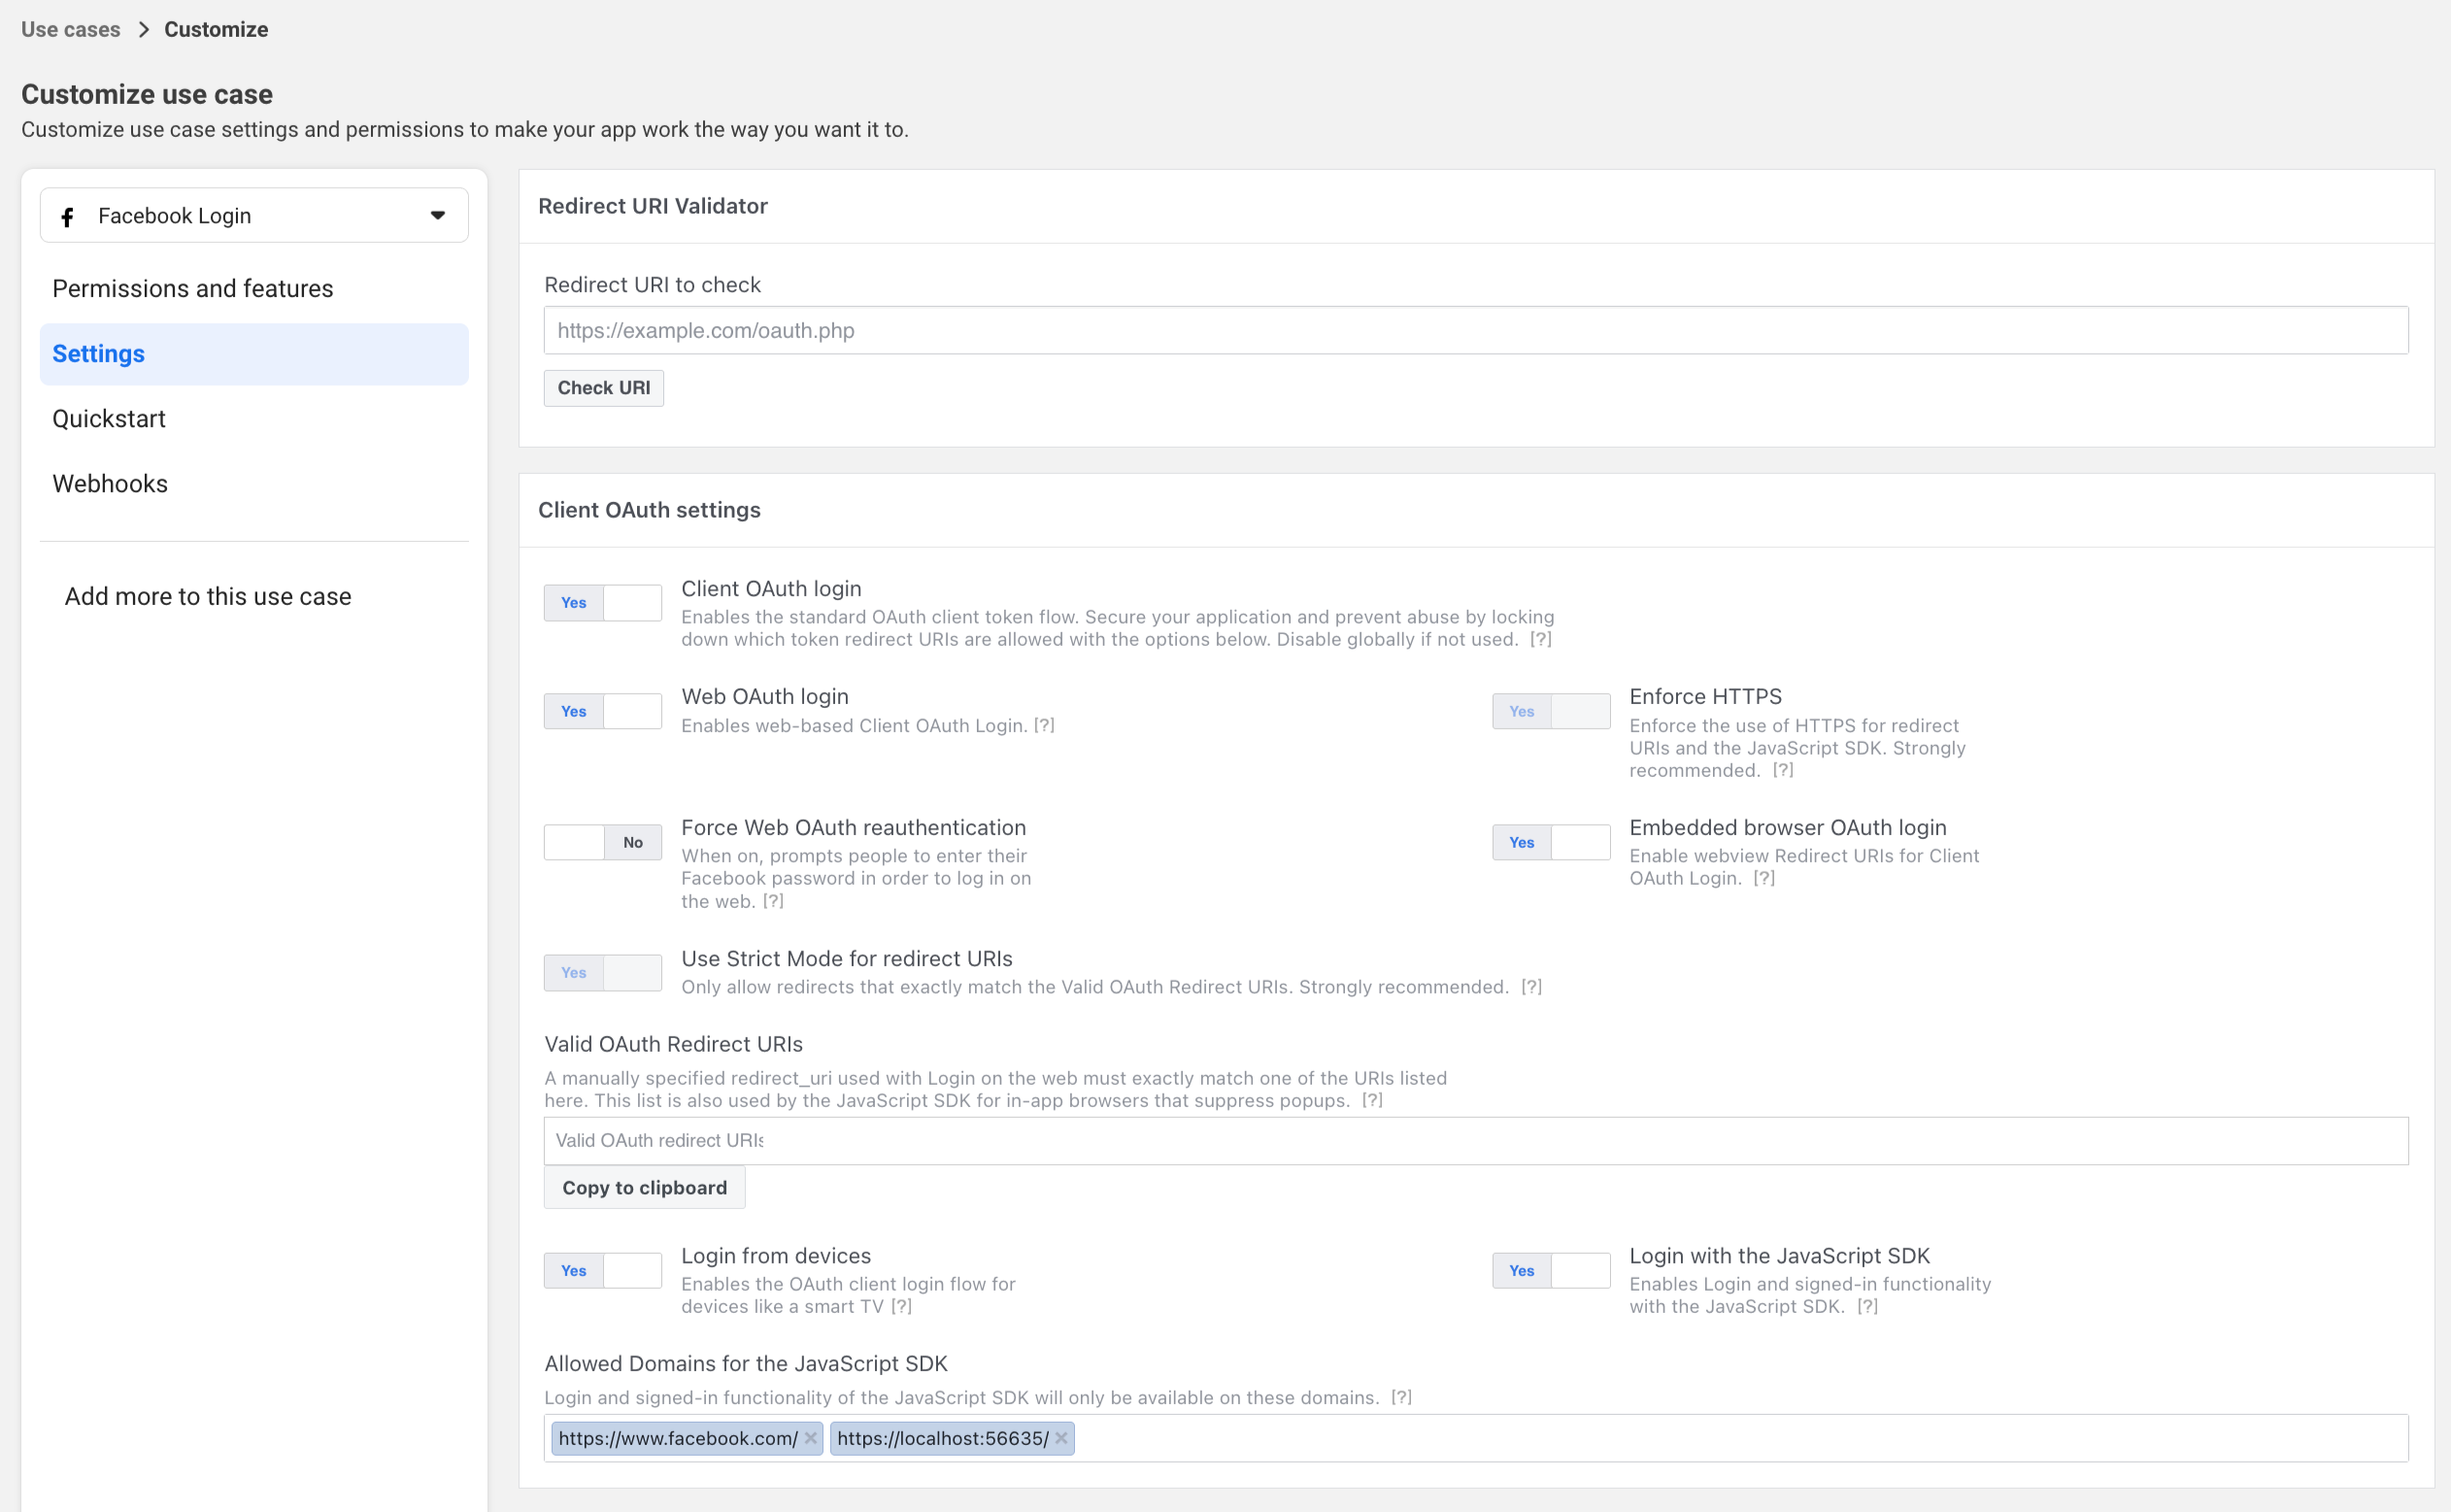
2. Configure Settings (Important)
Go to Use cases > Customize > Settings and configure the following:
- Confirm Login with the JavaScript SDK is set to Yes (from the Settings step above). Web sign-in fails with "JSSDK Option is Not Toggled" without it.
- Under Allowed Domains for the JavaScript SDK, add all domains where your app will be accessible:
- Your development domain:
http://localhost:PORT(e.g.,http://localhost:8082when serving the Flutter web build from Serverpod). - Your production domain:
https://yourdomain.com.
- Your development domain:
This enables Facebook authentication on these domains. Without it, Facebook sign-in fails due to CORS restrictions.
The Facebook JavaScript SDK is only allowed over https, but you can test the plugin on localhost (you will see an error message in your web console).
For more detailed web setup instructions, refer to the flutter_facebook_auth web documentation.
macOS
Enable Network Capabilities
In macos/Runner/Info.plist, add:
<key>com.apple.security.network.server</key>
<true/>
In Xcode, select the Runner target, go to Signing & Capabilities, and enable Outgoing Connections.
Enable Keychain Sharing
macOS uses flutter_secure_storage to securely store session data. Add the Keychain Sharing capability in Xcode (Runner > Signing & Capabilities > + Capability > Keychain Sharing).
Initialize the FacebookSignInService
For macOS, you must initialize the FacebookSignInService with your App ID:
await client.auth.initializeFacebookSignIn(
  appId: 'YOUR_FACEBOOK_APP_ID',
);
Configure macOS platform in Facebook
1. Configure settings
Go to Use cases > Customize > Settings and configure the following:
- Enable Login from Devices under Client OAuth settings.
- Enable Login with the JavaScript SDK under Client OAuth settings.
- In Allowed Domains for the JavaScript SDK, add
https://www.facebook.comto avoid CORS issues.
For more detailed macOS setup instructions, refer to the flutter_facebook_auth macOS documentation.
Present the authentication UI
Initialize the Facebook sign-in service
Initialize the service in your app's main() function using the initializeFacebookSignIn() extension method on FlutterAuthSessionManager, on the line after client.auth.initialize().
import 'package:serverpod_auth_idp_flutter_facebook/serverpod_auth_idp_flutter_facebook.dart';
import 'package:your_client/your_client.dart';

final client = Client('http://localhost:8080/')
  ..authSessionManager = FlutterAuthSessionManager();

void main() {
  client.auth.initialize();
  client.auth.initializeFacebookSignIn();
}
For web and macOS platforms, you must provide your Facebook App ID during initialization:
client.auth.initializeFacebookSignIn(
  appId: 'YOUR_FACEBOOK_APP_ID',
);
For iOS and Android, the App ID is not required as the SDK reads credentials from native configuration.
Show the Facebook sign-in button
If you use the template's SignInWidget (see Present the authentication UI), the Facebook button is detected and shown automatically once the serverpod_auth_idp_flutter_facebook package is installed and the service is initialized. It handles the full sign-in flow, token management, and error handling on iOS, Android, web, and macOS.
To customize the button or build a fully custom UI, see Customizing the UI.
Publishing to production
Before going live, complete the following steps.
1. Switch the app to Live mode
New Facebook apps start in Development mode, where only people with a role on the app (admins, developers, testers) can sign in. To let anyone sign in, toggle the app from Development to Live at the top of the Facebook App Dashboard.
Going Live requires a valid Privacy Policy URL (App settings > Basic), and requesting permissions beyond email and public_profile requires App Review. See Accessing Facebook APIs.
2. Add your production domains and platforms
-
Web and macOS: In Use cases > Customize > Settings, confirm Login with the JavaScript SDK is Yes and add your production domain to Allowed Domains for the JavaScript SDK (e.g.,
https://yourdomain.com) alongside your development domain. Both can stay registered so dev and prod work at the same time. -
Android: Add your release key hash (not just the debug one) to the Android platform in the Facebook app. Generate it from your release keystore:
keytool -exportcert -alias YOUR_RELEASE_KEY_ALIAS -keystore YOUR_RELEASE_KEY_PATH | openssl sha1 -binary | openssl base64 -
iOS: No change is needed between dev and prod for the custom URL scheme.
3. Set production credentials
Production runs out of the production: section of passwords.yaml, which is separate from the development: section you populated during setup. Adding production credentials does not replace your development ones; both stay in place and Serverpod picks the right set based on the run mode.
You can reuse the same Facebook app for development and production, or create a separate app per environment and use its credentials.
Self-hosted
Add facebookAppId and facebookAppSecret to the production: section of passwords.yaml:
production:
  # ... existing keys ...
  facebookAppId: 'your-facebook-app-id'
  facebookAppSecret: 'your-facebook-app-secret'
Alternatively, set the SERVERPOD_PASSWORD_facebookAppId and SERVERPOD_PASSWORD_facebookAppSecret environment variables on your production server with the same values.
Serverpod Cloud
Use scloud password set to upload each value. The App ID is public, so pass it as a positional argument. The App secret is sensitive, so read it from a file with --from-file to keep it out of your shell history:
scloud password set facebookAppId your-facebook-app-id
scloud password set facebookAppSecret --from-file path/to/facebook-app-secret.txt
Run these from your linked server project directory, or pass --project <project-id> on each call. See the Serverpod Cloud passwords guide for project linking and other options.
4. Provide the App ID to the production Flutter build
On web and macOS the App ID must be available to the Flutter app at build time. When you omit appId, the provider reads it from the FACEBOOK_APP_ID compile-time environment variable, so a single main.dart works in dev and prod:
await client.auth.initializeFacebookSignIn();
Pass the value in your production build (or the flutter_build step for Serverpod Cloud):
flutter build web --dart-define=FACEBOOK_APP_ID=your-facebook-app-id
On iOS and Android the App ID comes from the native configuration files, so no build-time value is needed. See Configuring Facebook sign-in on the app.
If you run into issues, see the troubleshooting guide.