Setup
To set up Sign in with GitHub, you must create OAuth2 credentials on GitHub and configure your Serverpod application accordingly.
You need to install the auth module before you continue, see Setup.
Choosing Your GitHub App Type
GitHub offers two ways to obtain OAuth2 credentials:
- GitHub Apps: more suitable when building integrations or bots that belong to an organization or repository, operate with their own identity, continue functioning regardless of which users come and go, and only access the repositories and permissions explicitly granted. They provide fine‑grained control, short‑lived tokens, and are the modern, secure choice for most automation and service scenarios.
- OAuth Apps: preferred when the primary need is authenticating users with "Sign in with GitHub" or performing actions strictly as the currently logged‑in user under broad OAuth scopes. Similar to other OAuth providers like Google or Apple, they allow access to a user’s GitHub resources within the scopes granted, but lack the flexibility and security of GitHub Apps.
GitHub Apps are the preferred choice for most scenarios — especially mobile and modern integrations. See the official comparison here: Differences between GitHub Apps and OAuth Apps.
Create your credentials
-
Go to GitHub Developer Settings.
-
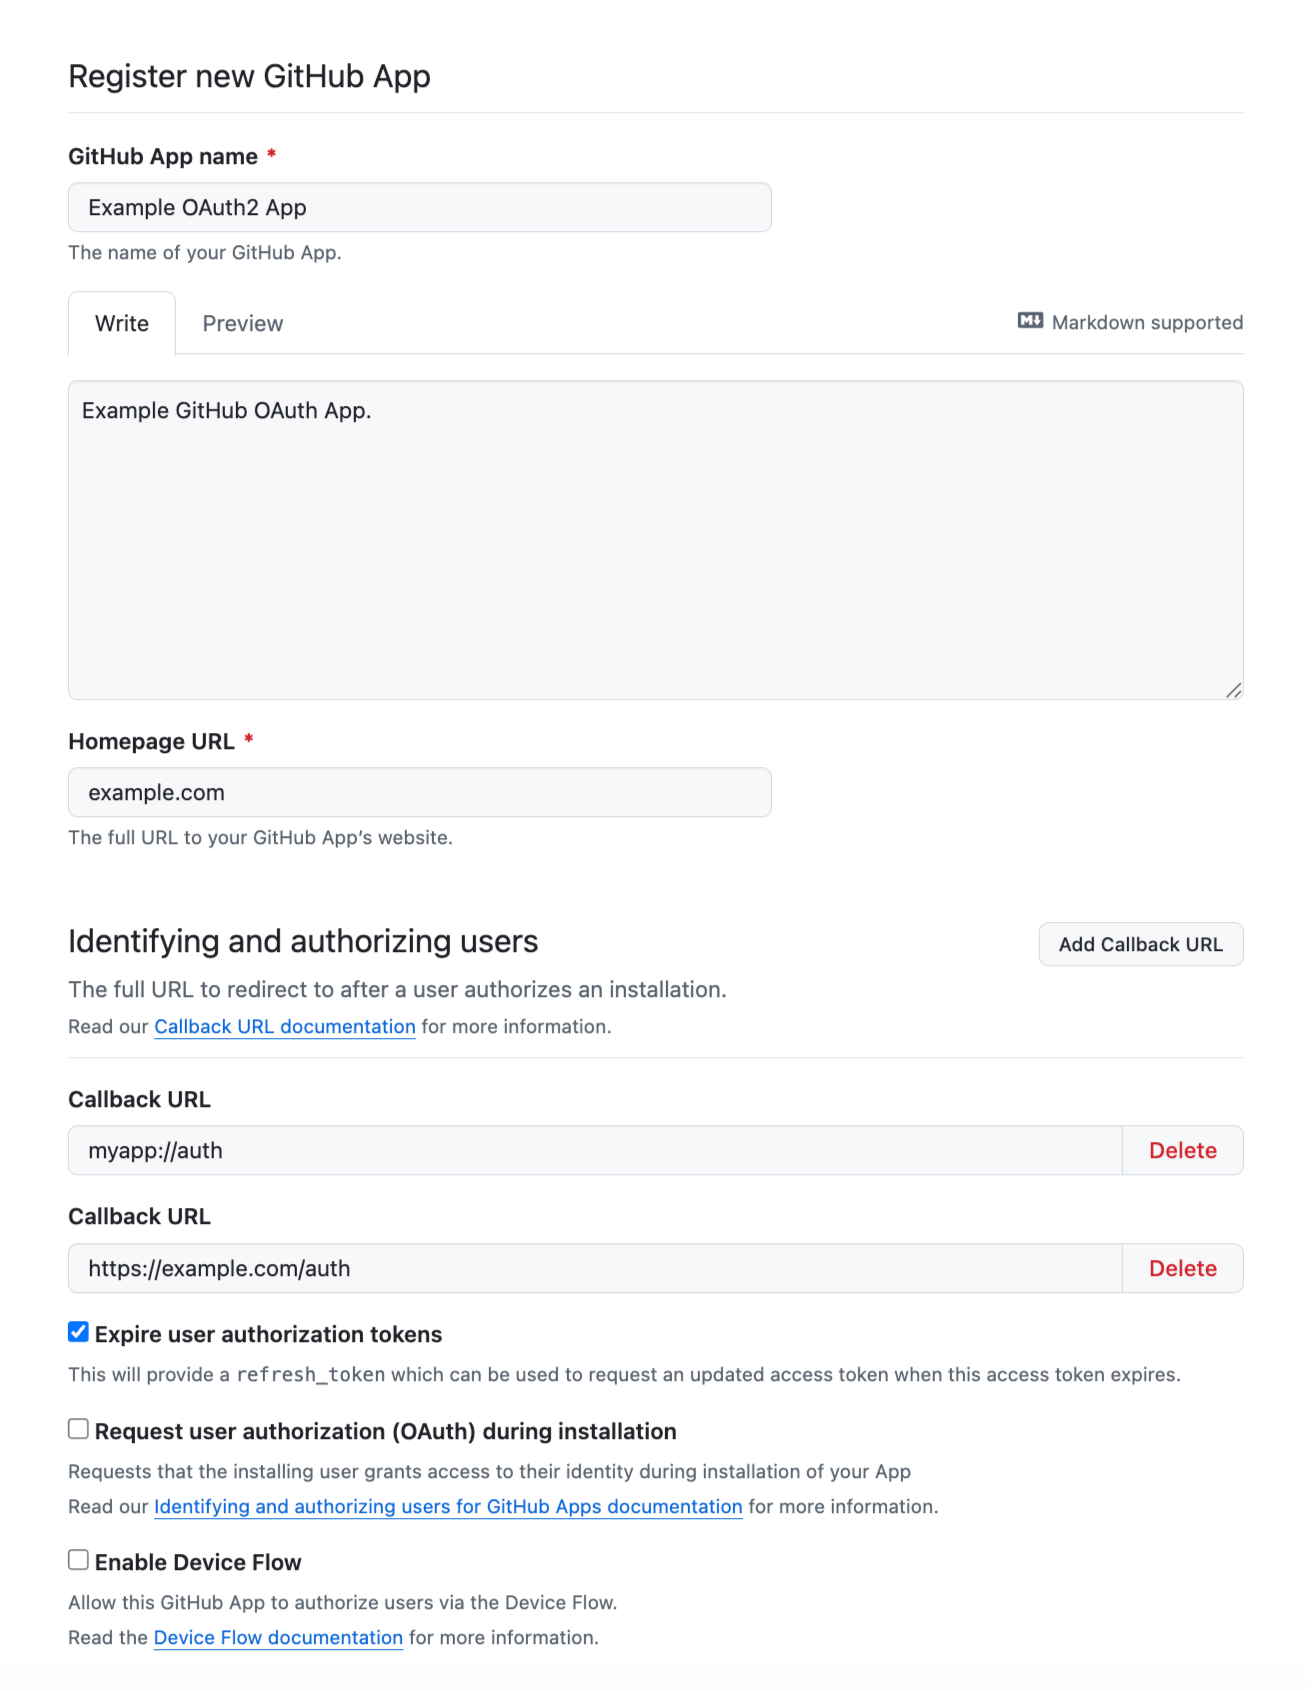
Click New GitHub App (recommended) or New OAuth App.
-
Fill in the required fields:
- App name
- Homepage URL
- Callback URL(s) (use your app's redirect URI, e.g.,
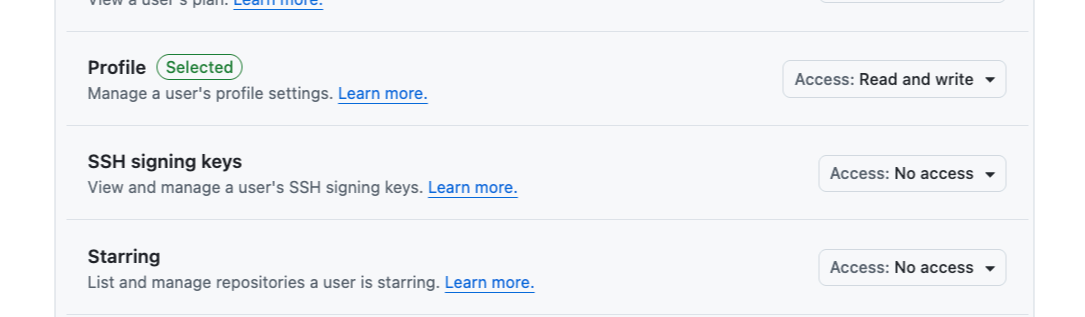
myapp://authfor mobile) - Permissions (at minimum: account permission = profile; add others as needed)
- Webhook URL (disable if not required; serves to receive events like commits, pull requests, and repo changes)

Webhooks let your GitHub App automatically receive notifications about repository activity. If your app doesn’t need to react to events (like commits or pull requests), it’s best to disable the webhook URL to reduce unnecessary traffic and complexity.
-
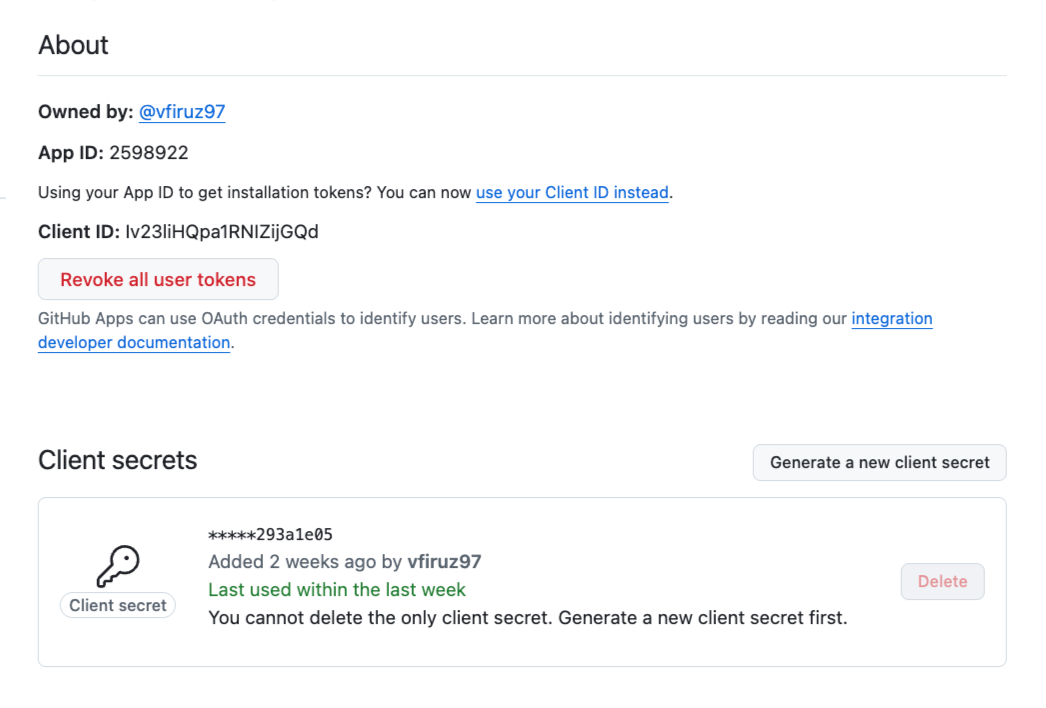
Click Create GitHub App (for GitHub Apps) or Register application (for OAuth Apps). This will save your app and generate the Client ID.
-
After the app is created, click Generate a new client secret to obtain the Client Secret. Copy both the Client ID and Client Secret for later use.
Server-side Configuration
Store the Credentials
This can be done by adding your credentials to the githubClientId and githubClientSecret keys in the config/passwords.yaml file, or by setting them as the values of the SERVERPOD_PASSWORD_githubClientId and SERVERPOD_PASSWORD_githubClientSecret environment variables.
development:
  githubClientId: 'YOUR_GITHUB_CLIENT_ID'
  githubClientSecret: 'YOUR_GITHUB_CLIENT_SECRET'
Keep your Client Secret confidential. Never commit this value to version control. Store it securely using environment variables or secret management.
Configure the GitHub Identity Provider
In your main server.dart file, configure the GitHub identity provider:
import 'package:serverpod/serverpod.dart';
import 'package:serverpod_auth_idp_server/core.dart';
import 'package:serverpod_auth_idp_server/providers/github.dart';

void run(List<String> args) async {
  final pod = Serverpod(
    args,
    Protocol(),
    Endpoints(),
  );

  pod.initializeAuthServices(
    tokenManagerBuilders: [
      JwtConfigFromPasswords(),
    ],
    identityProviderBuilders: [
      GitHubIdpConfig(
        clientId: pod.getPassword('githubClientId')!,
        clientSecret: pod.getPassword('githubClientSecret')!,
      ),
    ],
  );

  await pod.start();
}
You can use GitHubIdpConfigFromPasswords() to automatically load credentials from config/passwords.yaml or the SERVERPOD_PASSWORD_githubClientId and SERVERPOD_PASSWORD_githubClientSecret environment variables:
identityProviderBuilders: [
  GitHubIdpConfigFromPasswords(),
],
Expose the Endpoint
Create an endpoint that extends GitHubIdpBaseEndpoint to expose the GitHub authentication API:
import 'package:serverpod_auth_idp_server/providers/github.dart';

class GitHubIdpEndpoint extends GitHubIdpBaseEndpoint {}
Generate and Migrate
Finally, run serverpod generate to generate the client code and create a migration to initialize the database for the provider. More detailed instructions can be found in the general identity providers setup section.
Basic configuration options
clientId: Required. The Client ID of your GitHub App or OAuth App.clientSecret: Required. The Client Secret generated for your GitHub App or OAuth App.
For more details on configuration options, see the configuration section.
Client-side configuration
Add the serverpod_auth_idp_flutter package to your Flutter app. The GitHub provider uses flutter_web_auth_2 to handle the OAuth2 flow, so any documentation there should also apply to this setup.
iOS and MacOS
There is no special configuration needed for iOS and MacOS for "normal" authentication flows. However, if you are using Universal Links on iOS, they require redirect URIs to use https. Follow the instructions in the flutter_web_auth_2 documentation.
Android
In order to capture the callback url, the following activity needs to be added to your AndroidManifest.xml. Be sure to replace YOUR_CALLBACK_URL_SCHEME_HERE with your actual callback url scheme registered in your GitHub app.
<manifest>
  <application>

    <activity
      android:name="com.linusu.flutter_web_auth_2.CallbackActivity"
      android:exported="true"
      android:taskAffinity="">
      <intent-filter android:label="flutter_web_auth_2">
        <action android:name="android.intent.action.VIEW" />
        <category android:name="android.intent.category.DEFAULT" />
        <category android:name="android.intent.category.BROWSABLE" />
        <data android:scheme="YOUR_CALLBACK_URL_SCHEME_HERE" />
      </intent-filter>
    </activity>

  </application>
</manifest>
Web
On the web, you need a specific endpoint to capture the OAuth2 callback. To set this up, create an HTML file (e.g., auth.html) inside your project's ./web folder and add the following content:
<!DOCTYPE html>
<title>Authentication complete</title>
<p>Authentication is complete. If this does not happen automatically, please close the window.</p>
<script>
  function postAuthenticationMessage() {
    const message = {
      'flutter-web-auth-2': window.location.href
    };

    if (window.opener) {
      window.opener.postMessage(message, window.location.origin);
      window.close();
    } else if (window.parent && window.parent !== window) {
      window.parent.postMessage(message, window.location.origin);
    } else {
      localStorage.setItem('flutter-web-auth-2', window.location.href);
      window.close();
    }
  }

  postAuthenticationMessage();
</script>
You only need a single callback file (e.g. auth.html) in your ./web folder.
This file is shared across all IDPs that use the OAuth2 utility, as long as your redirect URIs point to it.
Present the authentication UI
Initializing the GitHubSignInService
To use the GitHubSignInService, you need to initialize it in your main function. The initialization is done from the initializeGitHubSignIn() extension method on the FlutterAuthSessionManager.
import 'package:flutter/material.dart';
import 'package:flutter/material.dart';
import 'package:serverpod_flutter/serverpod_flutter.dart';
import 'package:your_client/your_client.dart';

late Client client;

void main() async {
  WidgetsFlutterBinding.ensureInitialized();

  // Create the Serverpod client
  client = Client('http://localhost:8080/')
    ..connectivityMonitor = FlutterConnectivityMonitor()
    ..authSessionManager = FlutterAuthSessionManager();

  // Initialize Serverpod auth
  await client.auth.initialize();

  // Initialize GitHub Sign-In
  // Note: For Web, ensure the redirectUri matches your auth.html location.
  await client.auth.initializeGitHubSignIn(
    clientId: 'YOUR_GITHUB_CLIENT_ID',
    redirectUri: Uri.parse('https://example.com/auth.html'),
  );

  runApp(const MyApp());
}
Important: Ensure the redirect URIs used in your code are also explicitly listed in your GitHub App Dashboard under "Callback URLs". For Android, you must also register this scheme in your AndroidManifest.xml.
Using GitHubSignInWidget
If you have configured the GitHubSignInWidget as described in the setup section, the GitHub identity provider will be automatically detected and displayed in the sign-in widget.
You can also use the GitHubSignInWidget to include the GitHub authentication flow in your own custom UI.
import 'package:serverpod_auth_idp_flutter/serverpod_auth_idp_flutter.dart';

GitHubSignInWidget(
  client: client,
  onAuthenticated: () {
    // Do something when the user is authenticated.
    //
    // NOTE: You should not navigate to the home screen here, otherwise
    // the user will have to sign in again every time they open the app.
  },
  onError: (error) {
    // Handle errors
    ScaffoldMessenger.of(context).showSnackBar(
      SnackBar(content: Text('Error: $error')),
    );
  },
)
The widget automatically handles:
- GitHub Sign-In flow for iOS, macOS, Android, and Web.
- Token management.
- Underlying GitHub Sign-In package error handling.
For details on how to customize the GitHub Sign-In UI in your Flutter app, see the customizing the UI section.