To set up Sign in with Google, you will need a Google account for your organization and set up a new project. For the project, you need to set up Credentials and Oauth consent screen. You will also need to add the serverpod_auth_google_flutter package to your app and do some additional setup depending on each platform.
A comprehensive tutorial covering everything about google sign in is available here.
Right now, we have official support for iOS, Android, and Web for Google Sign In.
You need to install the auth module before you continue, see Setup.
Create your credentials
To implement Google Sign In, you need a google cloud project. You can create one in the Google Cloud Console.
Enable Peoples API
To be allowed to access user data and use the authentication method in Serverpod we have to enable the Peoples API in our project.
Enable it here or find it yourself by, navigating to the Library section under APIs & Services. Search for Google People API, select it, and click on Enable.
Setup OAuth consent screen
The setup for the OAuth consent screen can be found here or under APIs & Services > OAuth consent screen.
-
Fill in all the required information, for production use you need a domain that adds under
Authorizeddomains. -
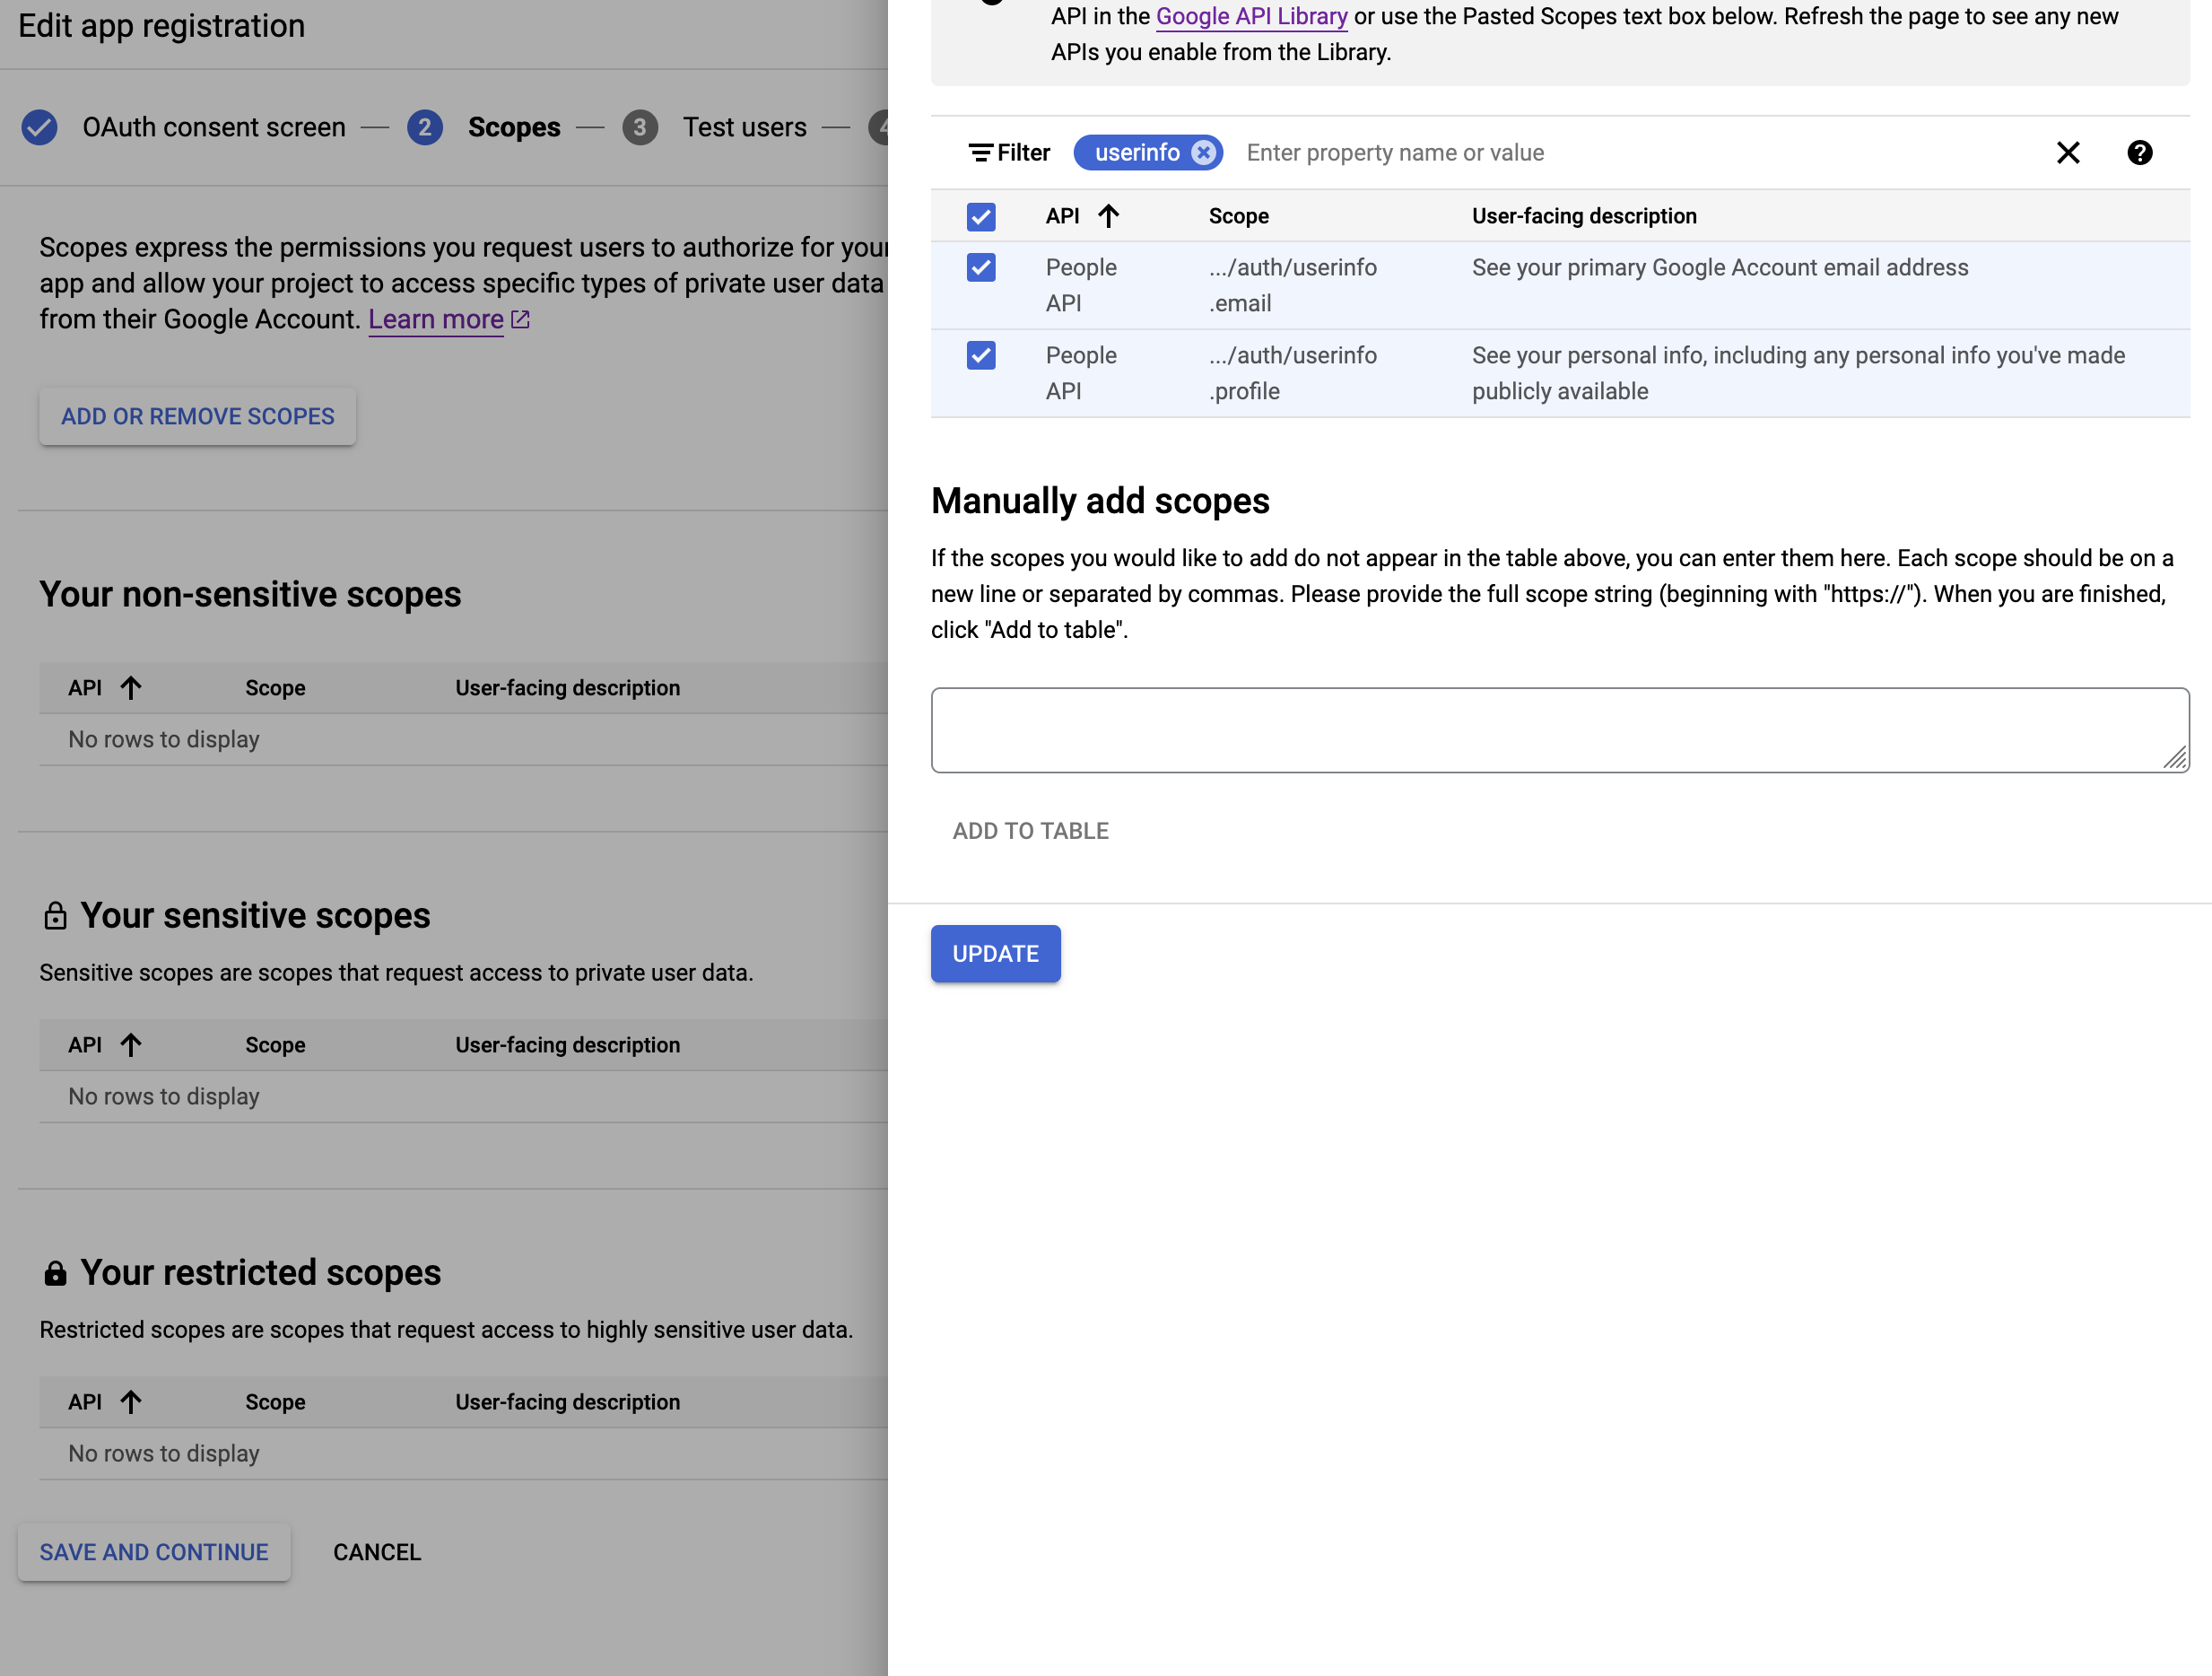
Add the scopes
.../auth/userinfo.emailand.../auth/userinfo.profile. -
Add your email to the test users so that you can test your integration in development mode.
Server-side configuration
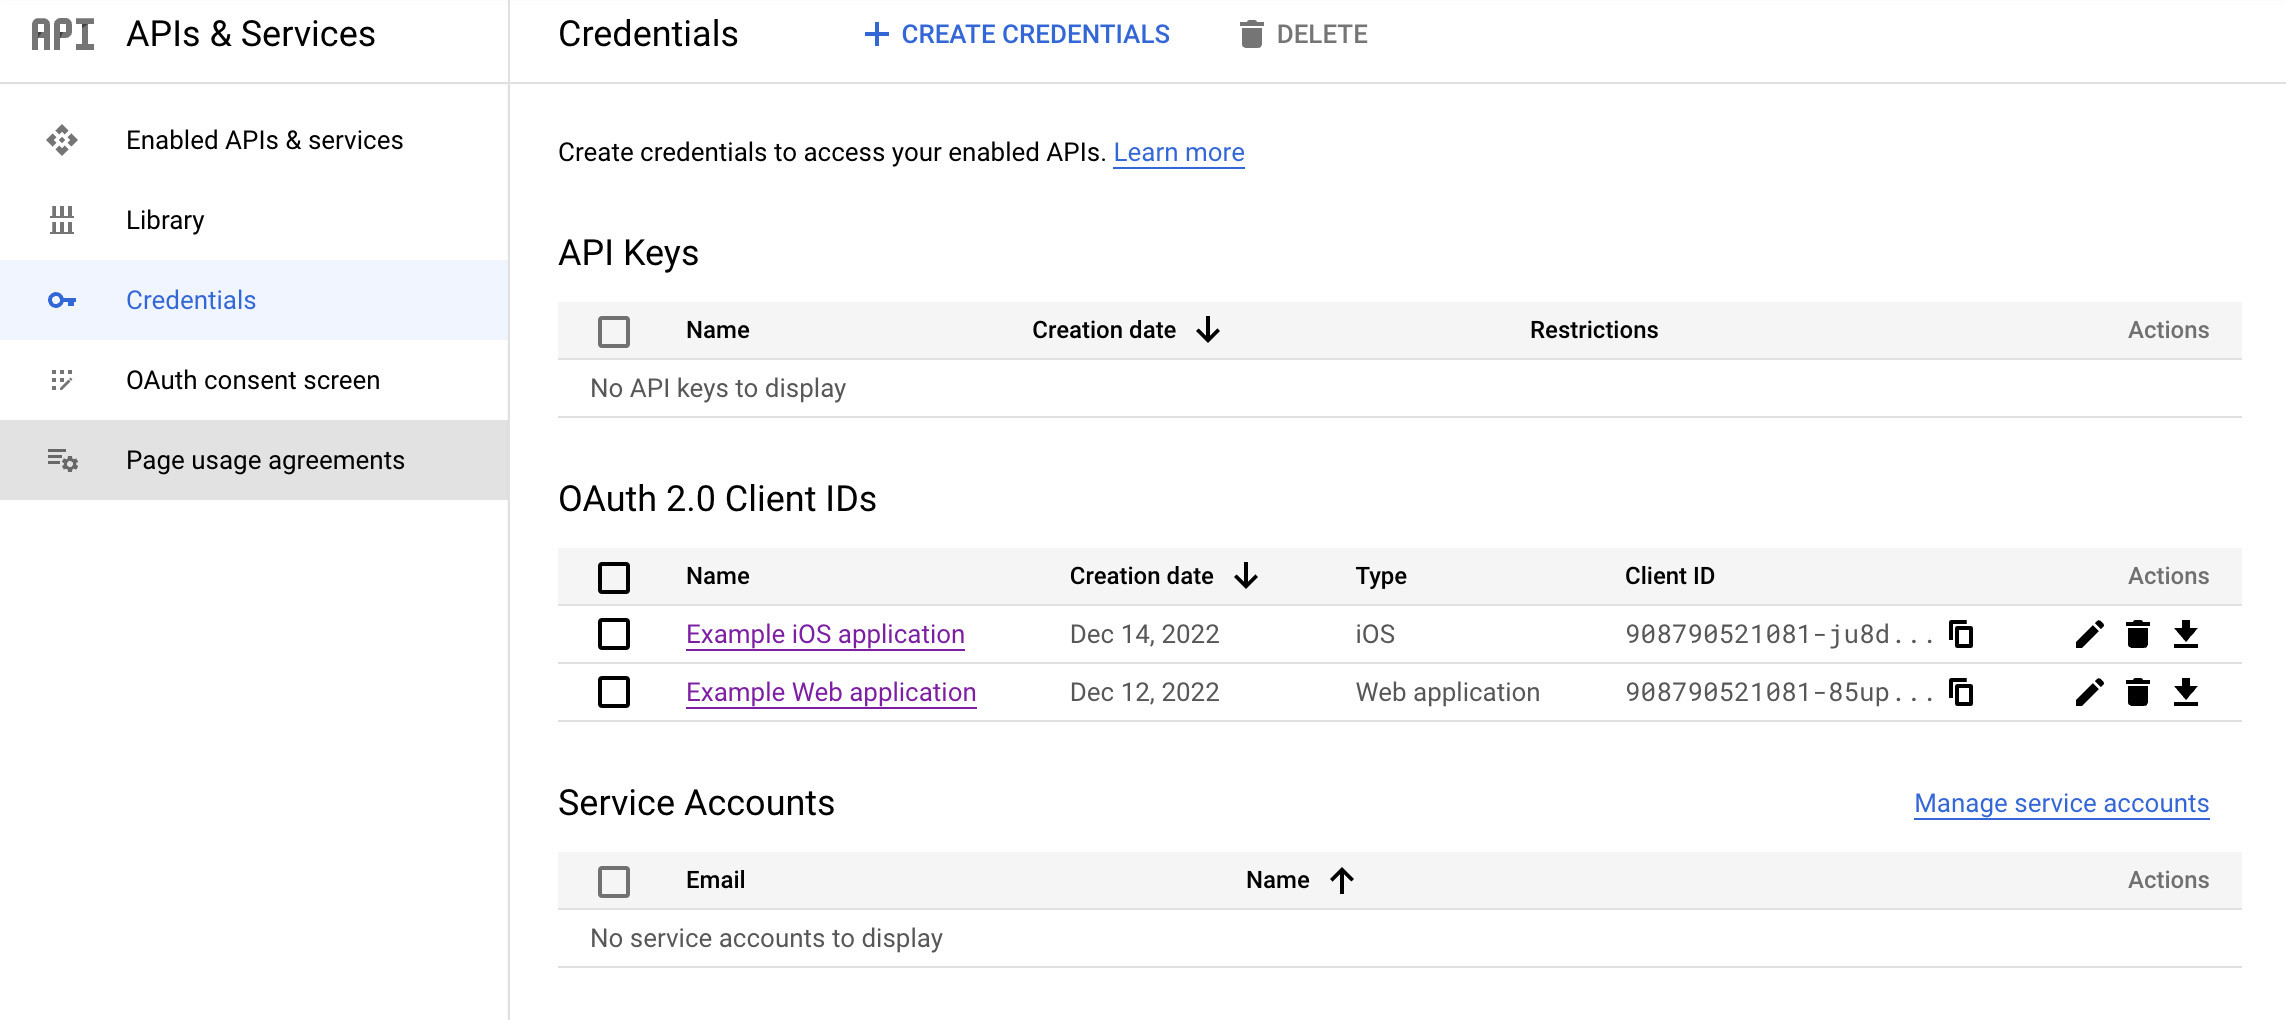
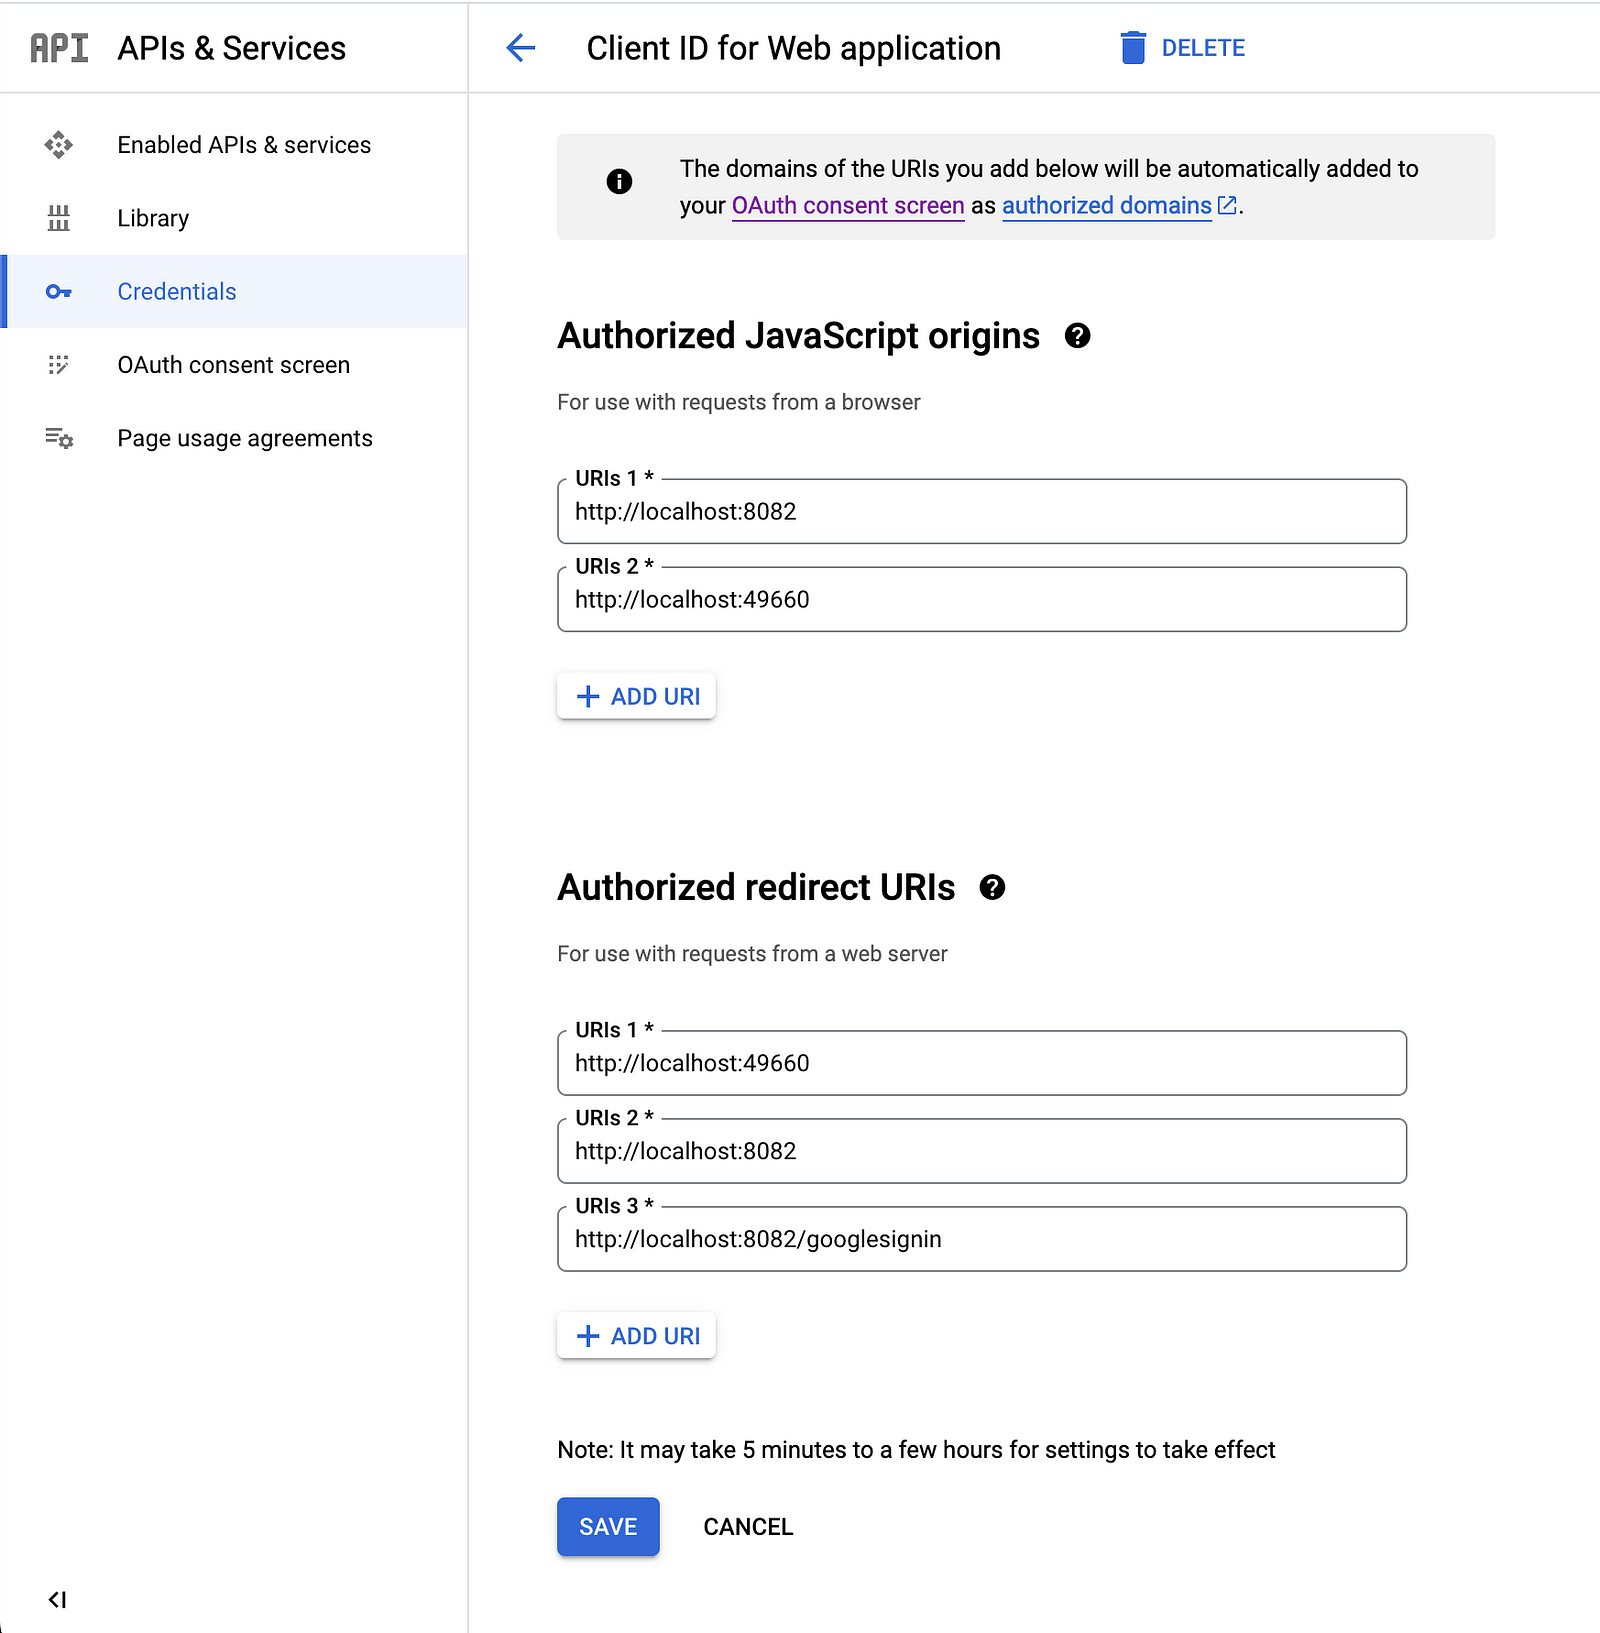
Create the server credentials in the google cloud console. Navigate to Credentials under APIs & Services. Click Create Credentials and select OAuth client ID. Configure the OAuth client as a Web application. If you have a domain add it to the Authorized JavaScript origins and Authorized redirect URIs. For development purposes we can add http://localhost:8082 to both fields, this is the address to the web server.
Download the JSON file for your web application OAuth client. This file contains both the client id and the client secret. Rename the file to google_client_secret.json and place it in your server's config directory.
Alternatively, you can provide the contents of the JSON file through the environment variable SERVERPOD_PASSWORD_serverpod_auth_googleClientSecret.
The google_client_secret.json contains a private key and should not be version controlled.
Client-side configuration
For our client-side configurations, we have to first create client-side credentials and include the credentials files in our projects. The Android and iOS integrations use the google_sign_in package under the hood, any documentation there should also apply to this setup.
Rather than using the credentails file for iOS and Android, you can pass the clientId and the serverClientId to the signInWithGoogle method or the SignInWithGoogleButton widget. The serverClientId is the client ID from the server credentials.
iOS
Create the client credentials. Navigate to Credentials under APIs & Services. Click Create Credentials and select OAuth client ID. Configure the OAuth client as Application type iOS.
Fill in all the required information, and create the credentials. Then download the plist file rename it to GoogleService-Info.plist and put it inside your ios project folder. Then drag and drop it into your XCode project to include the file in your build.
Open the GoogleService-Info.plist in your editor and add the SERVER_CLIENT_ID if it does not exist:
<dict>
  ...
  <key>SERVER_CLIENT_ID</key>
  <string>your_server_client_id</string>
</dict>
Replace your_server_client_id with the client id from the JSON file you put inside the config folder in the server.
Add the URL scheme
To allow us to navigate back to the app after the user has signed in we have to add the URL Scheme, the scheme is the reversed client ID of your iOS app. You can find it inside the GoogleService-Info.plist file.
Open the info.plist file in your editor and add the following to register the URL Scheme.
<dict>
  ...
  <key>CFBundleURLTypes</key>
  <array>
    <dict>
      <key>CFBundleTypeRole</key>
      <string>Editor</string>
      <key>CFBundleURLSchemes</key>
      <array>
        <string>your_reversed_client_id</string>
      </array>
    </dict>
  </array>
</dict>
Replace your_reversed_client_id with your reversed client ID.
If you have any social logins in your app you also need to integrate "Sign in with Apple" to publish your app to the app store. (Read more).
Android
Create the client credentials. Navigate to Credentials under APIs & Services. Click Create Credentials and select OAuth client ID. Configure the OAuth client as Application type Android.
Fill in all required information, you can get the debug SHA-1 hash by running ./gradlew signingReport in your Android project directory. Create the credentials and download the JSON file.
Put the file inside the android/app/ directory and rename it to google-services.json.
For a production app you need to get the SHA-1 key from your production keystore! This can be done by running this command: (Read more).
$ keytool -list -v -keystore /path/to/keystore
Web
There is no need to create any client credentials for the web we will simply pass the serverClientId to the sign-in button.
However, we have to modify the server credentials inside the google cloud console.
Navigate to Credentials under APIs & Services and select the server credentials. Under Authorized JavaScript origins and Authorized redirect URIs add the domain for your Flutter app, for development, this is http://localhost:port where the port is the port you are using.
Force flutter to run on a specific port by running.
$ flutter run -d chrome --web-port=49660
Set up the actual redirect URI where the user will navigate after the sign-in. You can choose any path you want but it has to be the same in the credentials, your server, and Flutter configurations.
For example, using the path /googlesignin.
For development inside Authorized redirect URIs add http://localhost:8082/googlesignin, in production use https://example.com/googlesignin.
Serve the redirect page
Register the Google Sign In route inside server.dart.
import 'package:serverpod_auth_server/module.dart' as auth


void run(List<String> args) async {
  ...
  pod.webServer.addRoute(auth.RouteGoogleSignIn(), '/googlesignin');
  ...
}
This page is needed for the web app to receive the authentication code given by Google.
Flutter implementation

Add the SignInWithGoogleButton to your widget.
import 'package:serverpod_auth_google_flutter/serverpod_auth_google_flutter.dart';


SignInWithGoogleButton(
  caller: client.modules.auth,
  serverClientId: _googleServerClientId, // needs to be supplied for the web integration
  redirectUri: Uri.parse('http://localhost:8082/googlesignin'),
)
As an alternative to adding the JSON files in your client projects, you can supply the client and server ID on iOS and Android.
import 'package:serverpod_auth_google_flutter/serverpod_auth_google_flutter.dart';


SignInWithGoogleButton(
  caller: client.modules.auth,
  clientId: _googleClientId, // Client ID of the client (null on web)
  serverClientId: _googleServerClientId, // Client ID from the server (required on web)
  redirectUri: Uri.parse('http://localhost:8082/googlesignin'),
)
Calling Google APIs
The default setup allows access to basic user information, such as email, profile image, and name. You may require additional access scopes, such as accessing a user's calendar, contacts, or files. To do this, you will need to:
- Add the required scopes to the OAuth consent screen.
- Request access to the scopes when signing in. Do this by setting the
additionalScopesparameter of thesignInWithGooglemethod or theSignInWithGoogleButtonwidget.
A full list of available scopes can be found here.
Adding additional scopes may require approval by Google. On the OAuth consent screen, you can see which of your scopes are considered sensitive.
On the server side, you can now access these Google APIs. If a user has signed in with Google, use the GoogleAuth.authClientForUser method from the serverpod_auth_server package to request an AutoRefreshingAuthClient. The AutoRefreshingAuthClient can be used to access Google's APIs on the user's behalf.
For instance, to access the Youtube APIs, add the scope to your SignInWithGoogleButton in your app:
SignInWithGoogleButton(
  ...
  additionalScopes: const ['https://www.googleapis.com/auth/youtube'],
)
On the server, you can utilize the googleapis package to access the Youtube API by first creating a client, then calling the API.
import 'package:serverpod_auth_server/module.dart';
import 'package:googleapis/youtube/v3.dart';


final googleClient = await GoogleAuth.authClientForUser(session, userId);

if (googleClient != null) {
  var youTubeApi = YouTubeApi(googleClient);

  var favorites = await youTubeApi.playlistItems.list(
    ['snippet'],
    playlistId: 'LL', // Liked List
  );

} else {
  // The user hasn't signed in with Google.
}