Build your first app
You will build a simple note-taking app in this tutorial. You will learn the fundamental building blocks of Serverpod that enable you to create powerful and scalable server-side applications with ease.
We are assuming you have all the tools setup and ready to go. If not, please follow the Installing Serverpod guide to get up and running.
We will cover the following topics:
- Creating serializable objects
- Creating a database table
- Creating API endpoints for CRUD operations
- Using the serverpod code generator
- Using the generated client library
- Connecting a Flutter app to the server
Demo of what we will build: (Full code example).
Create a new project
Create a new project using the Serverpod CLI. Run the following command in your terminal:
$ serverpod create notes
To start the server:
cd notes/notes_server
docker compose up --build --detach
dart bin/main.dart
Serialize objects
Serverpod comes with a convenient way to create serializable objects with the help of code generation. These objects can easily be sent back and forth between the server and the client. This is managed by defining our objects in a YAML file which the code generator then parses and generates the necessary code for.
To define the structure of our Note object, we will create a YAML file called note.yaml. Navigate to the lib/src/protocol folder in your Serverpod project (notes_server). Create the file and add the following content:
### Holds a note with a text written by the user.
class: Note
fields:
  ### The contents of the note.
  text: String
Let's take a closer look at the content of the notes.yaml file:
- class: Note Specifies the name of the class to be generated, which in this case is Note.
- fields: This keyword indicates the beginning of the field definitions for the Note class.
- text: String Defines a text field of type String in the Note class, in this minimal example we only have one field but you can add however many fields you need.
Use the code generator to generate the code for the Note class from the definition in notes.yaml. Run the following command from the root of your server project:
$ serverpod generate
After the code generation process is complete, you can access the generated code for the Note class in lib/src/generated/note.dart inside your Serverpod project.
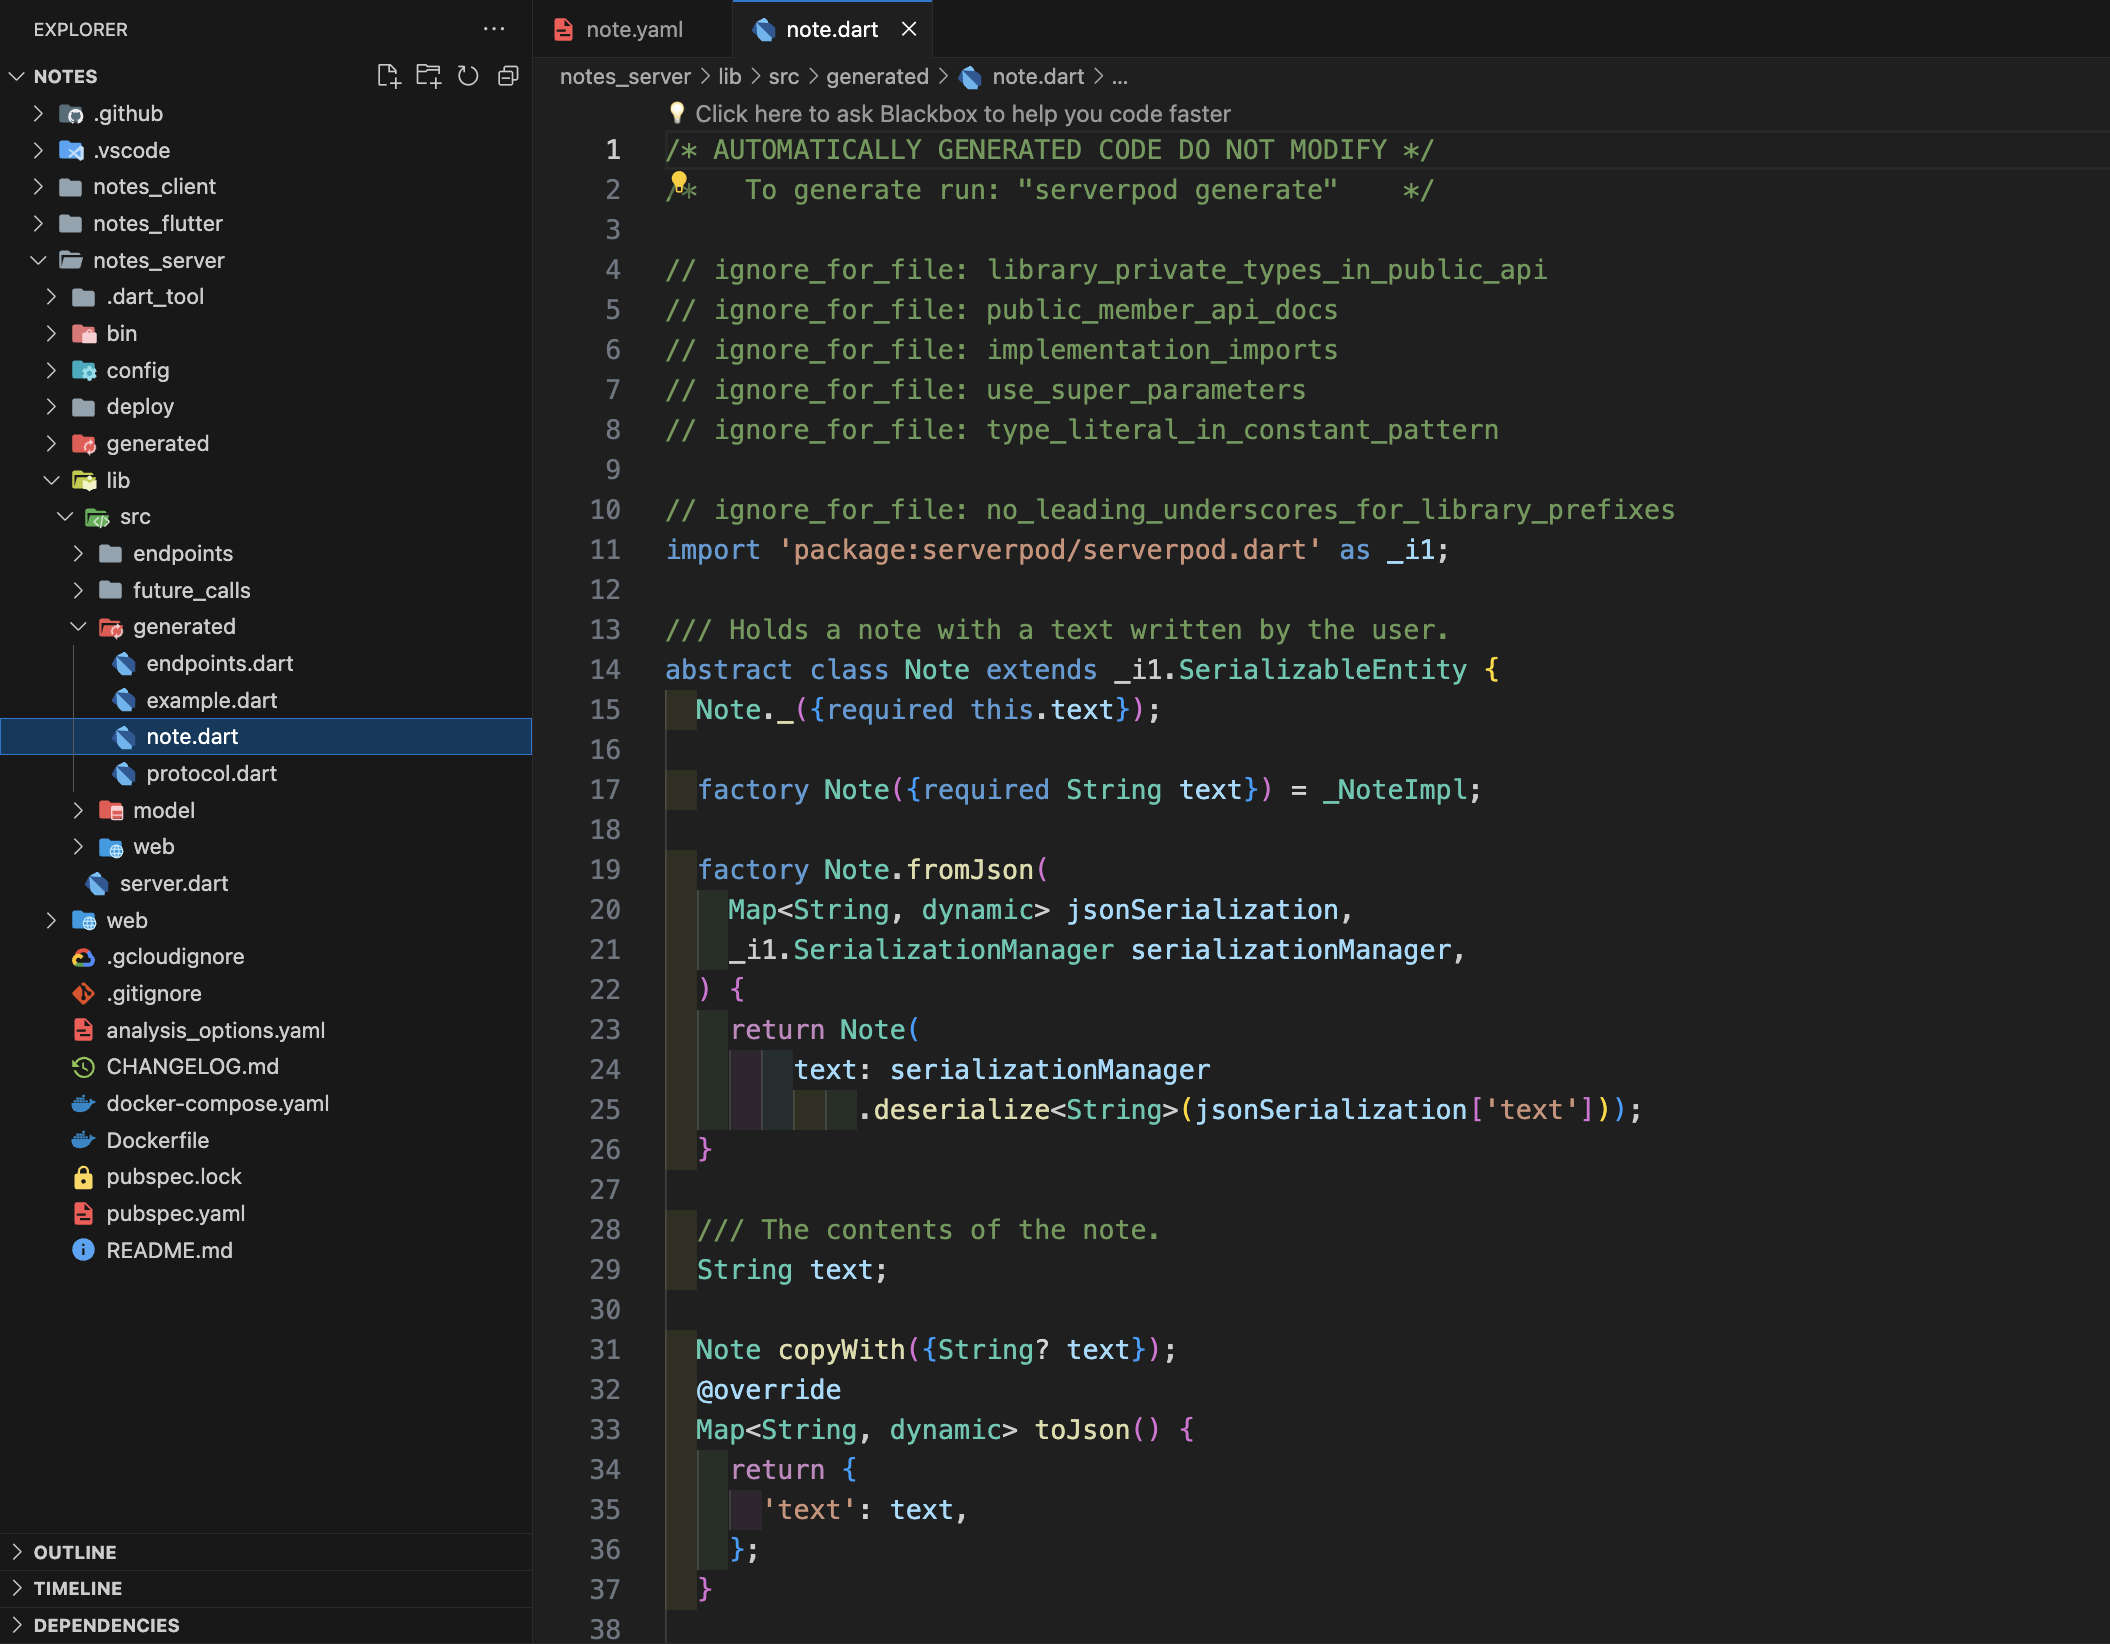
By extending the SerializableEntity class, the Note object becomes capable of automatic serialization and deserialization. This makes the Note object transmittable between the server and the client.
In simpler terms, we have created a class, Note, that can hold information and be passed around within the server. Additionally, we can send this object all the way to the client side of our application. Serverpod takes care of handling the conversion between the object and its serialized representation, making it convenient to work with and transfer data seamlessly.
Create database tables
Serverpod provides built-in support for database integrations. By defining a database table named note in the YAML file using the table keyword, we create database bindings for our Note class.
The updated content of the note.yaml file should look like this:
### Holds a note with a text written by the user.
class: Note
table: note
fields:
  ### The contents of the note.
  text: String
Run the code generator again to generate the necessary code for the database table:
$ serverpod generate
Take a look at the updated lib/src/generated/note.dart file. You will notice that the code generator has added new methods for interacting with the database.
Access the generated SQL code
The code generator also generate the necessary SQL code for creating the database table. The SQL code can be found in the notes_server/generated/tables.pgsql file.
Here is the SQL code generated for the Note table:
--
-- Class Note as table note
--

CREATE TABLE "note" (
  "id" serial,
  "text" text NOT NULL
);

ALTER TABLE ONLY "note"
  ADD CONSTRAINT note_pkey PRIMARY KEY (id);
Apply database changes
To apply the changes to the database, you need to execute the SQL code generated in the notes_server/generated/tables.pgsql file. You can use a database administration tool or the command line to run the SQL code.
- MacOS & Linux
- Windows
docker compose run -T --rm postgres env PGPASSWORD="<DATABASE_PASSWORD>" psql -h postgres -U postgres -d notes < generated/tables.pgsql
type .\generated\tables.pgsql | docker compose run -T postgres env PGPASSWORD="<DATABASE_PASSWORD>" psql -h postgres -U postgres -d notes
You need to replace <DATABASE_PASSWORD> with the password for the database, you can find it inside the notes_server/config/passwords.yaml file.
If you didn't name your project notes you need to replace -d notes with the name of your project.
Once the SQL code is executed successfully, the database table for storing the note data will be created.
Any time you update the table definitions you have to run the sql code on your database to update the database schema.
Create API endpoints
In Serverpod, endpoints are defined in the endpoints folder within your server project. The code generator analyzes the code within these endpoints and generates a client library based on the defined functions. This client library is then used by your Flutter app to interact with your backend server.
Create a new file called notes_endpoint.dart inside lib/src/endpoints folder.
import 'package:serverpod/server.dart';

import '../generated/protocol.dart';

class NotesEndpoint extends Endpoint {
  // Endpoint implementation goes here
}
In the above code, we import the necessary dependencies and import the generated Note class from the protocol.dart file. We also define the NotesEndpoint class, which extends the Endpoint class provided by Serverpod. This is required for the endpoint to be recognized by Serverpod's code generator.
Define endpoints
To define a method that can be called from the client, we need to create a method inside the NotesEndpoint class. This method must return a Future of a serializable object, primitive datatype, or void.
The first method parameter must be a Session object. This is a special object in Serverpod that contains information about the current session, as well as other helpful methods.
Future<void> example(Session session) async {
  // Endpoint implementation goes here
}
The method is also allowed to have any number of extra parameters. These parameters will be passed from the client when the endpoint is called. The parameters follow the same type restrictions as the return type.
Store notes in the database
To store notes in the database we define a createNote method in the NotesEndpoint class. The method takes a Note object and stores it in the database. To make the method accessible from the app, make sure that its first parameter is a Session object.
Future<void> createNote(Session session, Note note) async {
  await Note.insert(session, note);
}
In the above code, we use the Note.insert method, created by serverpod generate, to insert the specified Note object into the database.
Delete notes from the database
To delete notes in the database we define a deleteNote method in the NotesEndpoint class. The method takes a Note object representing the note that should be deleted.
Future<void> deleteNote(Session session, Note note) async {
  await Note.deleteRow(session, note);
}
In the above code, we use the Note.deleteRow method to delete the specified Note object from the database.
Fetch notes from the database
To retrieve all notes from the database we define the getAllNotes method. The method retrieves all the notes from the database and returns them as a list of Note objects.
Future<List<Note>> getAllNotes(Session session) async {
  // By ordering by the id column, we always get the notes in the same order
  // and not in the order they were updated.
  return await Note.find(
    session,
    orderBy: Note.t.id,
  );
}
In the code above, we use the Note.find method to retrieve all the notes from the database. By specifying orderBy: Note.t.id, we ensure that the notes are always returned in the same order based on the id column.
Putting it all together you end up with a file that looks like this:
import 'package:serverpod/server.dart';

import '../generated/protocol.dart';

class NotesEndpoint extends Endpoint {
  Future<List<Note>> getAllNotes(Session session) async {
    // By ordering by the id column, we always get the notes in the same order
    // and not in the order they were updated.
    return await Note.find(
      session,
      orderBy: Note.t.id,
    );
  }

  Future<void> createNote(Session session, Note note) async {
    await Note.insert(session, note);
  }

  Future<void> deleteNote(Session session, Note note) async {
    await Note.deleteRow(session, note);
  }
}
Generate the client library
Congratulations! You have now created all the endpoints needed for the note app. Complete with a database integration that persistently stores the notes.
Now run the code generator again to generate the client library for our endpoints. This needs to be run from the server directory notes_server.
$ serverpod generate
You can find all the newly generated code in the client directory notes_client. You normally don't need to touch this package, but it's good to know where it is located.
Build the Flutter app
Open the main.dart file in your Flutter project.
Locate the MyHomePageState class.
Update the MyHomePageState class by removing all unnecessary code, so that it looks like this:
class MyHomePageState extends State<MyHomePage> {
Widget build(BuildContext context) {
return Scaffold(
appBar: AppBar(
title: Text(widget.title),
),
);
}
}
You can also remove the entire _ResultDisplay class from the file.
Fetch the notes from the server
To fetch all the notes from the server and handle potential connection failures, we first need to declare variables to hold the state inside the MyHomePageState class.
import 'package:notes_client/notes_client.dart';
...

class MyHomePageState extends State<MyHomePage> {

  List<Note>? _notes;
  Exception? _connectionException;

  ...
}
Let's create a method to handle the connection failures. Call it _connectionFailed, it updates the state to set _notes to null and stores the thrown exception in _connectionException.
void _connectionFailed(dynamic exception) {
  setState(() {
    _notes = null;
    _connectionException = exception;
  });
}
Next, let's add a method for fetching notes from the server endpoint we created earlier. The method updates the state with the notes we received. If the call fails, we catch an exception and call the _connectionFailed method.
Future<void> _loadNotes() async {
  try {
    final notes = await client.notes.getAllNotes();
    setState(() {
      _notes = notes;
    });
  } catch (e) {
    _connectionFailed(e);
  }
}
Finally, we want to call the _loadNotes method when the app is started. We do this by overriding the initState method and calling _loadNotes from there.
void initState() {
super.initState();
_loadNotes();
}
Render the notes
To render the fetched notes in the app's main screen, we will update the build method inside the MyHomePageState class. Here is the modified code:
Widget build(BuildContext context) {
return Scaffold(
appBar: AppBar(
title: Text(widget.title),
),
body: _notes == null
? Container()
: ListView.builder(
itemCount: _notes!.length,
itemBuilder: ((context, index) {
return ListTile(
title: Text(_notes![index].text),
);
}),
),
);
}
The _notes variable is checked to determine if notes have been fetched from the server. If _notes is null, an empty Container widget is displayed as a placeholder.
If _notes is not null, a ListView.builder widget is used to render the notes. The itemCount property is set to the length of the _notes list, and the itemBuilder callback is responsible for building the individual ListTile widgets.
Inside the itemBuilder callback, each note's text is displayed in a ListTile using the Text widget.
Create new notes
To create new notes we need to access the createNote method of our notes endpoint. To do this we create a helper method called _createNote that takes a Note object as a parameter.
Future<void> _createNote(Note note) async {
  try {
    await client.notes.createNote(note);
    await _loadNotes();
  } catch (e) {
    _connectionFailed(e);
  }
}
The _createNote method calls the createNote method to store the note in the database on the server. Then _loadNotes is called to refresh our list of notes.
The user needs graphical interface to create notes, so let's create a dialog for this. Create a new file called note_dialog.dart in the src/lib directory of your Flutter app. Add the following code:
Code: note_dialog.dart
import 'package:flutter/material.dart';
void showNoteDialog({
required BuildContext context,
String text = '',
required ValueChanged<String> onSaved,
}) {
showDialog(
context: context,
builder: (context) => NoteDialog(
text: text,
onSaved: onSaved,
),
);
}
class NoteDialog extends StatefulWidget {
const NoteDialog({
required this.text,
required this.onSaved,
super.key,
});
final String text;
final ValueChanged<String> onSaved;
NoteDialogState createState() => NoteDialogState();
}
class NoteDialogState extends State<NoteDialog> {
final TextEditingController controller = TextEditingController();
void initState() {
super.initState();
controller.text = widget.text;
}
Widget build(BuildContext context) {
return Dialog(
child: Padding(
padding: const EdgeInsets.all(16.0),
child: Column(
children: [
Expanded(
child: TextField(
controller: controller,
expands: true,
maxLines: null,
minLines: null,
decoration: const InputDecoration(
border: InputBorder.none,
hintText: 'Write your note here...',
),
),
),
const SizedBox(height: 16),
ElevatedButton(
onPressed: () {
widget.onSaved(controller.text);
Navigator.of(context).pop();
},
child: const Text('Save'),
),
],
),
),
);
}
}
The dialog is needed but we will skip going into details on how it works as this is just normal Flutter code. The gist is that we have a function that triggers an input dialog and a callback for when the user saves the input.
We need a button to trigger this dialog and the floating action button is great for this. Add the following code to the build method inside the MyHomePageState class:
Widget build(BuildContext context) {
return Scaffold(
...
floatingActionButton: _notes == null
? null
: FloatingActionButton(
onPressed: () {
showNoteDialog(
context: context,
onSaved: (text) {
var note = Note(
text: text,
);
_notes!.add(note);
_createNote(note);
},
);
},
child: const Icon(Icons.add),
),
);
}
We trigger the note dialog when the action button is pressed and then save the note in the onSaved callback. To make the UI feel more responsive we add the changes to the notes list before calling _createNote. This way the note will be added to the list immediately and then updated when the server responds.
Finally, add the loading screen to the project, create a new file called loading_screen.dart and add the code.
Code: loading_screen.dart
import 'package:flutter/material.dart';
class LoadingScreen extends StatelessWidget {
const LoadingScreen({
this.exception,
required this.onTryAgain,
super.key,
});
final Exception? exception;
final VoidCallback onTryAgain;
Widget build(BuildContext context) {
if (exception != null) {
return Center(
child: ElevatedButton(
onPressed: onTryAgain,
child: const Text('Try again'),
),
);
} else {
return const Center(
child: CircularProgressIndicator(),
);
}
}
}
Replace the empty container with the loading screen in the build method.
Code: main.dart
import 'package:notes_client/notes_client.dart';
import 'package:flutter/material.dart';
import 'package:serverpod_flutter/serverpod_flutter.dart';
import 'note_dialog.dart';
// Sets up a singleton client object that can be used to talk to the server from
// anywhere in our app. The client is generated from your server code.
// The client is set up to connect to a Serverpod running on a local server on
// the default port. You will need to modify this to connect to staging or
// production servers.
var client = Client('http://localhost:8080/')
..connectivityMonitor = FlutterConnectivityMonitor();
void main() {
runApp(const MyApp());
}
class MyApp extends StatelessWidget {
const MyApp({Key? key}) : super(key: key);
Widget build(BuildContext context) {
return MaterialApp(
title: 'Notes',
theme: ThemeData(
primarySwatch: Colors.blue,
),
home: const MyHomePage(title: 'Notes'),
);
}
}
class MyHomePage extends StatefulWidget {
const MyHomePage({Key? key, required this.title}) : super(key: key);
final String title;
MyHomePageState createState() => MyHomePageState();
}
class MyHomePageState extends State<MyHomePage> {
// This field holds the list of notes that we've received from the server or
// null if no notes have been received yet.
List<Note>? _notes;
// If the connection to the server fails, this field will hold the exception
// that was thrown.
Exception? _connectionException;
void initState() {
super.initState();
_loadNotes();
}
Future<void> _loadNotes() async {
try {
final notes = await client.notes.getAllNotes();
setState(() {
_notes = notes;
});
} catch (e) {
_connectionFailed(e);
}
}
Future<void> _createNote(Note note) async {
try {
await client.notes.createNote(note);
await _loadNotes();
} catch (e) {
_connectionFailed(e);
}
}
void _connectionFailed(dynamic exception) {
// If the connection to the server fails, we clear the list of notes and
// store the exception that was thrown. This will make the loading screen
// appear and show a button to try again.
// In a real app you would probably want to do more complete error handling.
setState(() {
_notes = null;
_connectionException = exception;
});
}
Widget build(BuildContext context) {
return Scaffold(
appBar: AppBar(
title: Text(widget.title),
),
body: _notes == null
? LoadingScreen(
exception: _connectionException,
onTryAgain: _loadNotes,
)
: ListView.builder(
itemCount: _notes!.length,
itemBuilder: ((context, index) {
return ListTile(
title: Text(_notes![index].text),
);
}),
),
floatingActionButton: _notes == null
? null
: FloatingActionButton(
onPressed: () {
// When we tap the floating action button we want to show a
// dialog where we can create a new note.
showNoteDialog(
context: context,
onSaved: (text) {
var note = Note(
text: text,
);
// Add the note to the list of notes before we've received
// a response from the server which makes the UI feel more
// responsive.
_notes!.add(note);
// Actually create the note on the server.
_createNote(note);
},
);
},
child: const Icon(Icons.add),
),
);
}
}
Run the app
Start the database and server: Make sure you reboot the server if you started it earlier.
cd notes_server
docker compose up --build --detach
dart bin/main.dart
Start the Flutter app in Chrome (or the platform of your choice):
cd notes_flutter
flutter run -d chrome
Delete notes
Implementing the delete functionality is very similar to the create functionality. We will add a delete button to each note and then call the delete endpoint when the button is pressed. First, let's add a helper method to call the endpoint:
Future<void> _deleteNote(Note note) async {
  try {
    await client.notes.deleteNote(note);
    await _loadNotes();
  } catch (e) {
    _connectionFailed(e);
  }
}
The _deleteNote method calls the deleteNote endpoint to delete the note from the database on the server. Then _loadNotes is called to refresh the notes list.
Next in our ListTile we add a delete button and call the _deleteNote method when the button is pressed. Just as before we update the local state first to make the UI feel more responsive.
ListTile(
  ...
  trailing: IconButton(
    icon: const Icon(Icons.delete),
    onPressed: () {
      var note = _notes![index];

      setState(() {
        _notes!.remove(note);
      });

      _deleteNote(note);
    },
  ),
),
We can now delete all the notes we have created.
Edit notes
We leave this part as an exercise for the reader. Try to see if you can implement the edit functionality. You can use the showNoteDialog method we created earlier to show the dialog for editing the note. If you followed along so far you have all the tools you need to implement this feature!
Give it a go, in case you need some help you can look at the (full code example).
Summary
In this tutorial, you learned how to build a simple note-taking app using the Serverpod backend framework. You started by setting up the necessary tools and environment to work with Serverpod. Then, you covered various aspects of building an app, including creating serializable objects, creating database tables, and creating API endpoints for performing CRUD operations.
You also learned how to use Serverpod's code generator and how to use the generated client library to connect the Flutter app to the server. By establishing this connection, you were able to fetch data from the server and display it in the app.
Throughout the tutorial, you gained an understanding of how Serverpod simplifies the development process by automatically handling the serialization and deserialization of objects, managing database tables, and seamlessly integrating with Flutter. You have acquired the foundational knowledge to build powerful and scalable server-side applications using Serverpod.
Congratulations on completing this tutorial. You are now equipped with the skills to build your own server-side applications using Serverpod. Happy coding!
Want to learn more? Check out some of our other tutorials, or the tutorials created by our community.