Google Cloud Engine with Terraform
Serverpod makes deploying your server to Cloud Engine easy using Github, Terraform, and Docker containers. Terraform will set up and manage your infrastructure while you use Github to build your Docker container and manage versions and deployments. Creating your project using serverpod create will automatically generate your deployment scripts. The default setup creates a minimal configuration, but you can easily modify the configuration to suit your needs.
Using Serverpod's GCP deployment may incur costs to your GCP account. Serverpod's scripts are provided as-is, and we take no responsibility for any unexpected charges for using them.
Prerequisites
To use the deployment scripts, you will need the following:
- A paid Google Cloud Platform account.
- Terraform Install Terraform
- Your Serverpod project version controlled on Github.
- A registered custom domain name (e.g., examplepod.com), or register one through Cloud Domains in the GCP console.
If you haven't used Terraform before, it's a great idea to go through their tutorial for GCP, as it will give you a basic understanding of how everything fits together. Get started with Terraform and GCP
The top directory created by Serverpod must be the root directory of your Git repository. Otherwise, the deployment scripts won't work correctly.
Registering your domain through Cloud Domains in the GCP console allows you to create a hosted zone simultaneously. It also makes it easier to verify your domain, and you can skip a few of the steps below. If you use Cloud Domains, register the domain after the step where you create your service account.
What will be deployed?
The deployment scripts will set up everything you need to run your Serverpod, including an autoscaling cluster of servers, a load balancer, a Postgres database, Redis (optional), Cloud Storage buckets for file uploads, Artifact Registry for your Docker container, a private network, DNS records, and SSL certificates. Some of the components are optional, and you will need to opt in. You can also create a second server cluster for a staging environment. Staging servers allow you to test your code before you deploy it to the production servers.
You deploy your configuration with a domain name; the scripts will set up subdomains that provide access to different functions of your deployment:
- api.examplepod.com: This is the entry point for your Serverpod's API server.
- app.examplepod.com: The Serverpod web server. If you prefer to host it on your top domain and use www as a redirect, you can change this in the main Terraform configuration file.
- insights.examplepod.com: Provides an access point to Serverpod Insights, Serverpod's companion app.
- database.examplepod.com: This is how you access your database from outside the server.
- storage.examplepod.com: Access to public storage used by Serverpod.
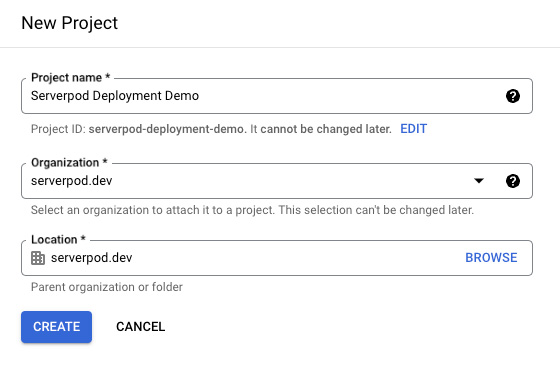
Create a new GCP project with a service account
Your deployment will live in a new GCP project that you create. Sign in to your Google Cloud Console, click the project selector and then the New Project button. Enter the name of your new project and take note of the Project ID; you will need it when setting up your deployment scripts.
Create service account
Next, you must create a service account allowing Terraform to access your account and set up the infrastructure for your Serverpod.
Select your newly created project if it isn't already selected. Then, navigate to IAM & Admin > Service Accounts. Click on the Create Service Account button.
Enter a name for your service account and take note of the email address associated with it. Click Create and Continue.
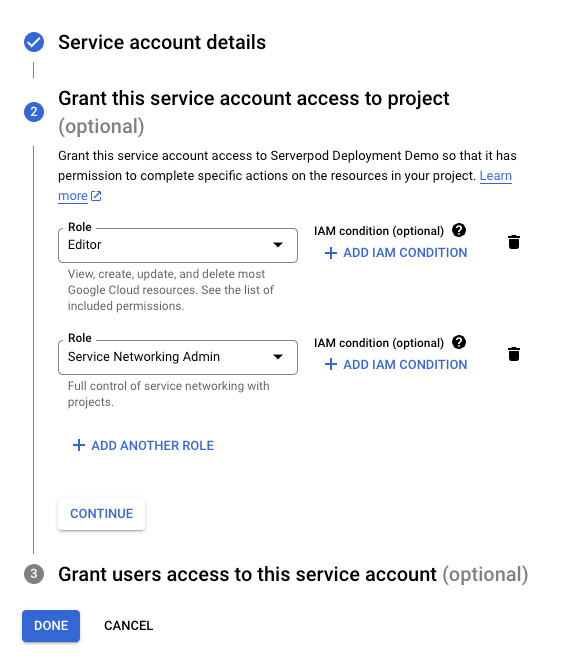
Next, you will need to add two roles to your service account. Basic > Editor and Service Networking > Service Networking Admin. These permissions will give Terraform the access it needs to create your infrastructure. When you've added the permissions, click Continue.
Finally, click Done to finalize the service account creation.
Download service account keys
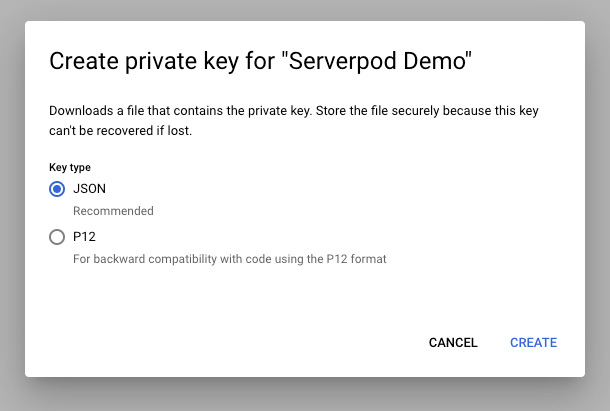
To be able to use your service account with Terraform, you will need to create a set of keys. Click on your newly created service account, then select the Keys tab. Click Add Key > Create a New Key. Select JSON as the key type and click Create.
The key is now downloaded to your computer. Rename the key to credentials.json and place it in your Serverpod's server directory under deploy/gcp/terraform_gce. E.g., the whole path would be something like myproject_server/deploy/gcp/terraform_gce/credentials.json.
Enabling APIs
To deploy your serverpod, you must enable a set of APIs on Google Cloud. You can find which APIs are enabled or enable new ones by going to APIs & Services > Enabled APIs & Services. These are the APIs that you should enable:
- Artifact Registry API (artifactregistry.googleapis.com)
- Certificate Manager API (certificatemanager.googleapis.com)
- Cloud DNS API (dns.googleapis.com)
- Cloud Resource Manager API (cloudresourcemanager.googleapis.com)
- Cloud SQL Admin API (sqladmin.googleapis.com)
- Compute Engine API (compute.googleapis.com)
- Service Networking API (servicenetworking.googleapis.com)
Set up your domain name
The Terraform script automatically handles your subdomains, but you must manually set up your domain zone in Google Cloud Console. This setup is also helpful if you want to add other things to your domain, such as email, or associate your domain with a website not hosted by Serverpod.
Register your domain
If you already have a domain that you want to use, you should skip this step and continue at: Create a DNS zone
Start by activating the required APIs for managing your domain. First, navigate to Network services > Cloud DNS and activate the service. Then navigate to Network services > Cloud Domains and activate it.
Once Cloud Domains is active, click the Register Domain button. Search for the domain name you want to use and add it to your cart.
In the DNS configuration, let Google's DNS servers manage the domain and connect it to a new DNS zone. Follow the steps to verify your email with Google Domains if needed.
Your domain will automatically be verified with Google, but you must add your service account email as verified by Google's Webmaster Central. This step is required to be able to create SSL certificates for your domain.
Go to the Google Webmaster Central: https://www.google.com/webmasters/verification
Select your newly registered domain. Then, click Add an owner. Enter the email from the service account that you created earlier.
Now, skip ahead to Deploy your Serverpod code
Create a DNS zone
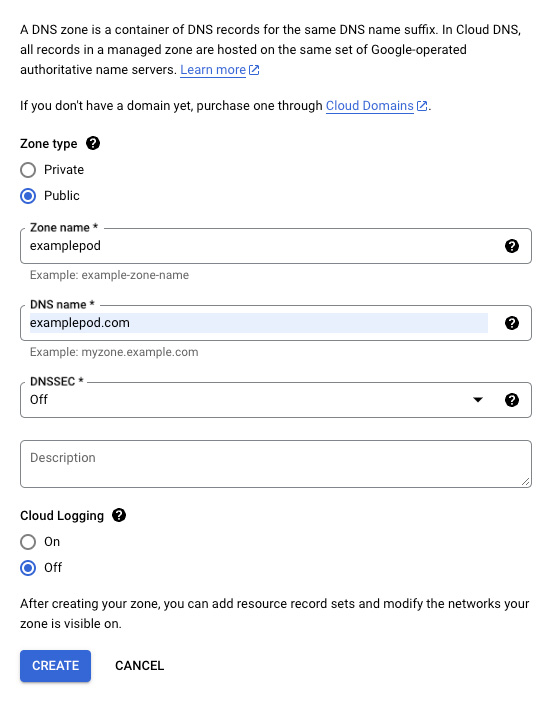
Go to Network Services > Cloud DNS, then click Create Zone. Create a public zone for your domain name. Take note of the name you assign to the domain name zone, you will need it when you configure the Terraform scripts.
To make the domain accessible, you must configure your registrar so that it points your domain to Google's domain name servers. Click the NS entry to reveal the domain name servers to which you should point your domain.
Now, head over to your domain name registrar and point the domain to Google's domain name servers. The domain name servers can take a while to update (worst case, up to a day, but it is usually much faster).
Depending on your domain name registrar, the process for setting up your domain name servers may look slightly different. Also, note that the Google servers may have different names than those shown in the screenshot.
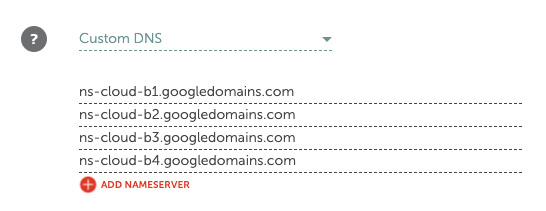
You can test that the domain points to the correct name servers by running dig on the command line. It will output the domain name servers.
$ dig +short NS examplepod.com
Should yield an output similar to this:
ns-cloud-b4.googledomains.com.
ns-cloud-b1.googledomains.com.
ns-cloud-b2.googledomains.com.
ns-cloud-b3.googledomains.com.
Verify your domain
Once your domain name zone is set up and has bubbled through the system, you must verify the domain with Google's Webmaster Central. This step is required to be able to create SSL certificates for your domain.
Go to the Google Webmaster Central: https://www.google.com/webmasters/verification
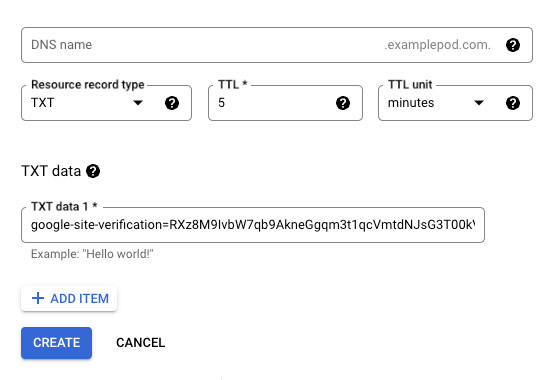
Click on Add a Property, enter your domain name and press Continue. Now click the Alternate methods tab and select Domain name provider. In the list that pops up, select Google Domains. A dialog showing the steps required to verify your domain will pop up. From the dialog, copy the highlighted TXT record.
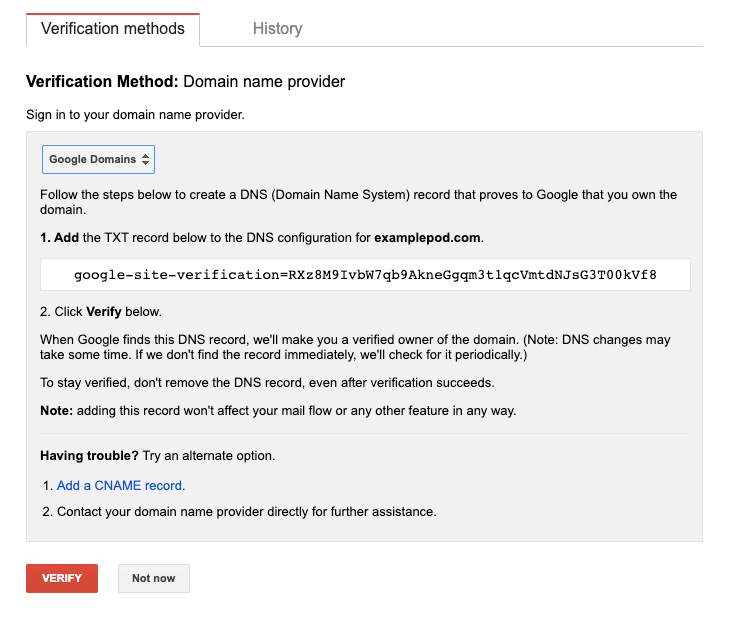
Now, open your Google Cloud Console and navigate to Network Services > Cloud DNS. Select the DNS zone you created earlier, then click Add Standard to create a new record set. Set the Resource record type to TXT, then paste the code from the Webmaster Central in the TXT data field and create the record set. In the Webmaster Central, you can now finish the verification by clicking Verify.
Finally, click on Add additional owners and add the email from the service account you created earlier. Doing this will allow Terraform to make any required changes to your SSL certificates.
Deploy your Serverpod code
Before creating our infrastructure, we must compile a Docker container with our Serverpod and deploy it to Google Cloud's Artifact Registry. The Docker container is compiled on Github and then pushed to the Artifact Registry using a Github action.
Create Artifact Registry repositories
Open up the Google Cloud Console and navigate to Artifact Registry > Repositories. Enable the API if needed. Click Create Repository. Set the Name to serverpod-production-container, Format to Docker, and Mode to Standard. Select a Region for your container.
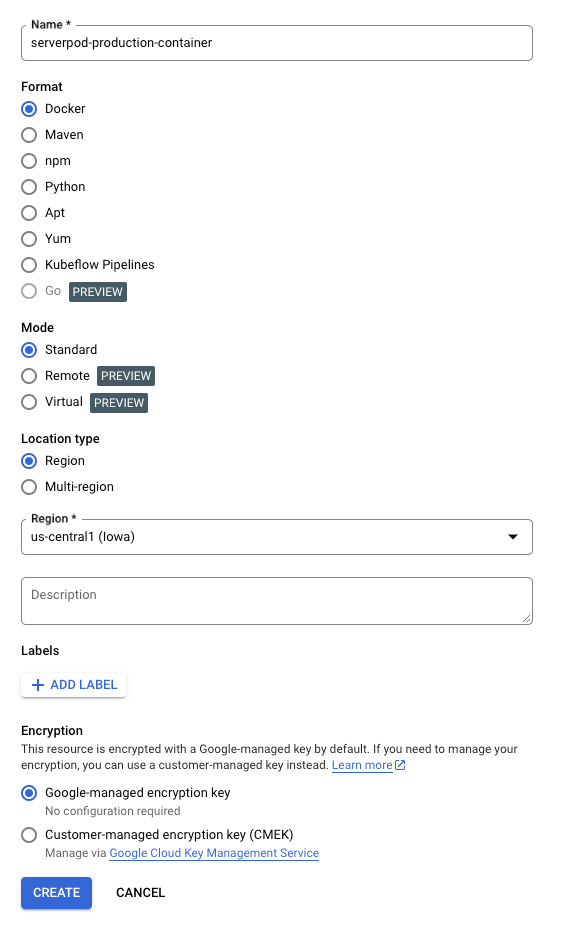
The region you pick for your Artifact Registry repository must match the region you later choose for your project. The default is us-central1.
Repeat the process and create a second container named serverpod-staging-container.
Configure Github
Now that we have our Artifact Registry repositories, we can push code to it. Head to your Github repository for your project. Navigate to Settings > Secrets and variables > Actions.
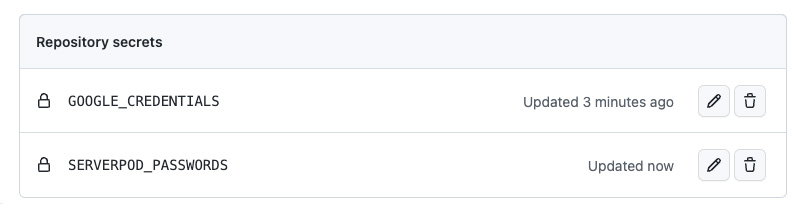
Click New repository secret. For the Name enter GOOGLE_CREDENTIALS. For the Secret, copy the contents of the gcp/terraform/credentials.json file and paste its contents into the text field.
Click New repository secret again and enter SERVERPOD_PASSWORDS for the Name. Copy the contents of the config/passwords.yaml file and paste it into the Secret text field.
When you are done, Repository secrets should look like this:
Finally, we must configure the Github action that compiles our Docker container. It's located in .github/workflows/deployment-gcp.yml. Open it in your favorite editor and update the values under PROJECT, REGION, and ZONE with your Project ID and the zone and region where you plan to deploy your server.
Push your changes to Github, and you are ready to deploy your Docker container.
Deploy your Docker container
Open your project on Github and navigate to Actions. On the right-hand side, click on the Deploy to GCP item. The action will open up, and you can run it. Click on Run workflow, select the branch where you have pushed your code, set the Target to production, and run the workflow.
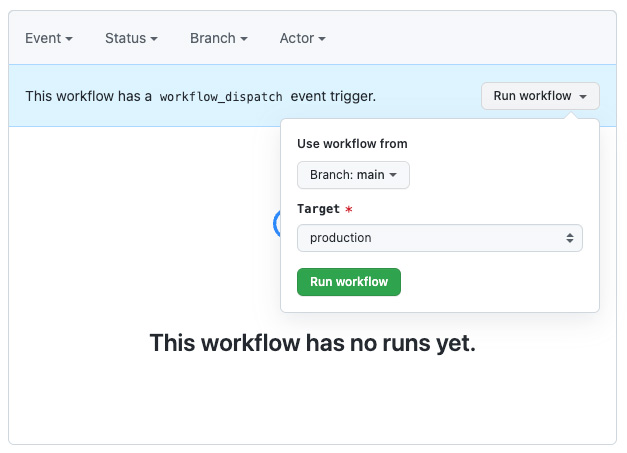
It will take a few moments for the workflow to show up and another minute or two to complete. When completed, it should have a green tick mark next to it.
In the future, just run the Github action whenever you want to release a new version of your server. You can also trigger the action by pushing code to the deployment-gcp-production or deployment-gcp-staging branches.
Create your infrastructure
You now have everything you need to start creating your infrastructure. Start by configuring your Terraform scripts, then apply the configuration.
Configure Terraform
You can find the configuration file for your Terraform project in your server's deploy/gcp/terraform_gce/config.auto.tfvars file. It is pretty self-explanatory; you only need to enter your Project ID and the Service account email, the name of your DNS zone, and the domain name you are deploying to. You got the details when completing the steps above, or you can find them in the Google Cloud Console.
If you want to do more detailed configurations, you can do so in the main.tf file. The main.tf file refers to the google_cloud_serverpod_gce module, which handles most of the infrastructure. It contains some comments that explain how to use it, but you can also find the complete documentation here.
Configure Serverpod
Serverpod uses different configuration files depending on whether you run your server locally, in staging, or in production. You find the configuration files in the server's config directory. You will need to edit the config/production.yaml file to match your setup. Typically, the only thing you need to change is the name of your domain.
If you are deploying a staging server in addition to your production server, you must edit the config/staging.yaml file too.
Deploy your infrastructure
Once you have configured Terraform and your Serverpod, you are ready to deploy your infrastructure. Make sure that you have cd into your deploy/gcp/terraform_gce directory. Now run:
$ terraform init
This will download the Serverpod module and initialize your Terraform configuration. Now, deploy your infrastructure by running:
$ terraform apply
Terraform will ask you for the password to your production and staging database. You will find the passwords in your config/passwords.yaml file. If you are not deploying a staging server, you can leave the staging database password blank.
Answer yes when Terraform asks you if you are ready to perform the changes. Deploying the complete infrastructure will take around 15 minutes, making this an excellent coffee break time.
Create database tables
As a final step in your GCP deployment, you must create your database tables. Terraform has created a database with a public IP number that you can access from database.<your-domain>.com. However, access is limited to connections from specific IP addresses for security reasons.
Open the Google Cloud Console, navigate to SQL, and click on the serverpod-production-database instance. Click Connections > Networking. Under Public IP click Add Network. Enter the name of the place you are connecting from, e.g. Office or Home, then enter your public IP number in the Network field.
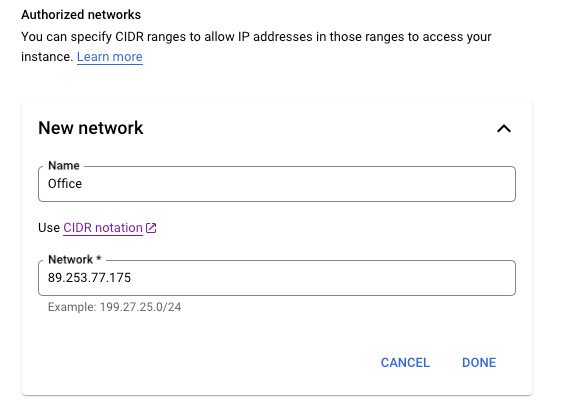
If you are unsure what your public IP number is, Google what is my IP, and Google will tell you.
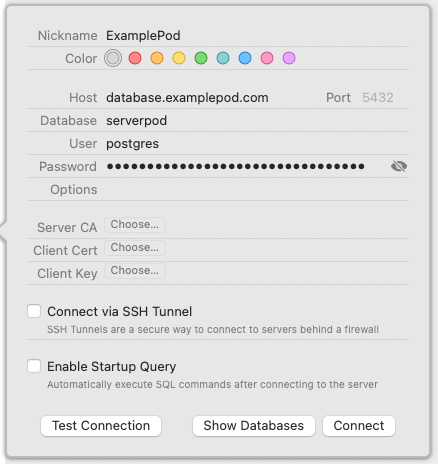
Now, you can connect to your database. Use your favorite database managing tool (we use Postico). To connect, use the password from the config/passwords.yaml file and the public database address (database.<your-domain>.com). For database enter serverpod and user should be set to postgres.
Once connected, run the database definition query in the latest migration directory migrations/<LATEST_MIGRATION>/definition.sql. When you have added the tables for the database, Serverpod should be able to start. However, it could take an hour before the correct SSL certificates are created and validated.
Deploying new versions
Once your infrastructure is set up, deploying new versions of your server code is easy. Push your updated code to Github and run the deployment action. Doing this will compile your code and upload it to the repository in Artifact Registry.
Once your code is uploaded to the Artifact Registry you can restart the servers in your auto scaling group by opening the Google Cloud console and navigating to Compute Engine > Instance Groups. Click on the serverpod-production-group, then Restart/Replace VMs.
You can also set up your deployment script on Github to automatically restart the servers when new code is deployed. To do this, uncomment the last section of the script in .github/workflows/deployment-gcp.yml, push the change to Github, and run the action.
Troubleshooting
Deploying your infrastructure is somewhat involved, and you can get stuck along the way. These are a few tips on debugging your issues:
Access the instance logs
You can find the logs from your running instances by navigating to Compute Engine > VM instances. Click on one of the instances, then click on Logging. It will list the output from starting the instance and logs outputted by the Docker container.
Log into the instance
You can log into your running instances by clicking the small SSH button next to the instance row. For this to work, make sure you have set enable_ssh to true in your Terraform module (this is the default).
Once logged in, you can check that your Docker container is up by running docker ps.
Some things take time
Some tasks described above can take time to bubble through the system. This is particularly true for working with DNS names and certificates. Sometimes they can take hours or up to a day to update.
If you get stuck
You can always find help in our support forum on Github.