Deploying to AWS
Serverpod makes it easy to deploy your server to AWS using Github and Terraform. Terraform will set up and manage your infrastructure while you use Github actions to manage versions and deployments. Creating your project using serverpod create Serverpod will automatically generate your deployment scripts. The default setup uses a minimal configuration that will fit within the AWS free tier, but you can easily modify the configuration to suit your needs.
Using Serverpod’s AWS deployment may incur costs to your AWS account. Serverpod’s scripts are provided as-is, and we take no responsibility for any unexpected charges for using them.
Prerequisites
To use the deployment scripts, you will need the following:
- An AWS account. It may take up to 24 hours to get your AWS account up and running.
- AWS CLI, configured with your credentials. Install AWS CLI
- Terraform. Install Terraform
- Your Serverpod project version controlled on Github.
If you haven’t used Terraform before, it’s a great idea to go through their tutorial for AWS, as it will give you a basic understanding of how everything fits together. Get started with Terraform and AWS
The top directory created by Serverpod must be the root directory of your Git repository. Otherwise, the deployment scripts won’t work correctly.
What will be deployed?
The deployment scripts will set up everything you need to run your Serverpod, including an autoscaling cluster of servers, load balancers, a Postgres database, Redis, S3 buckets for file uploads, CloudFront, CodeDeploy, DNS records, and SSL certificates. Some of the components are optional, and you will need to opt in. You can also create a second server cluster for a staging environment. The staging servers allow you to test code before you deploy it to the production servers.
You deploy your configuration with a domain name; the scripts will set up subdomains that provide access to different functions of your deployment:
- api.examplepod.com: This is the entry point for your main Serverpod server.
- app.examplepod.com: The Serverpod web server. If you prefer to host it on your top domain, and use www as a redirect, you can change this in the main Terraform configuration file.
- insights.examplepod.com: Provides access to the Serverpod UI and gets insights from your server while it is running.
- database.examplepod.com: This is how you access your database from outside the server.
- storage.examplepod.com: Access to public storage used by Serverpod. (This is optional.)
Set up your domain name and certificates
Before deploying your server, you must configure your server’s top domain in AWS. You can register your domain through any registrar, but you need to set up a public hosted zone in Route 53 in AWS.
- Sign in to the AWS console and navigate to Route 53 > Hosted zones.
- Click Create hosted zone.
- Enter your domain name and click Create hosted zone.
- Expand the Hosted zone details and take note of your Hosted zone ID (you will need it in your Terraform configuration later).
- The console will display a number of DNS names for Amazon’s name servers. You will need to have your domain registrar point to these name servers. Depending on your registrar, this process will be slightly different.
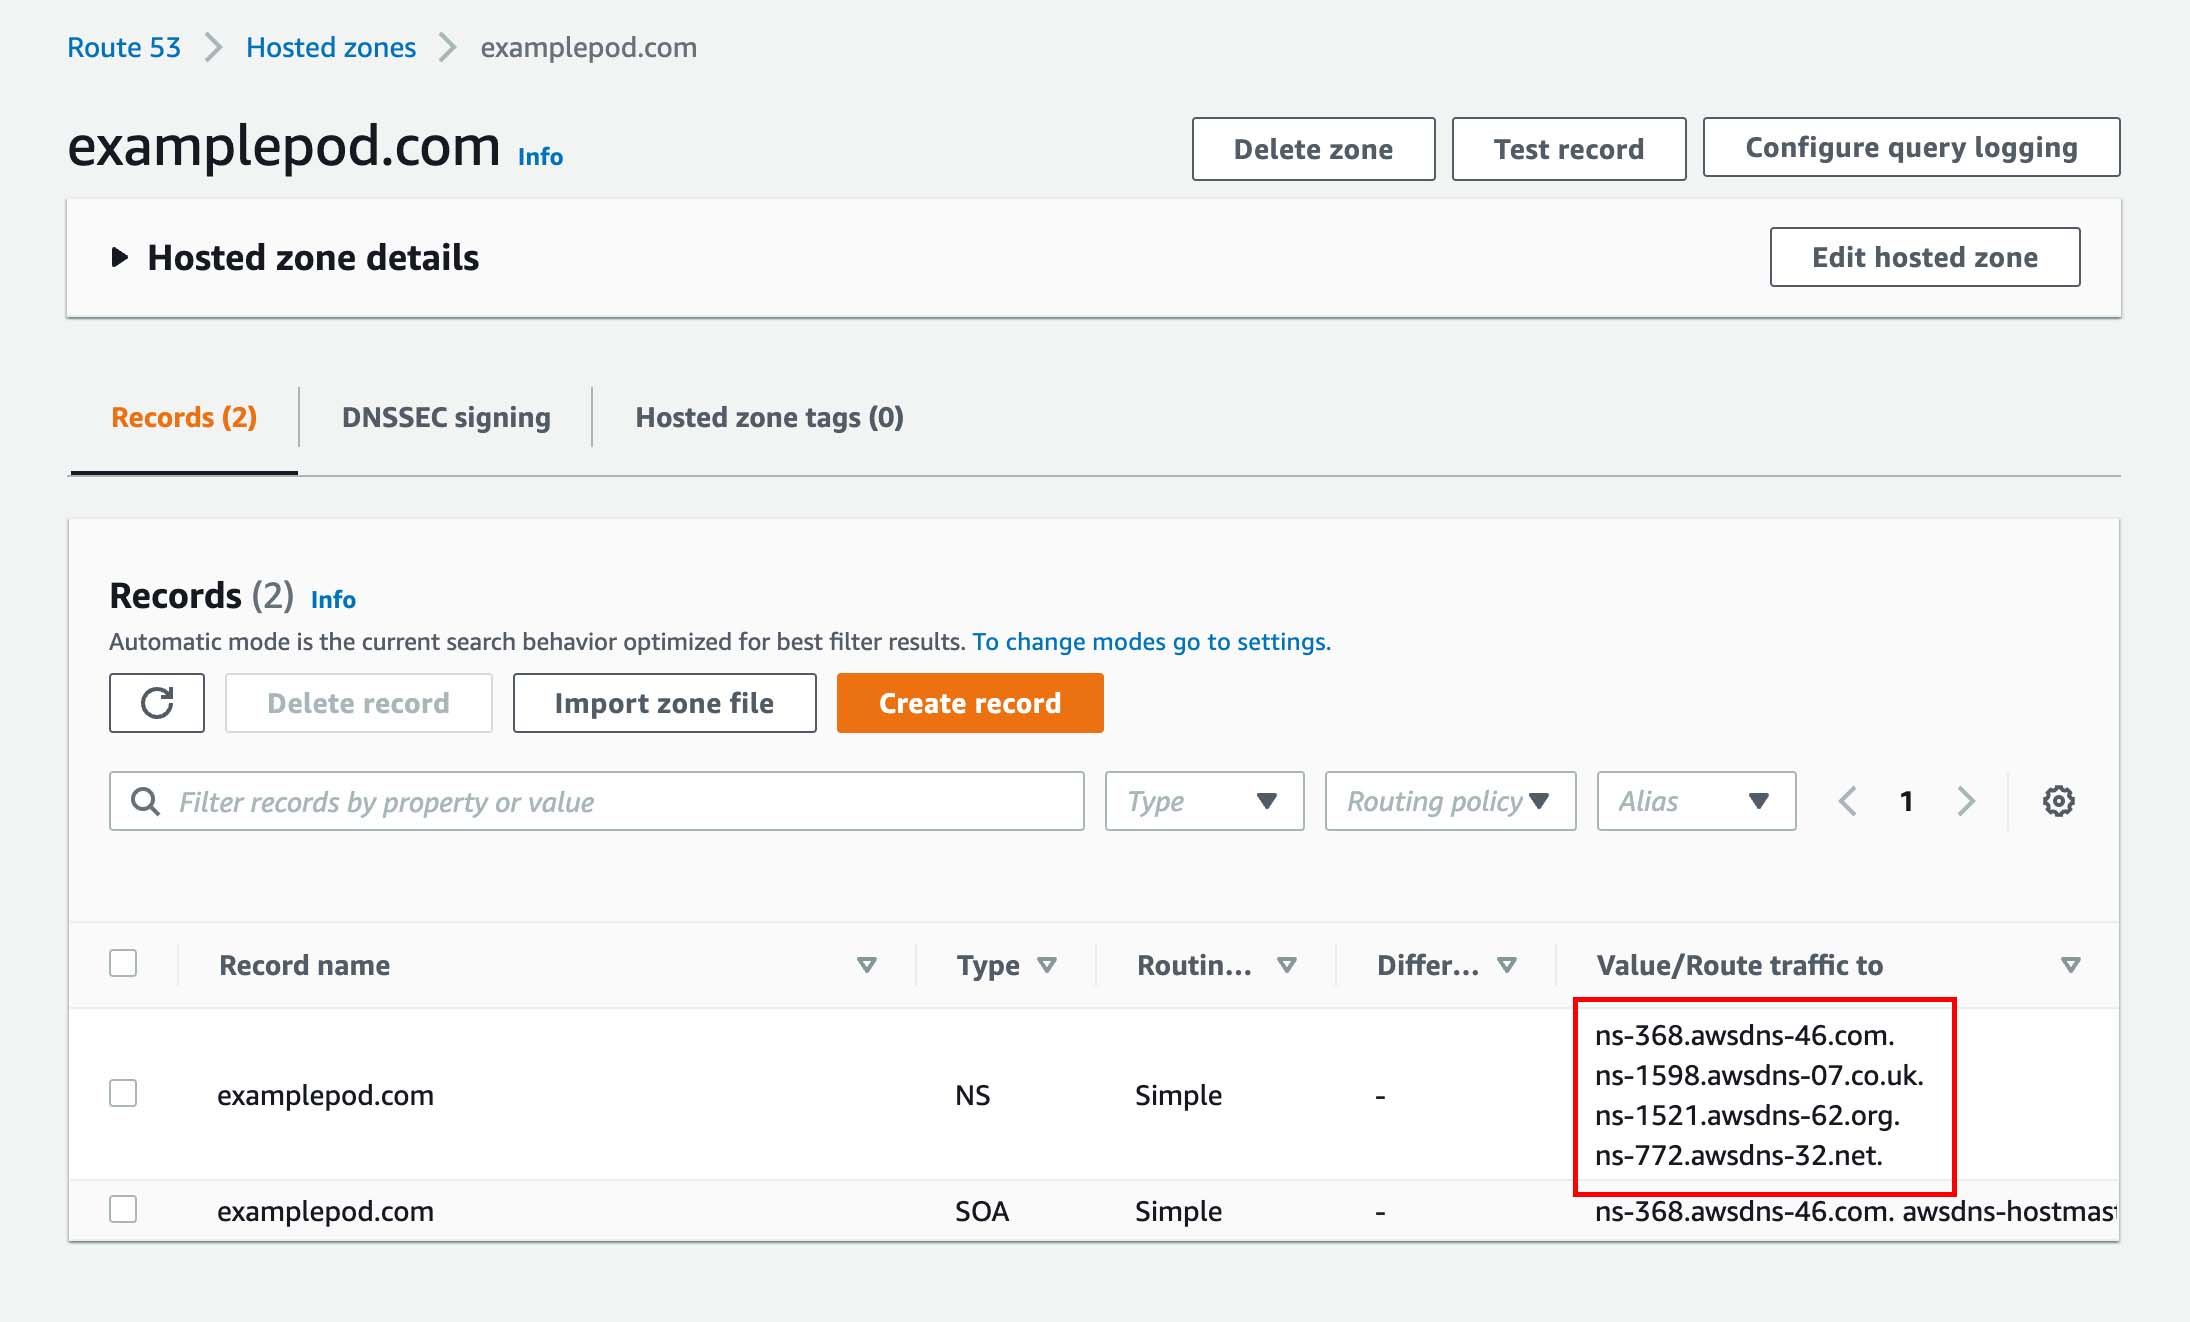
Finding the domain name servers for your hosted zone.
Next, you need to create two SSL certificates for your domain. Navigate to AWS Certificate Manager. Here it’s important in which regions you create your certificates. We are deploying to Oregon (us-west-2) in this example, but you can deploy to any region.
- In the top-right corner, choose your preferred region, then click the Request button to request a new certificate.
- Choose to request a public certificate.
- For the Fully qualified domain name, enter your domain name.
- Click Add another name to this certificate.
- Enter a wildcard for any subdomain. E.g., *.examplepod.com
- Validate the domain using DNS validation. AWS can automatically create the required entries in Route 53. Just follow the instructions.
- Save the ARN of your newly created certificate (you will need it in your Terraform configuration later).
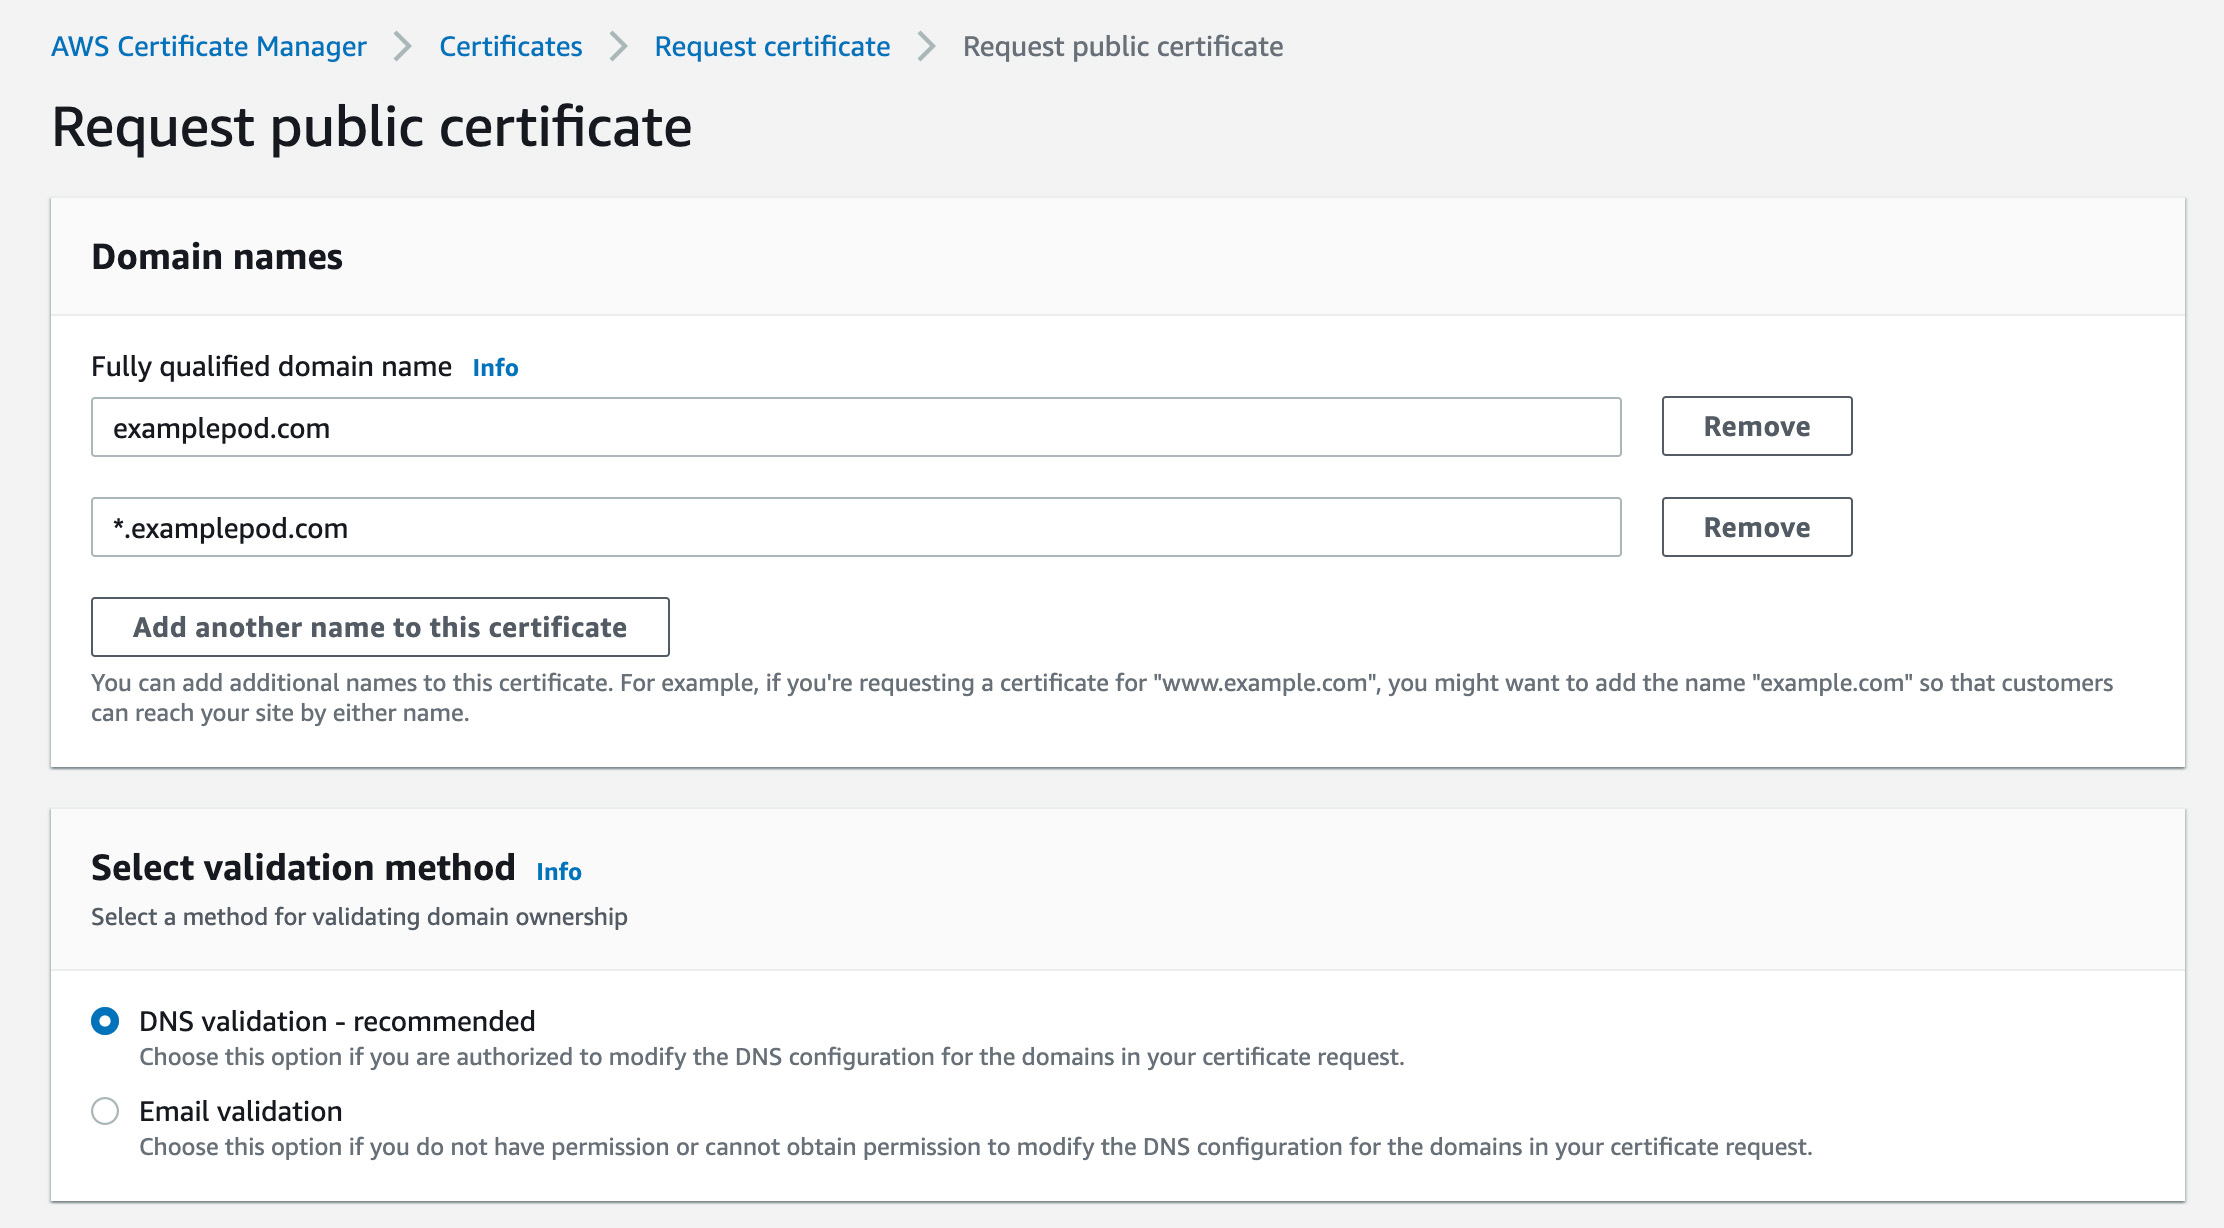
Create a wildcard certificate for your domain.
Finally, you must create a second wildcard certificate in the US East N. Virginia (us-east-1) region. AWS Cloudfront can only access certificates created in the us-east-1 region. Change the region, and repeat the steps from when you created your first certificate. Save the ARN of your second certificate.
Configure Github
To allow Github to manage deployments to your AWS server cluster, you need to provide it with access keys and our passwords.yaml file from the Serverpod project. You can use the same AWS access keys as you used to configure AWS CLI or generate a new pair.
Sign in to Github and find your project’s settings. Navigate to Secrets > Actions. Here you need to add three secrets for deployment to work correctly. AWS_ACCESS_KEY_ID and AWS_SECRET_ACCESS_KEY are your AWS credentials. Github also needs access to your config/passwords.yaml file. Copy the contents of the passwords file and add it to SERVERPOD_PASSWORDS.
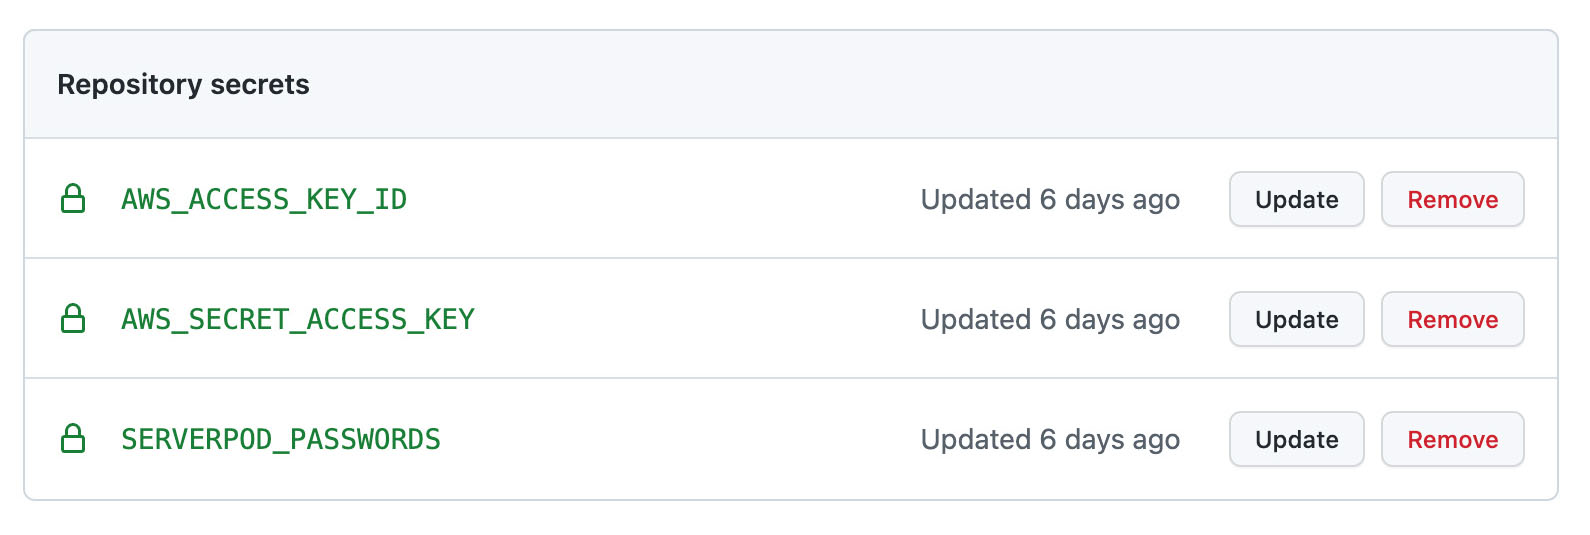
Your Github Action secrets after they have been configured.
Configure Serverpod
You acquired a hosted zone id and two certificate ARNs from AWS in the previous steps. You will need these to configure your Serverpod deployment scripts. You find the Terraform scripts in your server’s aws/terraform folder. Open up the config.auto.fvars file. Most of the file is already configured, including your project’s name. You will need to fill in the variables: hosted_zone_id, top_domain, certificate_arn, and cloudfront_certificate_arn.
If you deploy your servers in a region other than Oregon (us-west-2), you will need to update the aws_region, instance_ami and in some cases instance_type variable. Instructions are in the configuration file.
By default, the Terraform scripts are configured to use a minimal setup to reduce costs for running your Serverpod. You can quickly turn on additional features, such as enabling Redis or adding a staging server by changing values in the script. You can also change these values later and redo the deployment step.
Finally, to complete your Serverpod configuration, you will need to edit the config/staging.yaml and config/production.yaml files. In these files, you replace the examplepod.com domain with the domain you are using for your server.
Deploy your infrastructure
Your Serverpod should now be configured and ready to be deployed. Exciting times! Open up a terminal and cd into your server aws/terraform directory. First, you need to add an environment variable so that Terraform can correctly set the password for the Postgres database. You will find the production password for the database in your config/passwords.yaml file.
export TF_VAR_DATABASE_PASSWORD_PRODUCTION="<MY PRODUCTION PASSWORD>"
Next, we are ready to initialize Terraform and deploy our server. You will only need to run the terraform init command the first time you deploy the configuration.
terraform init
terraform apply
Terraform will now run some checks and make a plan for the deployment. If everything looks good, it will ask you if you are ready to go ahead with the changes. Type yes and hit the return key. Applying the changes can take up to five minutes as AWS creates the different resources needed for your Serverpod.
Create database tables
For your Serverpod to function correctly, you will need to create its required database tables and any tables specific to your setup. The database queries needed to set up your tables can be found in generated/tables-serverpod.pgsql and generated/tables.pgsql. The tables.pgsql file may be empty if you haven’t added any tables to your project. Use your favorite tool to connect to the database (Postico is a good option if you are on a Mac). Connect to database.examplepod.com (replace examplepod.com with your domain); the user is postgres, the port is 5432, and the database is serverpod. Use the production password from the config/password.yaml file.
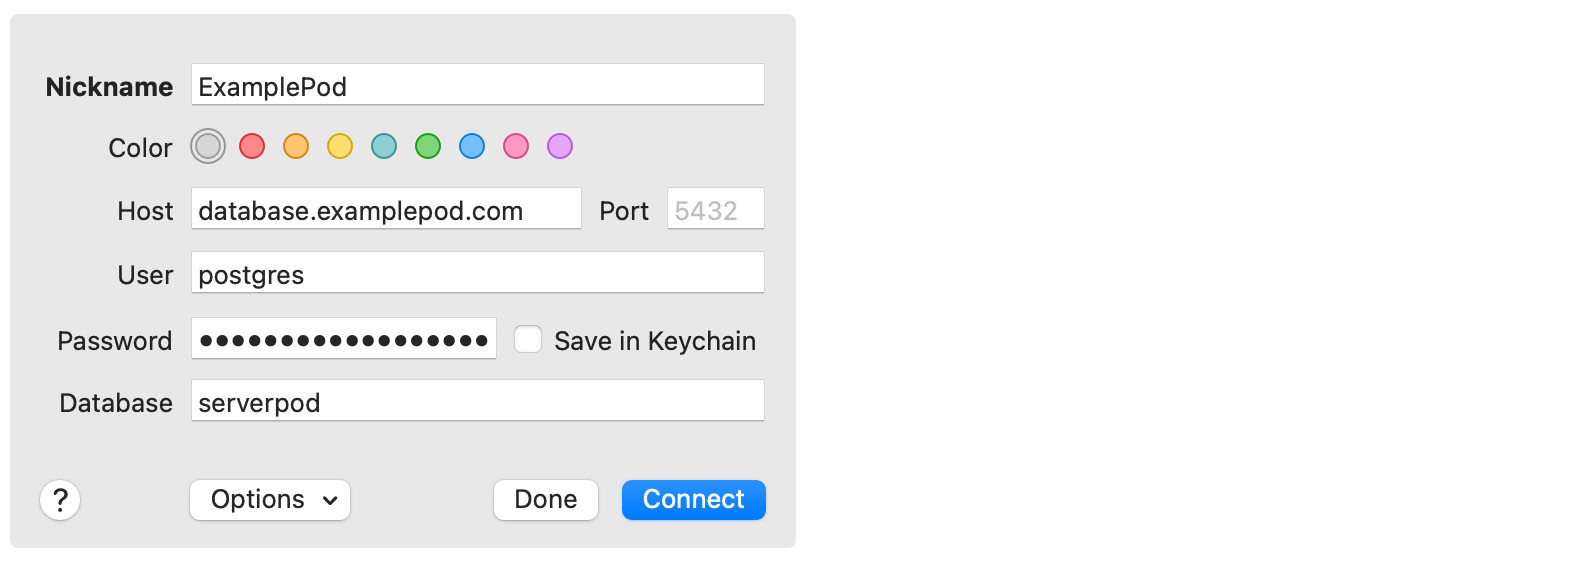
Connect to the database with Postico.
Deploy your code
We now have our servers, load balancers, database, and other required infrastructure. The only missing part is that our code is not yet up and running. There are two ways to deploy the code from our Github project. We can either push the code to a branch called deployment-aws-production or manually trigger the deployment action from the Github webpage.
If you have set up a staging server, you can also push code to a branch called deployment-aws-staging. This will deploy your code to the staging environment.
To manually trigger a deployment, navigate to your project on the Github webpage. Click Actions > Deploy to AWS > Run workflow. This will open up a small dialog that allows you to choose which branch you want to use and if you’re going to target the production or staging servers. Next, click Run workflow. This will trigger the action to deploy your code to your Serverpod. Usually, the deployment process takes around 30 seconds to complete.
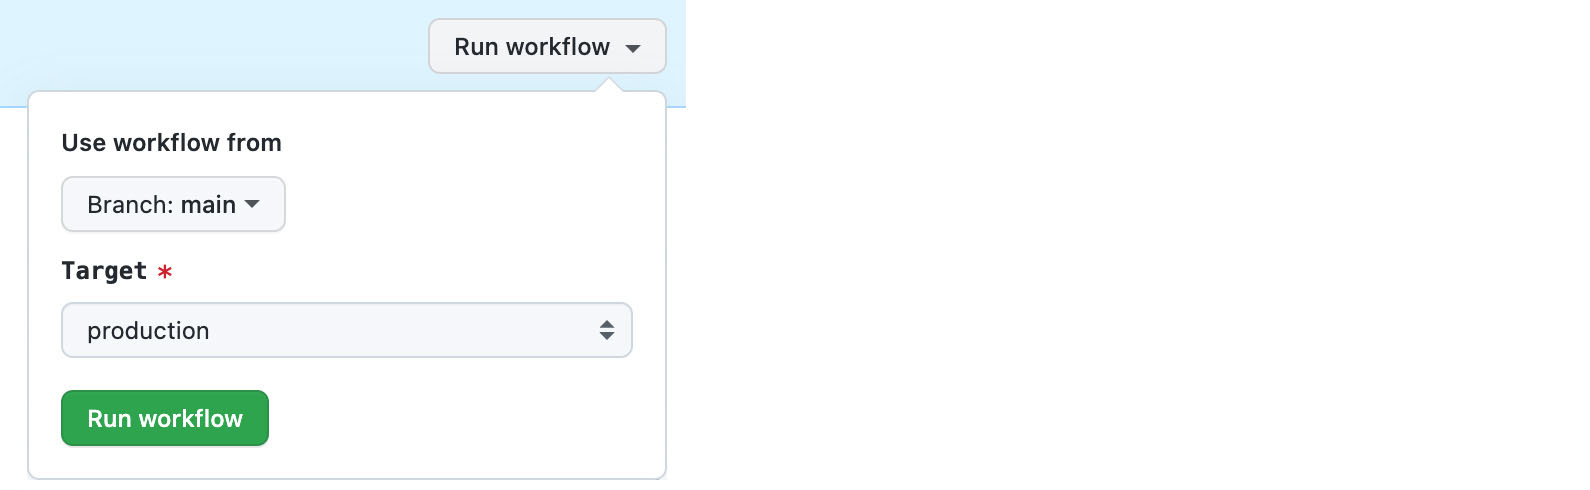
Manually deploy your server with Github actions.
Test your deployment
Your Serverpod should now be up and running! To check if everything is working, open up your web browser and go to https://api.examplepod.com. (You should replace your examplepod.com with your own domain name.) If everything is correctly configured, you will get a message similar to this:
OK 2022-05-19 14:29:16.974160Z
Troubleshooting and tips and tricks
Chances are that if you followed the instructions, you have a Serverpod deployment that you won't have to touch very often. However, this section gives you some pointers on where to start looking if things go wrong.
Signing in to your instances
You can find a list of your currently running EC2 instances by navigating to EC2 > Instances. Click on one of the instances to go to its summary page. From there, click Connect. On the Connect to instance page, click Connect, and AWS will open up a console window with access to your EC2 instance.
External dependencies and submodules
The deployment scripts support using submodules and external dependencies. Place any such dependencies in a directory called vendor at the root of your Github project.
Troubleshooting deployments
The deployment process involves a couple of steps. When you trigger a deployment from Github, the action will create a deployment and upload it to an S3 bucket. Then, CodeDeploy on AWS is triggered. You can find the logs from the Github action under the Actions tab of your project. If the deployment process fails later, those logs are available on AWS by navigating to CodeDeploy > Deploy > Deployments.